
Devastated in a war with a nearby wizards' school, the Fighters' Academy has since been surrounded by a foul and dank swamp - the Gloomfens. Since the climatctic battle between the wizards and fighters, the tower has decayed. The spirit of the head of the academy haunts the building, eternally plotting his revenge on the wizards who killed him. his loyal sutdents remain faithful to him even in death. Other foul undead have made their home in the rotting, spacious academy. From their lair, they make forays into farmsteads near the swamp in search of victims to feed their unspeakable appetites. The Problem of these terrible attacks by the savage undead will not stop until the evil that has found a home at the tower is burned from the face of the land forever. Will your party heed the call and help the town of Melinir? Will they be able to clear the former Academy of its undead? Towers of Evil is the second in a three part adventure, The Haunted Tower. Or, it can be ran as a stand alone adventure. The choice is up to you. Part of TSR 1081 The Haunted Tower
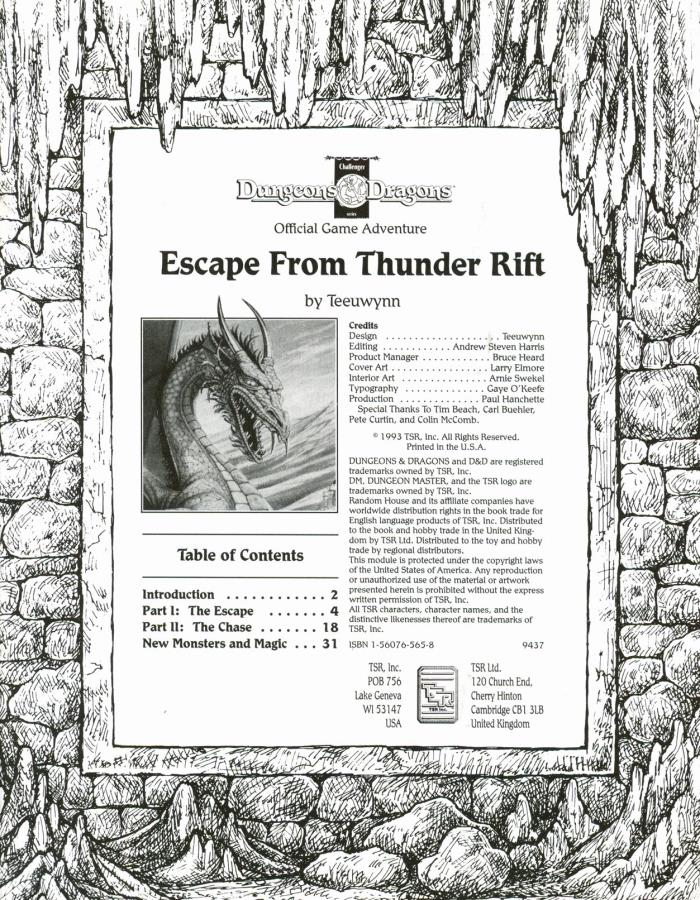
An emissary from the dwarven community of Hearth-Home approaches the player characters, beseeching them to aid the dwarves in finding a powerful mage who might bring disaster upon not only their mountain fortress, but all of the Thunder Rift! Escape from Thunder Rift adventure leads the heroes into a dark dungeon where they may discover a gate between the valley of Thunder Rift and the World of Mystara. Packaged with a DM screen. TSR 9437

The PCs begin in the port city of Luskan, where they're hired on by a caravaning merchant to perform guard duty for the long, dangerous journey over the Spine of the World Mountains. If the heroes do well, they reach the small town of Targos, where they hear rumors of a dead mage's lost tower out on the tundra. In order to find it, the PCs must overcome numerous obstacles but may find allies in the peoples of the Ten-Towns region, including a barbarian prince, a sly halfling, and a unique ranger. Not all is as it seems, though, nor can all smiling faces be trusted. Can the PCs separate the truth from the lies, locate the Accursed Tower, determine all its secrets, and survive?

The renowned adventuring company Acquisitions Inc. hires you to infiltrate a castle--but not just any castle. This is a flying fortress built by the cloud giant Count Stratovan, who is currently preparing to destroy the Sword Coast. Your mission is to meet with his son, who claims to want to prevent the war and establish peace between the giants and the small folk. If you can learn whether the son can be trusted, discover the secrets of the castle, and ... well, survive, you too can earn acclaim with Acquisitions Inc.! Released as a Fathom Events exclusive at movie theaters streaming the PAX 2016 Ac. Inc. game. Legal for AL play.

One of the original D&D classics, "The Isle of Dread" is a hex crawl wilderness adventure. It focuses on surviving primitive beasts, dinosaurs, and pirates while uncovering the mystery of the island's inland city, where a great treasure awaits. From the cover: "This module contains maps and background material for the Isle, fifteen new monsters, and suggestions for further adventures. In addition, The Isle of Dread contains a map and background information for a large continent, and eleven smaller maps for encounters on the island itself. In this module, players will push their way through dark jungles and treacherous swamps to discover the lost plateau, and the final secrets of - the Isle of Dread!" TSR 9043

Zhentish soldiers, Maerimydran drow, and Sharran cultists have forged a dark alliance to subjugate the peaceful land of Shadowdale. Elminster's tower lies in ruins, Lord Amcathra governs at the sufferance of the dale's conquerors, and the very Weave of magic in this embattled land seems to fray with each passing day. The Zhentish yoke lies heavy over Shadowdale—but the Dalesfolk are ready to fight for their freedom, if only they can find true heroes to lead the way!

At just 8 pages, with lots of illustrations, this adventure is much shorter than most TSR-published modules of the era (mid-90s). It is a very simple D&D adventure. It features a macguffin quest that immediately pushes the players into a dungeon crawl through the five-and-a-half-page "Dungeon of the Mad Warlock". The idol of old, The Jade Hare, as been taken from the Dar el-Tamyya, stolen by Goblins, who strangely enough killed no one. Abdullah, the old man who cared for the statuette remembered that about a month ago a stranger has asked if he might purchase the Jade Hare. Though he offered much gold, Abdullah of course refused the offer. Whom Abdullah describes the other villagers recognize as Abu-Ghabar, the mad warlock who lives in the hills. He is rumored to have built a dungeon there. Who knows what strange purposes the mad warlock has for the Jade Hare? In any case, the precious statuette's theft is an intolerable strain on the honor of the village and all the tribe therein. A party must be assembled to confront the warlock. This party may consist of none other than yourselves. Won't you save Dar el-Tamyya's ancient honor, and thwart whatever sinister plans the warlock has? TSR 9259
The Lantanese have lost their magical ship, but they aren't willing to fight for it. That's where your heroes come in. She's expecting you. A party of adventures has gone missing, and the inhabitants of a local town have been acting strangely it is up to the party to figure out what is going on and stop whatever force are at work on the towns people Pgs. 8-23 & 47

The wizard Kavorquian is dead. But certain items belonging to his adopted son were in the wizard's keeping at the time of his demise. Now someone must venture into the silent vaults of Kavorquian's stronghold and recover the missing property. Queen's Harvest picks up its story where B11, King's Festival, left off. It can be played as a sequel to that adventure or as a complete adventure in itself. It is tailored for beginning Dungeon Masters and players and contains helpful hints on adventuring and the land of Karameikos. The story develops simply, but ultimately leads the player characters into the nether reaches of Penhaligon's politics to confront Ilyana Penhaligon, mad pretender to the throne! TSR 9261

Finding missing people is a job any adventurers for hire get used to. But when the missing person turns out to be the recently deceased wife of a prominent merchant's son, and when there is the small matter of a major jewelry theft to deal with as well, then you've got an adventure that is nothing other than normal.... Find the Lady is an adventure for the D&D and AD&D game systems. It is designed for a party of 1st - 3rd level characters, with secondary skills generated according to the article in this issue. This scenario was not designed with any set number of characters or mix of professions and levels in mind, and could equally well be run as a group or solo adventure. It can be played as a one-off adventure or as part of the Pelinore or Zhalindor campaigns, and notes are included on placing the adventure in either world. GM2 Find the Lady Pgs. 15-46

The wizard Abracadamus hid the Forever Stone in the darkest depths of a failing mine, coerced monsters into serving as guardians, and rigged the dungeon with traps galore. Then he died, as all good wizards do. Many heroes have fallen prey to the Forever Stone’s lure of immortality. To date, only one stalwart band has plunged into the Mines of Madness and lived to tell the tale. You think you’re better than them? You think you got what it takes to grab life by the stones and conquer the dungeon that won the 2012 Gygaxian Award* for Bonecrushing Awesomeness? We seriously doubt it, but go ahead . . . prove us wrong! Mines of Madness is a Very Special D&D® Next Adventure written for PAX East 2013 and designed for four 3rd-level characters.

Having put down a rising of giants, it was discovered that the motivating force behind their depredations was that of long-forgotten evil - the Dark Elves. Determined to seek out these creatures, a body of doughty adventurers mounted an expedition to learn the strength of the Drow and bring retribution to them (DUNGEON MODULE D1, DESCENT INTO THE DEPTHS OF THE EARTH). This module contains background information, a large-scale referee's map with a matching partial map for players, referee's notes, special exploration and encounter pieces, a large map detailing a temple complex area, encounter and map matrix keys, and an additional section pertaining to a pair of unique new creatures for use with this module and the game as a whole. A complete setting for play of ADVANCED DUNGEONS & DRAGONS is contained herein. This module can be played alone, as the second part of a series of three modules (with DESCENT INTO THE DEPTHS OF THE EARTH, D1, and VAULT OF THE DROW, D3), or as the fourth part of a continuing scenario (DUNGEON MODULES G1, G2, G3, D1, D2, D3, and Q1, QUEEN OF THE DEMONWEB PITS). TSR 9020, From 1978

Not even memories of past glory live on in the gentle hills around the village of Kusnir. Today its people have more concern for commonplace things, like the harvest, trade, and the threat of death in the night! Kusnir is beset by a skulk. The attentions of such a creature are a curse on any community. Streets and alleys which ring to the voices of children by day become fearful, shadowy places by night. Men go abroad armed and in groups, while women and children stay behind locked doors and even there are not safe. But life goes on. The lot of the peasant is always hard, what cannot be prevented must be endured and, of course, things could be worse. Much worse. The skulk has begun to visit the village more and more often. Sometimes it kills, yet just as often it spares a victim, leaving clear signs of what it might have done had it wished. Its visits are now marked by strange and illegible symbols scrawled in blood on the walls of the buildings. The people are worried, helpless, and desperate. Desperate enough to welcome adventurers. UK2: "The Sentinel" (1983) is the second UK-series adventure, the fifth TSR UK adventure overall, the first solo effort by Morris, and the first half of the two-part Adlerweg series (whew!). It was run as a tournament at the GamesFair '83 Open, then published later in 1983. TSR 9101
The Golem Master, creator of pricey artificial servants, hasn’t been seen around for some time. His house stands dark and silent. Dare you enter?

Kravenghast Necropolis is hidden in a valley that was formerly part of a now dead city. It consists of a small cemetery that sits atop an abandoned necromancer's laboratory. The necropolis has been refitted as a temple to Vecna, the undead God of secrets. The mausoleum in the cemetery contains a secret spiral staircase that leads to the underground laboratory. The temple is populated by a twisted cult of Vecna, led by the lich-priest Mauthereign. Pgs. 96-103

The final confrontation with the giant, King Snurre, and the entry of mighty adventurers into the caverns under his stronghold (DUNGEON MODULE G3, HALL OF THE FIRE GIANT KING) discovered the Dark Elves, the Drow, had instigated the giant alliance and its warfare upon mankind and its allied races. This module contains background information, a large-scale referee's map with a matching partial map for players, referee's notes, special exploration and encounter pieces, a large map detailing a cavern area, encounter and map matrix keys, and an additional section pertaining to a unique new creature for use with this module and the game as a whole. A complete setting for play of ADVANCED DUNGEONS & DRAGONS is contained herein. This module can be played alone, as the first part of a series of three modules (with SHRINE OF THE KUO-TOA, D2, and VAULT OF THE DROW, D3), or as the fourth part of a continuing series of modules which form a special progressive campaign scenario (DUNGEON MODULES G1, G2, G3, D1, D2, D3, and Q1, (QUEEN OF THE DEMONWEB PITS). TSR 9019
In the city of Waterdeep rests a tavern called the Yawning Portal, named after the gaping pit in its common room. At the bottom of this crumbling shaft is a labyrinthine dungeon shunned by all but the most daring adventurers. Known as Undermountain, this dungeon is the domain of the mad wizard Halaster Blackcloak. Long has the Mad Mage dwelt in these forlorn depths, seeding his lair with monsters, traps, and mysteries—to what end is a constant source of speculation and concern. This adventure picks up where Waterdeep: Dragon Heist leaves off, taking characters of 5th level or higher all the way to 20th level should they explore the entirety of Halaster’s home. Twenty-three levels of Undermountain are detailed herein, along with the subterranean refuge of Skullport. Treasures and secrets abound, but tread with care!
A dangerous beast - but one with a mission. Even the gods slip up now and then, but few dare remind them of it. Ri Conn's son was killed by the white boar of Kilfay, and he has passed sentence of death upon it! What starts as a hunting expedition for the PCs ends up being a grand adventure through the forest. Several interesting set pieces on the path of the boar's rampage are included in the adventure. The path of destruction leads through a goblin camp and ends in the tower of a now-dead mage (which still holds the target of the boar's ire, a mutated bulette that the mage bred). Will the party help the boar kill the bulette mutation, or let it free? Pgs. 32-47

It's a horrible time to have a curse! Each wielding a powerful item to a family legacy, your players are a group of young adventurers who barely survive an attack on their order of vampire-hunters by agents of Dracula. After escaping, they discover Dracula has placed a curse upon the land which makes restful sleep difficult outside of hallowed areas. Dracula, "alive" on another plane but dead on this one, must be resurrected so they can kill him, end the curse, and avenge their dead. To accomplish this goal, the player characters must journey through forest, marsh, hill, and underground paths to retrieve relics of Dracula's last life from keeps and fortresses overrun by monsters and the undead. If they can resurrect him, he will be weak and easy to kill... but the adventurers aren't the only ones who want Dracula on the Material Plane, and Dracula is not the only vampire in the world. Gameplay overview This adventure takes the players from 2nd through 9th or 10th level on a milestone basis as they choose where to travel in what order to retrieve what they need. Starting at a happy gathering at the Belmonte Order, which the characters are hereditary members of, the campaign kicks off with a bang as the group retrieves their chosen legacy items, salvages what other gear they can in a race against time and a growing number of foes, and then escapes to begin their quest. In addition to the six main "dungeons," there are two optional regional lairs, traveling vampires, and many foes along the way. Most of the towns in the area have managed to survive, providing points of light at which the party may stop, long rest safely, acquire supplies, and socialize. Travel is hazardous! 5e classes are balanced for resource management across a 5-8 encounter adventuring day. The campaign is designed to have a semi-variable flow of encounters as the party traels around the area. Encounters grow progressively more difficult as time passes and the party spends more time within a region. These are not random encounters rolled on a table, but encounters designed to be unique to each area's geography, combat terrain, and mix of foes. As the party spends more time in a region or revisits it, the encounter difficulty increases. Dracula's curse requires a Constitution saving throw to successfully long rest outside of Hallowed areas (towns). The difficulty scales up over time, forcing the party to balance speed and safety as they try to accomplish their goals without pushing beyond the limits of what they can handle. The game concept, general map layout, and some enemy distributions are loosely inspired by Castlevania II for the NES, one of the forerunners of the "Metroidvania" genre. Dracula's Curse is indeed a game in which the forests are dark and full of monsters, and every night is a horrible one to have a curse. Includes 15 Legacy items, from weapons like whips and swords to a shield, a belt, or a decanter of holy water 60+ enemy statblocks 8 unique dungeons with unique layouts & challenges 5 inhabited towns with multiple named NPCs 100+ travel encounters (expect to use 30-50%) The module is printer-friendly with no artwork and straightforward grid maps for location-based encounters which require one.

First the bandits attacked then the Roc carried away the guide. Since then you have blindly followed the camels hoping that their instincts would lead you to water or help of some kind. You and your friends are lost in a sea of sand. Plodding along in the shadow of the camels and doing your best to stay alert. Ahead the heat shimmers take shape. This time it is a castle. Blinking away the dryness in your eyes you realize that the tower is not a mirage but it is broken.