
Along the windswept sea coast are several natural stone columns, sacred to the Sea Goddess Pelagia. One of these pillars is the tower of a reclusive wizard, a devout follower of Pelagia. But the wizard has gone missing, and the locals suspect foul play. Surely a powerful wizard must have many enemies! A band of fledgling heroes is tasked with entering one of the Pillars of Pelagia to contend with all manner of magical defenses, while uncovering cryptic clues to the wizard’s disappearance planted by an unknown benefactor. The insidious evil plot they uncover could spell eventual doom for the surface world. But the Pillars are sacred to Pelagia, and the Sea Goddess herself might just play a minor role, aiding the heroes as they attempt to thwart a nefarious plot.

"A great cat sits upon the northern grasslands, my friend, waiting to pounce on adventurers just like you." As you part the tall grass with your sword, the words of the tavernkeeper echo in your head. "He was the mightiest wizard we'd ever known, and that Lion Castle was his home." Your friends' voices mingle with the tavernkeeper's. "He's but a ghost now, haunting those halls, and waiting for an heir." The ground rises slightly. A strong wind rushes through the field. Suddenly, the grasses part, and Lion Castle rises majestically before you! "Magical riches await those who enter!" "Beware of man-beasts!" Voices flood your head again. Will you brave the haunted castle? Can you afford not to? It's all up to you in this D&D Solo Adventure. Ghost of Lion Castle is for one player only, but that one player makes all of the choices and enjoys all of the rewards. An entire castle and courtyard await your exploration. The adventure also includes a complete solo combat system. TSR 9097

The Tower. Standing on a grassy hilltop, it seems unremarkable from a distance. Two stories high, cylindrical, thatched roof. Simple and idyllic. There's even a whisper on the breeze, or maybe a thought in the back of your mind: There's nothing to see here. What brought you in the first place? Just turn around and go back. Those that venture nearer find that it's much more than meets the eye. The closer you get, the taller the tower seems to be... until standing at its base, the tower rises dozens of floors and pierces the sky. Do you have the courage to enter the unknown sanctum? What could possibly await you within? Gather your allies and find out!

Greatwall is in peril - not from military forces of Iuz, but from lack of goods and supplies. Caravans from Willip have ceased thanks to increased dangers on the Willip Critwall Grabford Trail. As the key fort positioned to contain the Iuzian flood, Greatwall is a strategic necessity. Its failure would mean a major incursion along the border. Your characters are hired to escort a caravan from Greatwall to Willip; if its merchants are afraid to come to the fort, the fort will go to them. This should be simple, cut and dried guard job. Right? Of course not. There are many surprises in store for your little caravan, and your characters will need to keep their wits about them day and night in order to make it to the other end. Secret plans are afoot, conspiracies are brewing, and nothing is as it seems while on the Border Watch. This module uses information presented in the From the Ashes boxed set and the Iuz the Evil accessories. However, ownership of these two products is not necessary to play this module. TSR 9406

Just as the trail led from the STEADING OF THE HILL GIANT CHIEF to the frozen wastes where was found the GLACIAL RIFT OF THE FROST GIANT JARL, so the adventure in the latter place has let (or transported) the intrepid party to what they hope will be their last challenge. They are about to venture into the hot and smoking barrens which are in effect Muspelheim, the home of fire giants. This module contains background information, referee's notes, three level maps, and exploration matrix keys. It provides a complete module for play of ADVANCED DUNGEONS & DRAGONS, and it can be used alone or as the last of a three-part expedition adventure which also employs DUNGEON MODULE G1 (STEADING OF THE HILL GIANT CHIEF and DUNGEON MODULE G2 (GLACIAL RIFT OF THE FROST GIANT JARL). TSR 9018

Not everything worth stealing is worth cash The party must recover a stolen patent of nobility from a thieves' guild, in order to stop a civil war. Pgs. 12-22

This adventure is the ninth part of the Shackled City Adventure Path that began with "Life's Bazaar" (Dungeon #97) Wherein a group of diverse and talented allies learns the folly of not working together against a common foe.

Continue the adventure inside the Dwarven Forge world of Mythras with the second part of this new gaming trilogy, The Hidden Valoria Campaign. Now entrenched in the tapestry of The Patina Court, the players must begin unraveling an even greater mystery that lies beneath the streets. Taking the adventure to the sewers, get ready to explore some of the locations that have made Valoria so famous among its players over the years This adventure is formatted to both 1E & 5E gaming rules. Also available in PDF.
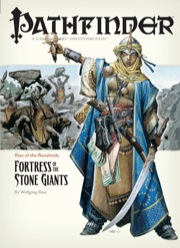
The Giants are on the March! The Rise of the Runelords Adventure Path continues! Driven to battle by a maniacal warlord, the once-peaceful stone giants of the Storval Plateau threaten to destroy the sleepy town of Sandpoint. Will fast action and quick wits be enough to save the defenseless community? Yet, even if the giants' initial raid can be repelled, only by striking at the heart of their titanic war machine—the black-towered fortress of Jorgenfist—can the menace be quelled. But who knows what mysterious bloodlust spurs the usually peaceful giants to war, or what mysteries lie beneath their ancient fortress?

The Fortress of the Yuan-Ti describes a fortress build into a cliff side and the slave village outside. The Adventure is the third of three but can easily be played by its self. The adventure revolves around the players discovering the dark plot to revive the demon Sertrous and then stopping it. The adventure describes the outside, inside, and hanging towers of the fortress. The adventure concludes in a forth extra-planer tower were you fight the boss. It also includes 4 sidetracks from portals that explain how they get the materials for the ritual. Final part of the Barrow of the Forgotten King series.

With allies gained from denizens of the Underdark, the former drown enclave of Szith Morcane is on the precipice of being retaken. During the battle for Szith Morcane, secrets of the drow community are revealed. What will you do with this knowledge, and how will it affect the outcome of the conflict?
On a storm-blasted mountain lives an immortal Arch-Mage with a foul temper. The townspeople want you to talk to him - and kill him, if necessary. Is immortality worth the price? An Arch-Mage's magics threaten a small village. To protect it the party must brave a dangerous climb, and survive the Mage's warded lair. Pgs. 43-64

A One-on-One Competition Module for Thieves Level 8 Your peaceful evening has been interrupted by an unusual request. As a thief, your skills are unmatched, but can you rise to the challenge of thieving for a powerful and frightening wizard? Do you have a choice? The Gem and the Staff is a special One-on-One competition module designed for one player and on Dungeon Master. The Module contains two separate scenarios, so you can switch roles with the other player after the first adventure. Scoring sheets and encounter summaries are provided for each adventure to make running competitions quick and simple. Character figures and a map book are also provided to help visualize the adventures. The player's maps are designed so you can see the rooms as they would appear. Complete DM's Maps are included. TSR 9050
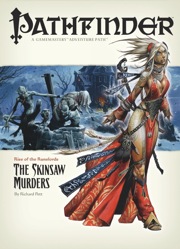
The Rise of the Runelords Adventure Path continues! A sudden string of brutal killings terrorizes the town of Sandpoint, and the killer's mark bears a familiar shape. Investigation leads to the Lost Coast's most notorious haunted mansion, a dilapidated ruin that has become the lair of a monstrous murderer. Yet this killer is but one of many, a member of a group of fanatic cutthroats calling themselves the Skinsaw Men. To defeat the cult, the PCs must travel to the bustling city of Magnimar to unravel the sinister source of these murders before they become the Skinsaw Men's next victims!

Strange tales of a mad queen and a hoard of legendary treasure have driven adventurers into the jungles of the great trade road between Tiefon and Nextyaria for a generation, but now new information has come to light. A travelling bard has uncovered certain keys to the location of the lost queen's mysterious volcanic home, and the secret that may thwart her seeing immortality and invulnerability. Once again, the Barrens takes center stage as characters must via for a chance to grow rich and expand their legend among the heroes of the Nameless Realms! The Infamous Black Label series continues with this second part to the Barrens trilogy as characters must dodge the marauding forces of bandit lords, discover a wayward bard, and then journey to the caldera fortress of the Hall of the Spider Queen. What secrets does that dark sanctuary hold? Only time, dice, and the comradery of the gaming table will tell. This adventure is formatted to both 1E & 5E gaming rules.

Deep within the Kraken's Maw, a brutal maelstrom of ocean that devours ships, lies the mysterious Isle of Jade. Long forgotten in the memory of men, the island has served as a bastion for an ancient sect of female Corsairs, but their power is waning and the threat of the outside world is at their shores in the form of a necromancer from Roslof Keep. Now a party has set out from Taux seeking the necromancer. Their course will take them directly into a conflict of high magic, ancient warrior religions, marauding fern goblins, and primordial dinosaurs. Will you take up the challenges presented by the Isle of Jade? When a necromancer steals a maiden of ancient bloodline, the Wizards of the Order of Towers must find a way to get her back. Hiring a merchant lord of Taux to fund a rescue mission the hope is to return her before the dark Wizard can use her to find the legendary White Ship and the key to magic beyond this world. Now the mission is in jeopardy as the adventurers have become stranded on the mysterious Isle of Jade. Braving a dark corruption, nasty native Fern Goblins, and even ancient Amazons, the party will have to stop the corruption before it turns the islands inhabitants and giant reptiles mad. This adventure is formatted to both 1E & 5E gaming rules. Also available in PDF.

This alternate starter campaign takes you to all the familiar locations of the Lost Mine of Phandelver adventure from the other side of the veil. Some places look the same, some very different. The entire plane is trying to strip you of your mind, your memory, and your motivation. Discover how the Forge of Spells was fueled. Learn the location of lost adventurers from the original Phandelver expedition. See what Cragmaw Castle looked like in its prime. All of this and more, as this takes you from level 1 to level 5 with well over 20 hours of play time. If you are looking to start a new campaign or just experience familiar locations in a new setting, this supplement accommodates. Inside you'll find: Maps: Nine encounter maps Cragmaw Castle rebuilt, including the upper floor, and underground level. Wave Echo Cave before it was tunneled. A very different looking Redbrant Hideout Ruins of a town similar to Phandalin A swamp and muck version of Cragmaw Hideout Plus new magic items, and more Monsters: 37 new creatures Lore Information on a shadowy Yuan-ti empire A new offshoot of the abyssal demonhive A cult using the stoic ways of stone to evade the Raven Queen's watchful eye and pilfering ways. New players vying for control of the Shadowfell Shadowfell Guide: Information on the plane, its inhabitants, and included with this supplement is the best selling Shadowfell Random Encounters appendix. Easter Eggs Hidden throughout the story are references to Lost Mine of Phandelver. Including references to other hard cover books as well.

The final fate of Roslof Keep and the Company of the Ivory Scimitar hangs in the balance. With five levels conquered, the party must finally face the ultimate challenge of the sixth and final floor. Can the stalward adventures overcome the last defense of the Infernal Machine? Will Roslof Keep be freed from the violet corruption? What unforeseen plot twists still await those willing to brave the challenges presented in The Realms of Madness and Despair? This adventure is formatted to both 1E & 5E gaming rules. Also available in PDF.

Finish up this Dwarven Forge world of Mythras trilogy in the epic conclusion of The Hidden Valoria Campaign. Master your occupation of the neighborhood of the Patina Court. In this climactic end your players will fight paralyzing hate crawlers, kobold trap masters, spiders, and even a dragon and a mummy lord before a final betrayal awaits This adventure is formatted to both 1E & 5E gaming rules. Also available in PDF.

A series of small earthquakes have brought a sense of disquiet to the town of Daern Kelton and Roslof Keep. Against these strange earthly portents, the members of the Ivory Scimitar have claimed their place as a true Mithel Company, but even greater danger now awaits them in the second level of the Dungeon of the Black Fey Mithelvarn. What lost secrets will be revealed as they journey below? What new threats and adventures can be had in Daern Kelton? The town opens its doors to the brave new heroes of the Company of the Ivory Scimitar. Here continues the Roslof Keep Campaign in the pages of ROS2, The Tremors in the Machine. This adventure is formatted to both 1E & 5E gaming rules. Also available in PDF.