
The final installment of the three-part Rock Con ’17 convention is here! Can the heroes enter the stronghold of the brazen thief and recover the final tome? The challenge is high but the stakes are much higher for failure!

The Holdfist Mountain range hosted many battles during the Troll Wars and during the dark years many villages, shrines, and castles were destroyed. When the fighting was over the villages were rebuilt so that farmers could resupply the duchy and the former strongholds were lost to the sands of time. One of these forgotten areas is the Church of Scakla and is said to be home to lost magical items...

"The Hive" is a spawn of Arbeyach lair, also featuring giant termites and termite swarms, for five 6th-level characters. This adventure can be finished in one session. Several mounds in the Forsaken Hills are the dens of voracious termites that have added flesh to their diet to supplement dwindling wood supplies. At night, swarms of termites hunt and devour prey. They swarm over victims in wooden carts and wagons, and bring the dismantled wood back to their mounds. Three spawn of Arbeyach, searching for a location to summon Ia'Affrat, Arbeyach's herald, discovered a mound filled with particularity nasty termites and used their vermin empathy to gain acceptance. They dug out a cavern beneath the mound, and now use the termites to protect themselves and gather food while they complete a difficult ritual involving dozens of sacrifices. The final sacrifice is prepared and the spawn are finishing their ritual when the party arrives.

Retribution and revenge are yours for the taking! Demise of the Slavers pits you against the forces responsible for turning your life upside down and kidnapping your friends and family. The original pair of adventurers have come a long way and with the help of friends, it is time to end the slavers hold on your homeland of Esaq! Don’t miss this exciting conclusion for the DQ series.

This beginning level adventure pits your PC party against humanoid thugs who have found a nice niche in a narrow pass headed to HAVENDALE. Adorning the pass is a rock formation that appears to be a large skull thereby giving its name to the pass. These humanoids are led by a large Ogre named Roark. The mayor of Feastelburg has placed a bounty on the head of Roark and his evil minions. Is your party strong enough to rid the area of this menace?
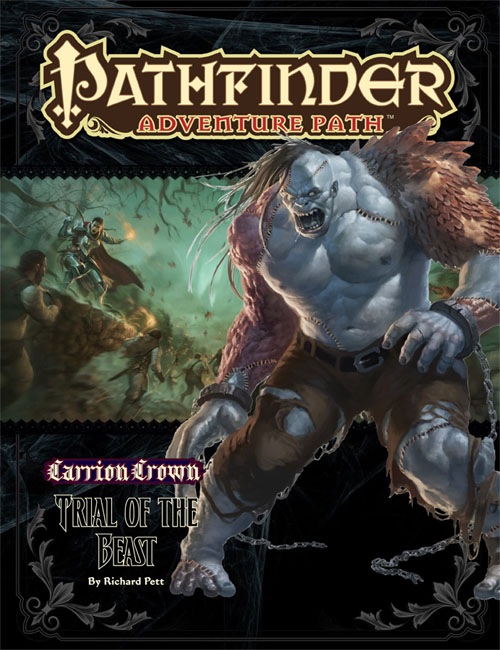
Evil Stitched to Evil The rampaging abomination known as the Beast of Lepidstadt has been captured! Yet rather than destroy the monster for its countless murders and untold crimes, the city council demands the creature receive a fair trial. Upon traveling to Lepidstadt, the adventurers find themselves caught up in the anger and investigations surrounding the Beast’s judgment. Soon it’s up to them to discover whether the legendary monster is truly a killer or merely the instrument of some greater evil—and either way, whether it’s too dangerous to be allowed to survive. This volume of Pathfinder Adventure Path continues the Carrion Crown Adventure Path and includes: • “Trial of the Beast,” a Pathfinder RPG adventure for 4th-level characters, by Richard Pett. • An investigation into the secret society called the Esoteric Order of the Palatine Eye, by Brandon Hodge. • Revelations on the faith of Pharasma, goddess of birth, death, and fate, by Sean K Reynolds. • Terror upon terror for Laurel Cylphra in the Pathfinder’s Journal, by F. Wesley Schneider. • Four exciting and deadly new monsters, by Rob McCreary, Patrick Renie, and Sean K Reynolds.

The sequel to the DMs Guild best-selling Tales from Frozen North returns better than ever with almost 4 times more content! What you will find inside: * 36 random encounters (plus 4 mini random encounters within random encounters! Encounter-ception?!) * Chapter 1: Carnival Encounters. 6 Short encounters for any carnivals and fairs in the Feywild. * Chapter 2: The Summer Court. 10 Encounters that are short and whimsical, or featuring creatures common to the Summer Court. * Chapter 3: The Gloaming Court. 10 Encounters that are short and wicked, or featuring creatures common to the Gloaming Court. * Chapter 4: The Feydark. 10 Short encounters in the subterranean world of the Feydark. * Scaling guide provided for most encounters (Tiers 1-2) * Puzzle Encounters (The Fey do love their puzzles, especially if it infuriates others) * New Fey-themed Magic Items * New Creatures! Including but not limited to: * Tooth Fairy (you might want to hold on to your teeth with this one!) * The Dawn Growlers — a team of superhero hounds?! * and a totally innocent and harmless small white rabbit…yes… harmless

An extended campaign for the Midnight setting from Fantasy Flight Games. Crown of Shadow is a desperate quest across Eredane, ranging from the depths of the Kaladrun Mountains, across the grim expanse of the occupied plains of Erenland, through the secretive underground of the Eren River, and finally into the heart of the Whispering Wood itself. Published by Fantasy Flight Games.

The Proving Glade is a one-shot adventure meant for parties or duets. Your characters arrive in a small settlement that has a big problem. The forest, its lifeblood, has seemingly withdrawn its bounty. Others have gone in, only to return hours later confused about how they got out. Will your party have the wherewithal to navigate the treacherous forest, pass its surprising tests, and uncover what’s truly going on? I wanted a forest adventure that felt alive and busy. I also didn’t want every encounter to be solved with the swing of a sword. The Proving Glade is about questioning value, morality, judgement, and redemption. This adventure was written as part of the Summer 2019 RPG Writer's Workshop. We also submitted In the Heart of the Forest. While these two adventures are not necessarily connected, they both involve navigating difficult and dangerous scenarios in a forest and could naturally be strung together. This Product Includes -A 3 to 4 hour one-shot designed for parties or 1-1 play. -A new Sidekick stat block: Daelin Hoofbane, ranger extraordinaire. -A new custom creature: the mysterious and powerful Alseiad, a glade nymph of incredible beauty. -2 new maps: One region map for the forest around Quaervarr near Silverymoon and one battle map for The Hydra's Mire.
The PCs intervene in an attempted murder and are hired to find out what made a guy go mad. This leads them to search for Yenejg Togan's tower/a strange merchant in the nearby forest, where they discover that bugbears have moved in. After exploring the tower, finding the "merchant", and dealing with the bugbears and the lamia that caused the incident in the first place, they were still unable to get into Yenejg's inner sanctum without a key. The PCs return with the key and figure out how to use it to enter Yenejg's sanctum. They then explore it, dealing mostly with traps, and finally discover the resting place of the treasure Yenejg stole from the town. This adventure begins with a skill-based roof-top chase and can include some complex non-combat interactions with potentially hostile NPCs. It includes some semi-interesting traps as well as some nifty puzzles. No villain to speak of. Fool-hardy adventurers can get themselves killed, but some caution will result in only one extremely hard fight, and even that can be avoided if action is taken quickly. Pgs. 74-107

Ranked in 2004 as the single greatest adventure of all time by Dungeon magazine, this is a compilation of three series of modules: the G series "G1-2-3 Against the Giants" (G1 Steading of the Hill Giant Chief, G2 Glacial Rift of the Frost Giant Jarl, G3 Hall of the Fire Giant King), the D series (D1 Descent into the Depths of the Earth, D2 Shrine of the Kuo-Toa, D3 Vault of the Drow), and Q1 Queen of the Demonweb Pits. The characters begin by attempting to stop giant raids that have become prolific. They find out that the giant alliance is caused by the drow. They then descend into the Underdark in order to find the drow and stop their sinister plan. TSR 9179

FN11 – The Amulet of Dorian Beldor begins as a race to catch a fugitive from justice and quickly escalates into a much larger problem. With over 40 pages and 8 different maps this adventure has your party stumbling onto a former city covered by a rock slide now inhabited by a large group of humanoids. Buried deep within the complex is the ancient relic that controls elementals and will be quite useful as the Filbar North series winds down.

In PS1 - Barrow of the Culder, your newfound companions were offered a paying job as adventurers. With your victory complete it is now time to get paid. The only problem is that your benefactors are not in Merrydale, they are in Upton. With a payday in sight you head out on the Highway to Upton. As an ancient sage once said “It’s not about the destination, it’s about the journey” In this case the journey is going to be the adventure!

Continue your duet campaign or add something new! Wake up in a druid colony and embark on a quest for trust and truth with plenty of political intrigue, hidden plots, and exciting combat along the way! Second Glance picks up where our first adventure, First Blush, left off and invites the PC to explore their world, test their growing abilities, and get to know their mysterious crystalline companion. However, this adventure can be inserted into any campaign setting and scaled accordingly. Second Glance is part of D&D Duet’s mission to bring you high-quality, ready-to-play material that supports adventuring parties of 1 Player and 1 DM. This adventure is written for a second-level character in a one-on-one 5th edition D&D campaign. It lets the PC explore a druid grove and observe its mysterious residents before traveling to a too-perfect town with twisted secrets. They’ll take on a calculating magistrate, addled cleric, and dark forest creatures but find that other, more ancient mysteries lie in wait just beneath the surface. Everything you need for your own two-person game is inside! This product includes: -A 2nd or 3rd-level adventure adaptable to any setting -Stat blocks for FOUR new creatures and three NPCs -A region map, two settlement maps, and two site maps to aid the PC’s investigations -A fully realized town complete with shops, fleshed out NPCs, and places to explore -Side-quests for curious adventurers or those fond of gold and magical items -Detailed backstory for the ancient warrior sheltered inside the PC’s treasured amulet -A custom magical item And helpful tips for DMing a one-on-one game This adventure is perfect for those looking to begin or continue their duet campaign. It could also serve as a story hook, session zero, or multiclassing narrative for a PC who wants to become a druid. Published by D&D Duet.
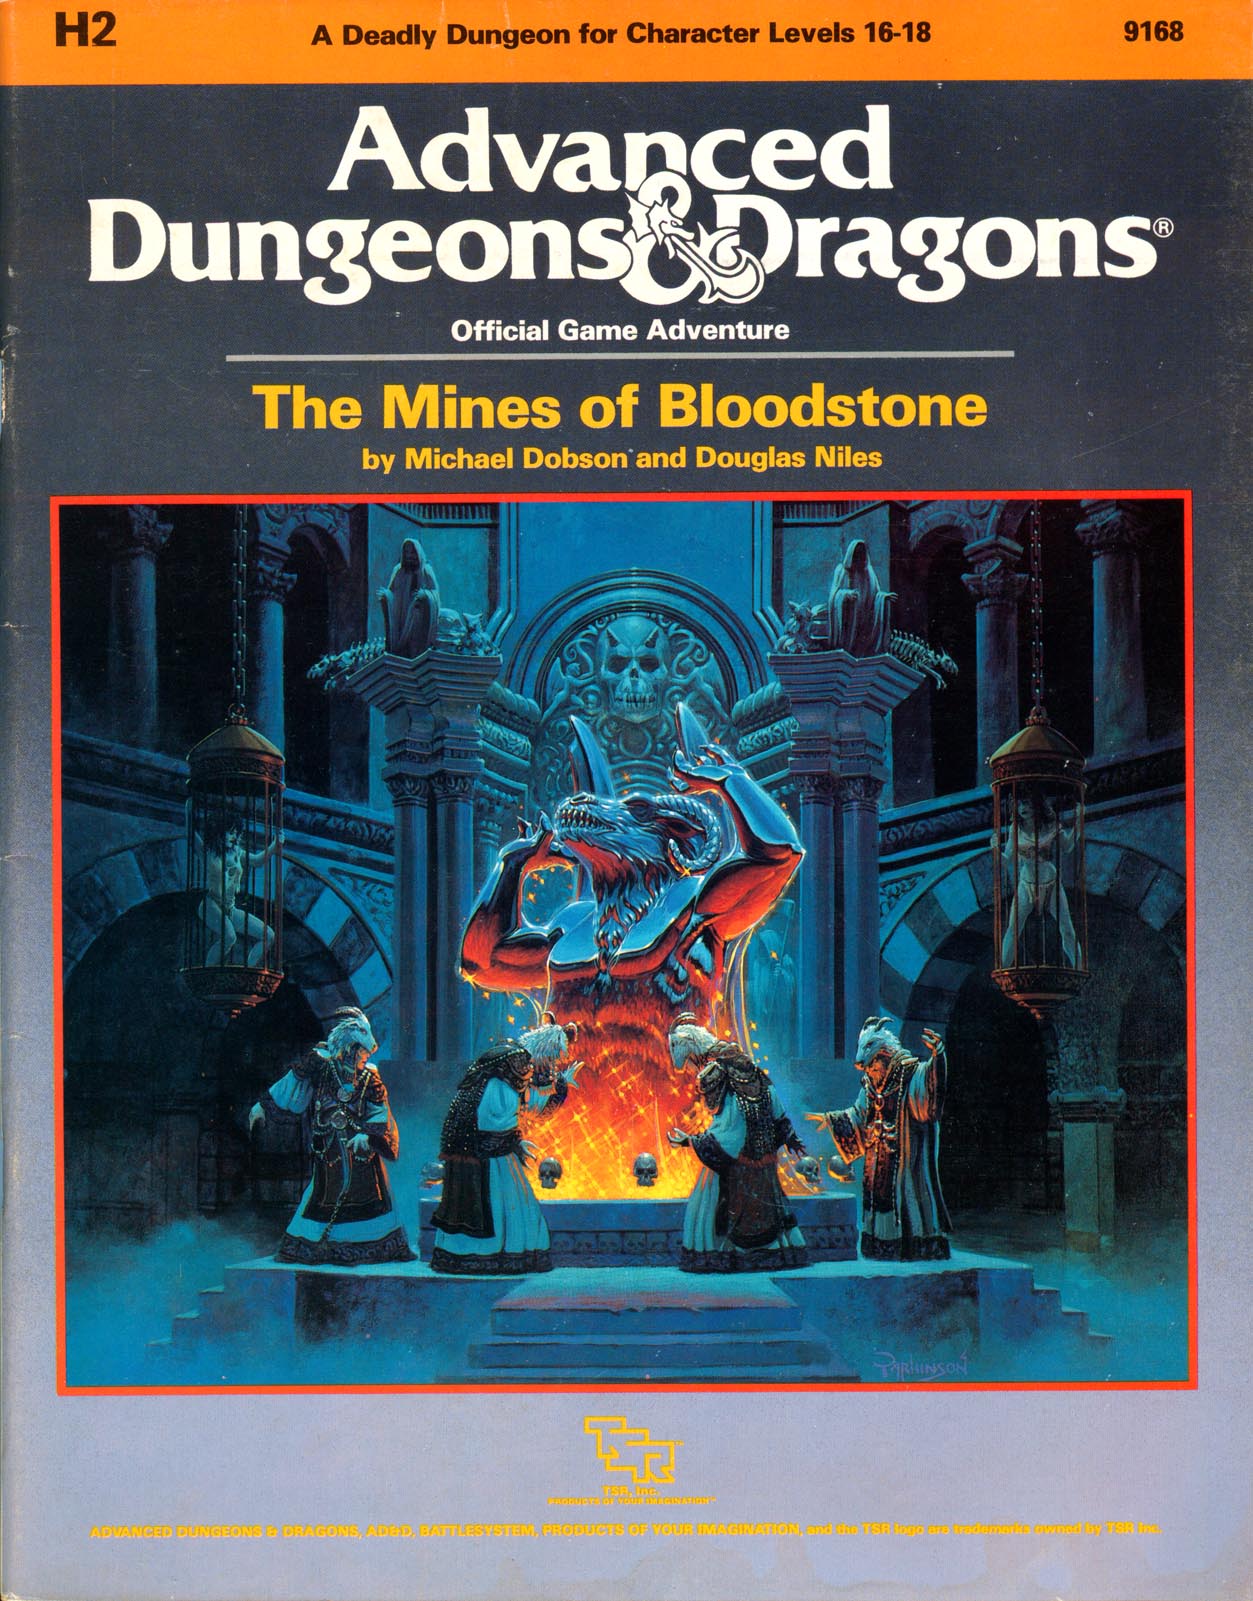
The most deadly dungeon ever devised! High-level characters brave the unexplored corridors of Deepearth to confront perhaps the most feared adversary in the AD&D game. The second chapter of the Bloodstone Pass saga follows the conclusion of the desperate war against the bandit army. A cold and bitter winter drives the villagers to the edge of starvation, and numerous horrors strike the town of Bloodstone Pass. Join the adventure as the heroes explore the depths of the ancient bloostone mines, now inhabited by fearsome demons. There they hope to uncover the fantastic treasures rumored to exist in the unknown darkness. But deep within the mines, all is not what it seems.... This module uses the new rules from the Dungeoneer's Survival Guide and Wilderness Survival Guide. The adventure also includes optional BATTLESYSTEM scenarios fought entirely underground. These supplementary products are not required to play the adventure, however. TSR 9168
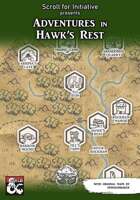
Adventures in Hawk's Rest is a love letter to low-level D&D: Studio Ghibli meets the Shire meets Lost Mine of Phandelver. An open-world hexcrawl for characters of 1st to 2nd level, Hawk's Rest is intended as a prologue to a longer campaign, with seven keyed adventure sites and fantastic maps by Dungeon Baker (How to Defend Your Lair, The Lazy DM's Companion). Hawk's Rest is written for new and veteran players alike but avoids the usual pitfalls associated with 1st-level adventures: not only are encounters balanced to avoid character death, but most combats can be avoided entirely with clever roleplaying.

Sometimes protecting the cargo is easy but getting the pay not so much. The caravan is already on its way, some disagreement with the guards makes them leave the cargo without protection midway. You are just in the right place to catch up fast and guard the wagons the last stretch home.
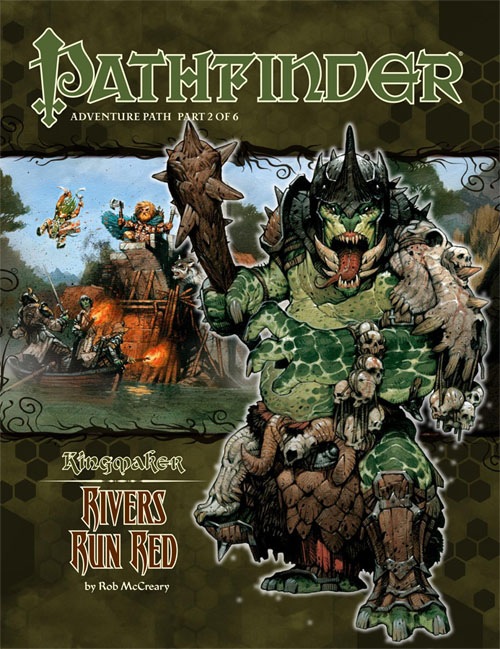
A Pathfinder Roleplaying Game adventure for 4th-level characters, this volume of Pathfinder Adventure Path is part 2 of 6 of the Kingmaker Adventure Path, in which the heroes win and defend a small kingdom from threats foreign and domestic. PCs should advance to 7th level by the end of this adventure. The PCs receive a shipment of funds, materials, and colonists from Brevoy and beyond, along with instructions to build a town and attract more pioneers to their nascent country. Having already explored the northern reaches of their new domain, the PCs must now venture into the wilds to bring the rule of law to the south. Wicked fey inhabiting a ruined keep, undead haunting an ancient barrow mound, and others must be defeated to make the region ever more secure. Along the way, the PCs might also have the opportunity to ally themselves with some of the region’s local residents, including the dryad druid Tiressia, her satyr consort Falchos, and a band of gnome explorers called the Narthropple Expedition. In addition, the PCs will be called upon to mediate between two rival factions in the area: a group of independent loggers and the angry fey sorceress who opposes them. As they explore, evidence that a group of trolls is stirring up trouble in the region becomes apparent. Meanwhile, the PCs must deal with events within their burgeoning kingdom—a rabble rouser seeks to oust the PCs from their positions of power, the secretive cult of the hag goddess Gyronna has infiltrated the town, and a werewolf is preying on the townsfolk. All of these events build to the adventure’s twin climaxes: the sudden assault on their capital city by an owlbear of unprecedented size and the expansion of Hargulka’s trolls into the north. Faced with danger on multiple fronts, the PCs must draw upon all of their resources and bravery to become the undisputed rulers of the Greenbelt.

This area of adventure is a continuation from FV1 – Jeopardy Caverns and picks up where the party left off. If your party discovered the “back door” this is where it leads. It also offers an opening that flanks Jeopardy Caverns that has a perilous rope bridge to navigate! This area provides multiple smaller adventures and was utilized to get the party from different adventures. Portions of this adventure can be used as fillers in your own campaign. I hope you enjoy it as much as my players did!

Tragedy has struck the Dwarven Kingdom of the Hammerskin Clan. Recent quakes have opened the Dwarven mines to a humanoid invasion that have taken over the Stonegate and Irongate sections of the kingdom. On your last foray into the Dorgel Mountains you were tasked to deliver a plague cure for the town of Timel. On your way through the trade route you discovered the invasion and fought your way through to deliver the remedy. Now you must return to help the Dwarves secure their domain!