
The citizens of Phent, which is a large town in Thesk, are a proud, yet warm and accepting folk. For the past nine years, they have been host to over six hundred orcs, which is certainly an anomaly in the average Faerûnian community. In 1360 DR, Zhentil Keep sent one thousand orcs to aid in the fight against the westward-sweeping Tuigan hordes. The orcs fought well—well enough that the citizens of Thesk welcomed them as citizens when Zhentil Keep abandoned them in this land in 1363 DR. Still, a current of unsettling concern lingers. Some believe that the orcs are still part of Zhentil Keep’s strike force, but that they went on standby to wait for the moment when their masters give the signal. Once allowed, these orcs may launch a crippling attack from within. However, in nine years, no signal has been given—at least none that any of the paranoid folk have noticed. The orcs are enthusiastic citizens and, apart from some rowdiness during breaks from the mines or fields, they have hurt no one. And then, a prophet comes, with a message of war . . . In A Call to Arms, the player characters (PCs) have a chance to prevent orcs from rising up against some humans. This adventure is designed for four 9th-level D&D® characters. The encounters can be adjusted up or down to suit your group’s needs, however.

The Legend of the Black Monastery Two centuries have passed since the terrible events associated with the hideous cult known as the Black Brotherhood. Only scholars and story-tellers remember now how the kingdom was nearly laid to waste and the Black Monastery rose to grandeur and fell into haunted ruins. The Brothers first appeared as an order of benevolent priests and humble monks in black robes who followed a creed of kindness to the poor and service to the kingdom. Their rules called for humility and self denial. Other religious orders had no quarrel with their theology or their behavior. Their ranks grew as many commoners and nobles were drawn to the order by its good reputation. The first headquarters for the order was a campsite, located in a forest near the edge of the realm. The Brothers said that their poverty and dedication to service allowed them no resources for more grand accommodations. Members of the Black Brotherhood built chapels in caves or constructed small temples on common land near villages. They said that these rustic shrines allowed them to be near the people they served. Services held by the Brothers at these locations attracted large numbers of common people, who supported the Black Brotherhood with alms. Within 50 years of their first appearance, the Black Brotherhood had a number of larger temples and abbeys around the kingdom. Wealthy patrons endowed them with lands and buildings in order to buy favor and further the work of the Brothers. The lands they gained were slowly expanded as the order’s influence grew. Many merchants willed part of their fortunes to the Black Brotherhood, allowing the order to expand their work even further. The Brothers became bankers, loaning money and becoming partners in trade throughout the kingdom. Within 200 years of their founding, the order was wealthy and influential, with chapters throughout the kingdom and spreading into nearby realms. With their order well-established, the Black Brotherhood received royal permission to build a grand monastery in the hill country north of the kingdom’s center. Their abbot, a cousin of the king, asked for the royal grant of a specific hilltop called the Hill of Mornay. This hill was already crowned by ancient ruins that the monks proposed to clear away. Because it was land not wanted for agriculture, the king was happy to grant the request. He even donated money to build the monastery and encouraged others to contribute. With funds from around the realm, the Brothers completed their new monastery within a decade. It was a grand, sprawling edifice built of black stone and called the Black Monastery. From the very beginning, there were some who said that the Black Brotherhood was not what it seemed. There were always hints of corruption and moral lapses among the Brothers, but no more than any other religious order. There were some who told stories of greed, gluttony and depravity among the monks, but these tales did not weaken the order’s reputation during their early years. All of that changed with the construction of the Black Monastery. Within two decades of the Black Monastery’s completion, locals began to speak of troubling events there. Sometimes, Brothers made strange demands. They began to cheat farmers of their crops. They loaned money at ruinous rates, taking the property of anyone who could not pay. They pressured or even threatened wealthy patrons, extorting money in larger and larger amounts. Everywhere, the Black Brotherhood grew stronger, prouder and more aggressive. And there was more… People began to disappear. The farmers who worked the monastery lands reported that some people who went out at night, or who went off by themselves, did not return. It started with individuals…people without influential families…but soon the terror and loss spread to even to noble households. Some said that the people who disappeared had been taken into the Black Monastery, and the place slowly gained an evil reputation. Tenant farmers began moving away from the region, seeking safety at the loss of their fields. Slowly, even the king began to sense that the night was full of new terrors. Across the kingdom, reports began to come in telling of hauntings and the depredations of monsters. Flocks of dead birds fell from clear skies, onto villages and city streets. Fish died by thousands in their streams. Citizens reported stillborn babies and monstrous births. Crops failed. Fields were full of stunted plants. Crimes of all types grew common as incidents of madness spread everywhere. Word spread that the center of these dark portents was the Black Monastery, where many said the brothers practiced necromancy and human sacrifice. It was feared that the Black Brotherhood no longer worshipped gods of light and had turned to the service of the Dark God. These terrors came to a head when the Black Brotherhood dared to threaten the king himself. Realizing his peril, the king moved to dispossess and disband the Black Brother hood. He ordered their shrines, abbeys and lands seized. He had Brothers arrested for real and imagined crimes. He also ordered investigations into the Black Monastery and the order’s highest ranking members. The Black Brotherhood did not go quietly. Conflict between the order and the crown broke into violence when the Brothers incited their followers to riot across the kingdom. There were disturbances everywhere, including several attempts to assassinate the king by blades and by dark sorcery. It became clear to everyone that the Black Brotherhood was far more than just another religious order. Once knives were drawn, the conflict grew into open war between the crown and the Brothers. The Black Brotherhood had exceeded their grasp. Their followers were crushed in the streets by mounted knights. Brothers were rounded up and arrested. Many of them were executed. Armed supporters of the Black Brotherhood, backed by arcane and divine magic, were defeated and slaughtered. The Brothers were driven back to their final hilltop fortress – the Black Monastery. They were besieged by the king’s army, trapped and waiting for the king’s forces to break in and end the war. The final assault on the Black Monastery ended in victory and disaster. The king’s army took the hilltop, driving the last of the black-robed monks into the monastery itself. The soldiers were met by more than just men. There were monsters and fiends defending the monastery. There was a terrible slaughter on both sides. In many places the dead rose up to fight again. The battle continued from afternoon into night, lit by flames and magical energy. The Black Monastery was never actually taken. The king’s forces drove the last of their foul enemies back inside the monastery gates. Battering rams and war machines were hauled up the hill to crush their way inside. But before the king’s men could take the final stronghold, the Black Brotherhood immolated themselves in magical fire. Green flames roared up from the monastery, engulfing many of the king’s men as well. As survivors watched, the Black Monastery burned away, stones, gates, towers and all. There was a lurid green flare that lit the countryside. There was a scream of torment from a thousand human voices. There was a roar of falling masonry and splitting wood. Smoke and dust obscured the hilltop. The Black Monastery collapsed in upon itself and disappeared. Only ashes drifted down where the great structure had stood. All that was left of the Black Monastery was its foundations and debris-choked dungeons cut into the stones beneath. The war was over. The Black Brotherhood was destroyed. But the Black Monastery was not gone forever. Over nearly two centuries since its destruction, the Black Monastery has returned from time to time to haunt the Hill of Mornay. Impossible as it seems, there have been at least five incidents in which witnesses have reported finding the Hill of Mornay once again crowned with black walls and slate-roofed towers. In every case, the manifestation of this revenant of the Black Monastery has been accompanied by widespread reports of madness, crime and social unrest in the kingdom. Sometimes, the monastery has appeared only for a night. The last two times, the monastery reappeared atop the hill for as long as three months…each appearance longer than the first. There are tales of adventurers daring to enter the Black Monastery. Some went to look for treasure. Others went to battle whatever evil still lived inside. There are stories of lucky and brave explorers who have survived the horrors, returning with riches from the fabled hordes of the Black Brotherhood. It is enough to drive men mad with greed – enough to lure more each time to dare to enter the Black Monastery.

The dreadful jails below the appalling City of Skulls, Iuz's nightmare capital, contain many wretched and desperate captives. Among them is Earl Holmer, Knight Commander of the Shield Lands. A brave spy in Dorakaa has shown the ay to find and free Holmer—is your party up to the job of freeing him? King Belvor IV of Furyondy believes so. In the way stand fearsome priests and mages of the Lord of Pain; ogres, giants, fiends, and worse hinder the struggle to defeat the traps and guardians of Iuz. Plucking Holmer from his grasp will bring great renown, knighthood, and treasure—for those who survive. None has ever escaped Iuz's jails. Who will you be the first to use stealth or storm to breach them? TSR 9405
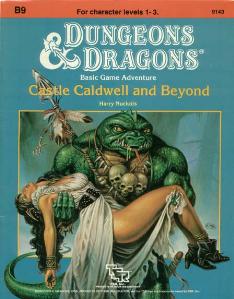
Five exciting short adventures to make your Basic campaign come alive! The Clearing of Castle Caldwell - A local merchant has recently purchased a small castle... but when he tried to move in, he discovered that the castle was already inhabited! Dungeons of Terror - A strange trapdoor in the floor of Castle Caldwell leads to a terrifying challenge! The Abduction of Princess Sylvia - On the eve of her wedding, the beautiful princess has been kidnapped! Can you save her in time? The Great Escape - Imprisoned in an enemy fortress, without armor or weapons, your situation seems hopeless. Yet there may be a way to freedom... The Sanctuary of Elwyn the Ardent - A mystical chime of great power has been stolen - but by whom? In the wrong hands, the chime can cause untold harm! But can you find and defeat this mysterious and powerful creature? TSR 9143

The characters have escaped the maze only to find themselves in strange dimensions of fire, stone and ice, and a strange idyllic hunting ground where all is not as it appears.

In this level 3 adventure, the heroes face off against a band of orcs who live on islands in a pool of their orc god's blood. Warpath of Gruumsh is part 2 of the Litany of Arrows adventure path, following up on the platinum-selling Castle of Corellon adventure. This can very easily be run as a standalone adventure. Warpath of Gruumsh contains three versions of each full-color map (untagged, player's map and DM's Map), original artwork, one page of new magic items, and full entries on 6 new monsters, including mithral dragons and blood moon harpies.

This adventure takes place in the Moonsea of Faerûn. The players have been brought to Melvaunt to search for the missing scions of the city's great families. To the north, in Thar the orc tribes converge on the ruined fortress of Xul-Jarak, flocking to the banner of a charismatic warlord. There, he intends to sacrifice the scions of the great families of Melvaunt in a bloodritual to Gruumsh. The players will escape Melvaunt, search along the wilderness of Thar for the Fortress of Xul-Jarak, and then explore the dungeons of the ruined fortress and hopefully rescue the scions before they are sacrificed. There also is a Web Enhancement by Eric Cagle on the archives of wizards of the coast's website designed to scale the adventure to level 8. For example, it replaces the Owlbear with a Tyrannosaurus. This is an easy to scale adventure with much of the player's difficulty coming from intelligently avoiding problems, choosing how to approach each floor in the most tactical way, and quickly adjusting when something goes wrong. The adventure has sidebars including common orc battle cries (In Orc!), ready to use orc names, weather and random encounter table in Thar, a description of what happens if the party fails or partially succeeds, and suggested minis for each of the encounters. There is even an extended description of the bloodspear ritual, an event the party is not meant to encounter in a normal run. The appendix is detailed for all the humanoid characters including the scions and their equipment, the named villains, and variety of unnamed orcs the party will encounter. The fortress also offers an opportunity to introduce the players to the Underdark and the Zhentil Keep. There is a passage to the Underdark the players can accidentally explore, and return to later. Emissaries from Zhentil Keep have come to watch the ritual and have their own motivations. These npcs provide an opportunity for exposition and role playing at a point which otherwise might be combat heavy, acting as a valve for the first floor - helping or hurting the party with subtle magic should the difficulty be off.

The North can become very appealing to those who seek fame and fortune on their own course. The North is also home to humanoids and fell creatures, things that can find a foothold in the lawless wastes while also making a living. Larger and more lethal creatures like frost giants and white dragons can also be found, assuming you are foolish enough to go looking for them. This adventure is formatted to both 1E & 5E gaming rules.
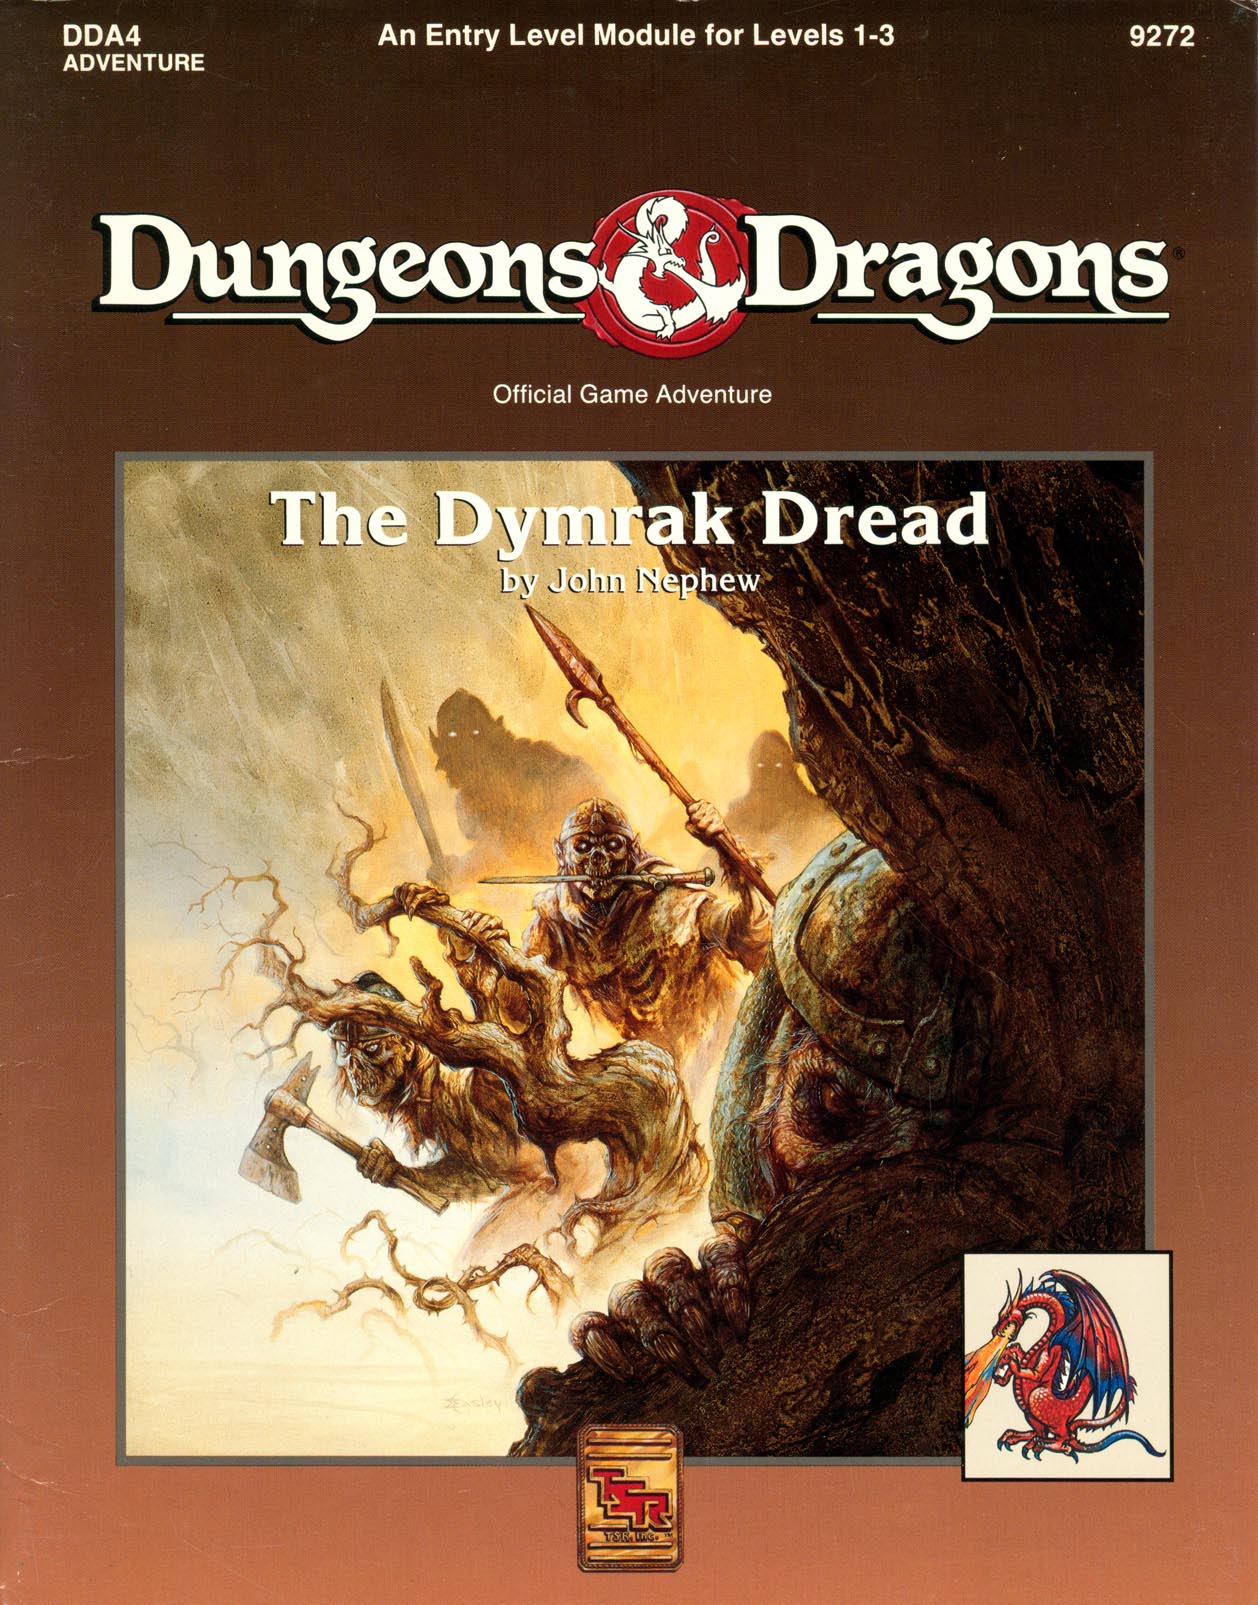
Adventure Lies Ahead, Deep in the Heart of the Dymrak Forest Are you ready to meet the Lord Forester's challenge: to put an end to needless death and destruction by doing away with the goblin war chieftain, Kosivikh, and his evil band of raiders? Eager to prove yourselves as new adventurers and to collect a sizable bounty, you travel to the goblins' dungeon in the Dymrak Forest - a place that has captivated your interest for years, a place where few have dared to venture. Only you and your fellow adventurers can put an end to the rampant bloodshed and return peace to the territory. This module is recommended especially for beginner Dungeon Masters and players who are interested in dungeon exploration. Can be used as a follow-up to the DDA3, Eye of Traldar module or it can stand alone Features easy-to-follow rules on dungeon adventuring in the heart of the Dymrak Forest. TSR 9272

Even bad guys have heroes they look up to. The Silver Knight is a champion among the orcs, a title that is passed from orc to orc. As one falls in battle another rises, and the lineage continues. Forged of an ancient compact between deities of fate and heroism, the secret to the Silver Knight’s immortality lies in the signet ring worn by every Silver Knight. Tyrants and Hellions is a Dungeon Master's aide, containing fifteen villains complete with schemes, lairs, backstories, and everything else you need to drop them into your own 5th Edition Dungeons & Dragons campaign. Within its 400 pages you'll also find the methods, both mechanical and thematic, used to create villains that spark the imaginations of your players. The Silver Knight is one of these villains, and their adventure takes up 17 pages (pg 180-197). Published by 2CGaming
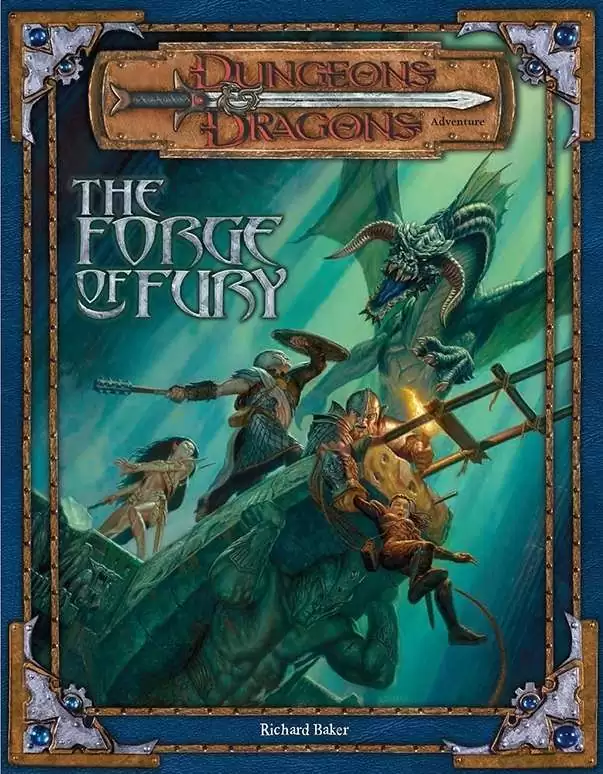
Two centuries past, the dwarven smith Durgeddin the Black carved a secret stronghold from the caverns riddling a hill known as the Stone Tooth. Laboring ceaselessly in their halls under the mountain, Durgeddin’s clan forged enchanted weapons for use in their vendetta against the orcs that had driven them out of their old homes. Durgeddin and his followers are long dead, but the dwarf-hold is not empty. Deadly peril waits in the caverns beneath the Stone Tooth, as well as Durgeddin’s hidden armory of matchless weaponry. The Forge of Fury is a dungeon crawl, or site-based adventure, describing the ruined stronghold of Khundrukar. The characters come to the Stone Tooth in search of a hidden cache of Durgeddin’s superior blades. They find the old stronghold inhabited by a number of dangerous monsters.

Morgansfort: The Western Lands Campaign is the first published campaign setting for the Basic Fantasy Role-Playing Game. This module includes a brief description of the Western Lands: A campaign adventure area consisting of the remnants of a once-great empire, a pair of important free cities, and a vast wilderness territory, plus Morgansfort, a detailed "home base" for adventurers set in the western lands. Also included are three adventures designed for a part of new player characters, comprising a total of six dungeon levels: The Olde Island Fortress: a two-level dungeon environment suitable for beginning adventurers, located near Morgansfort. The Nameless Dungeon: a three-level dungeon designed to be a bit more challenging. The Cave of the Unknown: a one-level dungeon filled with strange monsters led by a fearsome master. This campaign module combines: The Western Lands, a briefly sketched campaign area; Morgansfort, a detailed "home base" for an adventuring party; The Old Island Fortress, a two level dungeon suitable for beginning adventurers; The Nameless Dungeon, a tough three level dungeon; and The Cave of the Unknown, a dungeon controlled by an evil magic-user. This campaign module is highly suitable for starting a new group, even a group of new players. Published by basicfantasy.org

Blackwater Redux is an Eberron adventure designed for a group of five characters starting on 1st level. It brings the group to the backwater of Khorvaire, aptly named the Shadow Marches. By the end of the adventure, the characters should reach 5th level or higher. To run this adventure, you need the fifth edition Player’s Handbook, Dungeon Master’s Guide, Monster Manual, and Eberron: Rising from the Last War (RFTLW). Blackwater Redux is a dark, hopeless adventure with strong horror notes. It is inspired by Apocalypse Now by John Milius and Francis Ford Coppola, The Heart of Darkness by Joseph Conrad, and The Call of Cthulhu by H. P. Lovecraft. Consuming these before running the adventure is highly recommended. The adventure’s themes loosely touch on current and past real-world conflicts. If one or more of the players are former or active soldiers, make sure to discuss the campaign’s content beforehand.

An evil cult gathers for one night of dark acts, and on this night a group of brave adventurers enter their hide out. It is a mission of stealth and subterfuge for the dark forces are powerful, and quick thinking is needed to succeed for one night amongst the necromancers. The adventure introduces several new monsters and magic items. Originally from the Danish convention Fastaval as part of the living campaign, Hinterlandet. Now presented here for the first time in English. It is an adventure with emphasis on exploration and meeting the unknown.
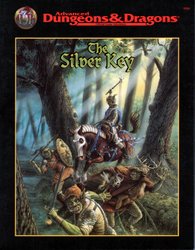
Between the settled human lands and the orc-filled mountains rests the barony of Honshar. The residents have grown used to occasional orc raids, but now they find themselves facing a full-scale war. As if that wasn't bad enough, the orcs have kidnapped an important political figure from Honshar, along with a crucial magical item - the Silver Key. Unless the key is recovered, it could be Honshar's undoing. Both the key and the hostage are being held in the orc city of Krimba-hai, so getting them back will be tricky. However, there is a plan.... TSR 9508

This short adventure is set in the Forgotten Realms campaign setting; it may be run as a standalone adventure, or as a side trek for a larger module . Alternatively, this adventure could be inserted into any campaign setting. Trouble is brewing near the town of Red Larch; specifically, in the caves near Lance Rock. A few good adventurers are needed to investigate the increased orc and ogre sightings in the area.

𝐅𝐨𝐫 𝐭𝐡𝐞 𝟓𝐭𝐡 𝐞𝐝𝐢𝐭𝐢𝐨𝐧 𝐨𝐟 𝐭𝐡𝐞 𝐰𝐨𝐫𝐥𝐝'𝐬 𝐦𝐨𝐬𝐭 𝐩𝐨𝐩𝐮𝐥𝐚𝐫 𝐫𝐨𝐥𝐞𝐩𝐥𝐚𝐲𝐢𝐧𝐠 𝐠𝐚𝐦𝐞! In the steaming jungles of the east, the Feathered City rises like a jewel from the lush forests. An important stop on many aerial trade routes, the skies above the city are filled with griffons, rocs, and airships from the far corners of the world. But your adventure takes you to the very belly of this exotic city. Forced into the service of a night hag, you must help her find and eliminate her enemy - a demon with no name, that rules from the shadows. This is a mystery adventure for characters level 5-10, and optimized for a party of 5 level 7 characters. It takes about 10 hours, or two sessions, to complete. 𝐁𝐞 𝐰𝐚𝐫𝐧𝐞𝐝 - 𝐭𝐡𝐢𝐬 𝐢𝐬𝐧'𝐭 𝐚𝐧 𝐚𝐝𝐯𝐞𝐧𝐭𝐮𝐫𝐞 𝐟𝐨𝐫 𝐭𝐡𝐞 𝐟𝐚𝐢𝐧𝐭 𝐨𝐟 𝐡𝐞𝐚𝐫𝐭! It contains horror elements that may be too graphic some players, and even worse - this adventure packs an old school punch. Teamwork and caution are needed to survive long enough to hear the Tiger's Song.
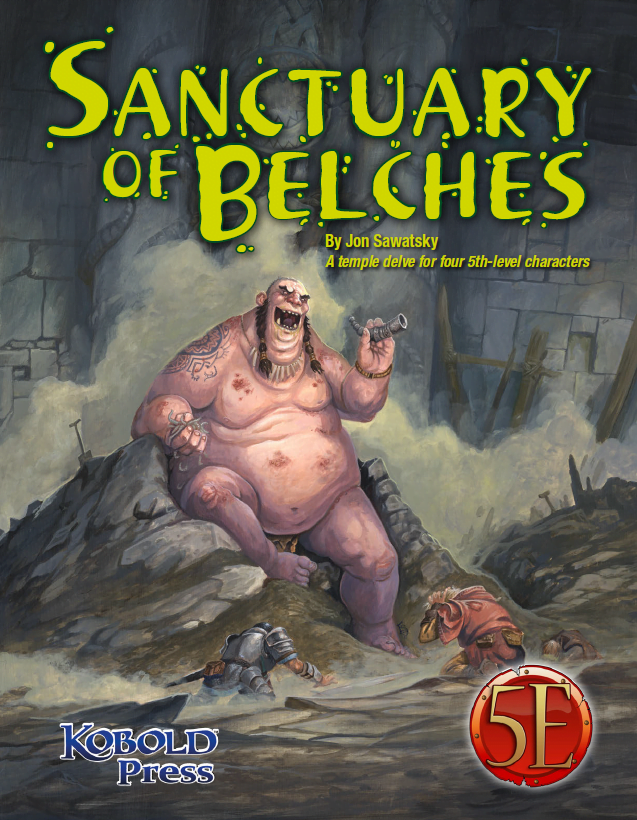
The trouble began several weeks ago when a duergar excavation team went to work in a long-abandoned temple. Drawn to the temple by stories of riches and artifacts, the duergar hired several giants as laborers before cracking the temple’s sealed doors. The largest of the giants, a loathsome Thursir mutant named Huppo, used his acidic vomit to expedite tunneling into the temple’s collapsed hall of worship. Then, Huppo found the horn—an unusual instrument made from a single piece of stone, with a mouthpiece so intricate only a master carver could have made it. The horn became the giant’s obsession. Seeing only the horn’s potential sale value, the dwarves demanded Huppo turn it over to them, but Huppo refused. To force compliance, the dwarves stopped feeding the gluttonous brute, but Huppo had already found his own source of food; in deep areas of the temple, worms were chewing out of the rocks, and Huppo ate them by the fistful. He also played the horn. Then, after several days of blowing the horn and devouring the strange worms, Huppo released a belch so noxious the dwarves had no choice but to lock him in a sealed chamber and carefully consider their next move. The horn’s call, however, had caught the attention of passing nomadic orcs. They set up camp outside the temple entrance in the hope of finding the horn and its player. That’s the current situation at the temple: the giant refuses to stop blowing the horn and belching out deadly clouds of stomach gas; the dwarves are frightened and edgy while their leader is obsessed with malevolent whispers; orcs are threatening to overrun the place; and the population of worms grows steadily as something awakens deep in the stone beneath the sanctuary of belches.

This deluxe adventure takes heroes into the ruins of Gardmore Abbey, a monastery that was once the base of a militant order of paladins devoted to Bahamut. According to legend, the paladins brought a dark artifact back from a far crusade and stored it in their abbey for safekeeping, and evil forces gathered to assault the abbey and take it back. What the legends don’t tell is that this artifact was actually the Deck of Many Things, a force of pure Chaos. This adventure brings characters into the extensive dungeons beneath the ruins - dungeons that are warped and twisted with the raw forces of Chaos surrounding the cards of the deck.

The wizard Kavorquian is dead. But certain items belonging to his adopted son were in the wizard's keeping at the time of his demise. Now someone must venture into the silent vaults of Kavorquian's stronghold and recover the missing property. Queen's Harvest picks up its story where B11, King's Festival, left off. It can be played as a sequel to that adventure or as a complete adventure in itself. It is tailored for beginning Dungeon Masters and players and contains helpful hints on adventuring and the land of Karameikos. The story develops simply, but ultimately leads the player characters into the nether reaches of Penhaligon's politics to confront Ilyana Penhaligon, mad pretender to the throne! TSR 9261