
A top the crown of the Isle of Dread, a hateful monster broods. Spawned by the Price of Demons, the architect of the shadow pearls dwells deep under the ruins of ancient Thanaclan. As long as this vile monster lives, the threat of the savage tide remains, looming dark on the horizon. "City of Broken Idols" is the seventh chapter of the Savage Tides Adventure Path, a complete campaign consisting of 12 adventures appearing in Dungeon magazine. For additional aid in running this campaign, check out Dragon magazine's monthly "Savage Tidings" articles, a series that helps players and DMs prepare for and expand upon the campaign. Issue #354 of Dragon magazine features the totemic demonslayer, a new prestige class that focuses on fighting and defeating demons, be they at the heart of the Isle of Dread or encountered in the depths of the Abyss itself. The central mesa of the Isle of Dread is taboo to the locals, a place shrouded in mystery and cloaked in rumor. The time has come to confront the evil that dwells atop the island’s savage crown. Pgs. 54-84

"A Triangle in Shadows" is an umbral vampire lair suitable for a party of four 15th-level characters. Magic weapons are highly advised. This adventure can be completed in one session. The City Fallen into Shadow is the domain of the fiendish umbral vampires, and they are rarely found outside it. But one named Caragorn has fled the city after coming between the lovers Philadon and Zenobia. Philadon and Caragor, however, are secretly meeting at Caragorn's tower behind Zenobia's back. Zenobia suspects them of collusion, and is seeking out the two male umbral vampires to get revenge.

Devastated in a war with a nearby wizards' school, the Fighters' Academy has since been surrounded by a foul and dank swamp - the Gloomfens. Since the climatctic battle between the wizards and fighters, the tower has decayed. The spirit of the head of the academy haunts the building, eternally plotting his revenge on the wizards who killed him. his loyal sutdents remain faithful to him even in death. Other foul undead have made their home in the rotting, spacious academy. From their lair, they make forays into farmsteads near the swamp in search of victims to feed their unspeakable appetites. The Problem of these terrible attacks by the savage undead will not stop until the evil that has found a home at the tower is burned from the face of the land forever. Will your party heed the call and help the town of Melinir? Will they be able to clear the former Academy of its undead? Towers of Evil is the second in a three part adventure, The Haunted Tower. Or, it can be ran as a stand alone adventure. The choice is up to you. Part of TSR 1081 The Haunted Tower

Time is running out for the members of the Ivory Scimitar as they strive to overcome the latest challenges of the Infernal Machine and Mithelvarn's Labyrinth. With the discovery of a secret entrance into the 5th level of the dungeon, the party must now enter uncharted waters with an entirely new type of environment and monstrous threats. Can they withstand these new creation of the Machine, and will they finally breach the 6th seal and gain entry into the last level of the legendary dungeon and save all of Roslof Keep? This adventure is formatted to both 1E & 5E gaming rules. Also available in PDF.

The legendary spellcaster Emirikol the Chaotic has turned the region into a wild magic zone, a place where all magic goes awry. The only way to put things back to normal is to retrieve the source of the problem deep inside the Ooze Chambers of Emirikol! This adventure is for 4th level characters and can be run on its own or as part 3 of the Litany of Arrows adventure path. This adventure contains, 2 pages of new magic items, 8 new monsters and NPCs, a full write-up of Bwimb II, the Paraelemental Princess of Ooze, an entity referred to in many D&D products but never fully fleshed out and stats for the 3rd edition iconic heroes Regdar and Mialee, who play a major role in this adventure. It's got over 10 pieces of original art, full color maps, tagged and untagged, and a special handout for the player who obtains the Ooze Fist of Emirikol. This adventure builds on the story begun in the platinum-selling Castle of Corellon and the follow-up, Warpath of Gruumsh.
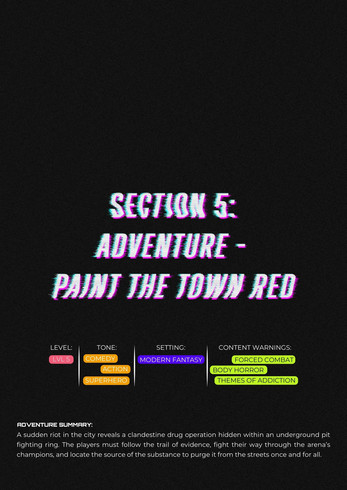
A sudden riot in the city reveals a clandestine drug operation hidden within an underground pit fighting ring. The players must follow the trail of evidence, fight their way through the arena’s champions, and locate the source of the substance to purge it from the streets once and for all.
The Demesne of Rangers is at war with the Horde of the Black Blood – an alliance of rampaging tribes of goblinkin. It is the heart of winter and the forest sleeps uneasily under a white veil. This is a time to huddle before the fire, not be out in the cold fighting a war but the heroes have no choice but to infiltrate the occupied territory in order to find and destroy the dreaded Goatskull Helm. Hope for victory hinges on the success of this quest and the call goes out for heroes to gather. The Goatskull Helm is an adventure module compatible with the Fifth Edition. This 35-page adventure is designed for a party of 1st level characters and will see them through to the 3rd level. This adventure is set in a fantasy medieval world with the mythological flavour of Ancient Greece. However, it can be easily adapted to any other medieval fantasy setting. This adventure includes entries for familiar monsters that are modified to better fit the setting as well as five new monsters and new equipment and magical items.

"People have been disappearing at night in the city of Silverymoon. Some vanish entirely, leaving behind whispered rumors of fiends or other evil creatures having spirited them away. Others return strangely altered, with their memories of having been kidnapped wiped clean and their minds strangely dulled — and always with remarkable haircuts."

The final confrontation with the giant, King Snurre, and the entry of mighty adventurers into the caverns under his stronghold (DUNGEON MODULE G3, HALL OF THE FIRE GIANT KING) discovered the Dark Elves, the Drow, had instigated the giant alliance and its warfare upon mankind and its allied races. This module contains background information, a large-scale referee's map with a matching partial map for players, referee's notes, special exploration and encounter pieces, a large map detailing a cavern area, encounter and map matrix keys, and an additional section pertaining to a unique new creature for use with this module and the game as a whole. A complete setting for play of ADVANCED DUNGEONS & DRAGONS is contained herein. This module can be played alone, as the first part of a series of three modules (with SHRINE OF THE KUO-TOA, D2, and VAULT OF THE DROW, D3), or as the fourth part of a continuing series of modules which form a special progressive campaign scenario (DUNGEON MODULES G1, G2, G3, D1, D2, D3, and Q1, (QUEEN OF THE DEMONWEB PITS). TSR 9019

Encounters in the Savage Wilderness contains 19 encounters / mini-adventures, a few new creatures and items, and downloadable maps. We've also added suggestions on how to use the encounters in Eberron.
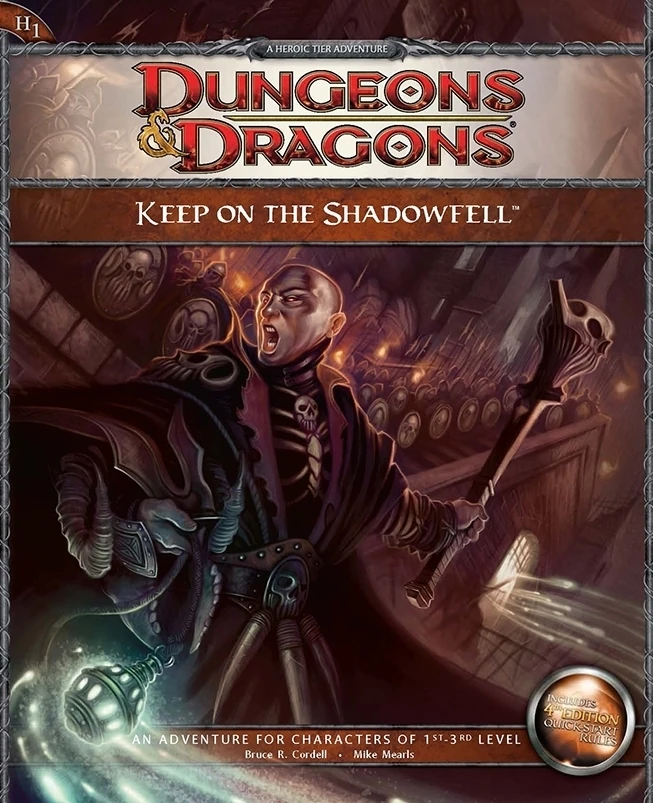
Darkness looms near Winterhaven! Kobold brigands have grown ever bolder in their attacks, marauding the once peaceful town, and a known explorer has been missing ever since their departure to the excavation site of a dragon burial site. When the party investigates, they will discover that the kobold's leader, Irontooth, bears a tattoo of a ram-headed demon. This is a troubling portent, for the townsfolk will report that this can only mean the dread god Orcus, master of death, has an active cult in that ruined keep! It is up to the party to enter the Keep on the Shadowfell and put a stop to the cult's fell machinations before it threatens all the realm. There they will fight the evil priest Kalarel, Scion of Orcus and seal off the vile portal to the dark realms he is master of. Should the heroes seize victory, glory and treasure are sure to be theirs. But first they must endure the challenges of that dreaded KEEP ON THE SHADOWFELL!

Having put down a rising of giants, it was discovered that the motivating force behind their depredations was that of long-forgotten evil - the Dark Elves. Determined to seek out these creatures, a body of doughty adventurers mounted an expedition to learn the strength of the Drow and bring retribution to them (DUNGEON MODULE D1, DESCENT INTO THE DEPTHS OF THE EARTH). This module contains background information, a large-scale referee's map with a matching partial map for players, referee's notes, special exploration and encounter pieces, a large map detailing a temple complex area, encounter and map matrix keys, and an additional section pertaining to a pair of unique new creatures for use with this module and the game as a whole. A complete setting for play of ADVANCED DUNGEONS & DRAGONS is contained herein. This module can be played alone, as the second part of a series of three modules (with DESCENT INTO THE DEPTHS OF THE EARTH, D1, and VAULT OF THE DROW, D3), or as the fourth part of a continuing scenario (DUNGEON MODULES G1, G2, G3, D1, D2, D3, and Q1, QUEEN OF THE DEMONWEB PITS). TSR 9020, From 1978

Important: The adventure is 1e but it has monster conversion notes for D&D 4th edition The town of Highport, once a human community overlooking Wooly Bay from its perch on the northern coast of the Pomarj, fell prey to hordes of humanoids swarming out of the jungle-covered hills surrounding the settlement. Though the orcs, goblins, kobolds, ogres, and gnolls razed much of the place in their ferocious rampages, the smoldering ruins they left behind soon became a new kind of community, a place of trade between the humanoid “locals” and the unsavory human traders who have no compunction about doing business with them. Slaves are a commodity in ready supply in Highport’s market, since many pirates raid up and down the coast of the bay, putting fishing villages to the torch and filling their holds with captured refugees. Slavery has become a thriving business in the town, and rumors abound of a cartel of Slave Lords who run things from behind the scenes, filling their coffers in secret from the buying and selling of human chattel. The trade has become so prolific that the good folk to the north have grown tired of these depredations and decided to fight back. Forces of righteousness and honor have recently descended upon Highport, some openly and others in secret, in various attempts to destroy the machinations of the Slave Lords and abolish the abominable enterprise that has taken far too many loved ones from home and hearth. One such doughty servant of goodness is Mikaro Valasteen, a cleric of Trithereon. Mikaro slipped unnoticed past the crumbling walls of Highport with a single mission: to rescue and transport as many slaves to their freedom as possible. Mikaro and a handful of faithful assistants located a number of escaped slaves—as well as rescued a few more not sufficiently restrained and guarded—and shepherded them through the gates and beyond the reach of their humanoid tormentors, returning them to their lands and homes. This covert freedom brigade enjoyed remarkable success early on, since the servants of the Slave Lords were often lax in their vigilance and sloppy in their efforts to prevent loss of the “merchandise.” After one too many shipments never made its destination, the humanoids stepped up their security and the normal channels of escape from Highport closed to Mikaro and his team. He cannot risk exposure by smuggling the freed slaves through the gates as merchandise any longer, since shipments of goods are now regularly stopped and checked. No longer able to free the slaves in that manner, Mikaro began hiding his charges in an abandoned villa in a particularly rundown part of the town. Although they are safe for the moment, their numbers have grown unmanageable, and the priest fears it is only a matter of time before someone slips up and brings slavers to their doorstep. Ever more desperate to find a new means of escape from Highport, Mikaro has started work on a plan that is both daring and dangerous. He intends to use a series of old sewers coupled with natural caverns running beneath the town as an escape route to the sea beyond the walls. But he needs someone to clear out the creatures and pitfalls he knows lie within. Pgs. 2-27

An interesting and atypical adventure in its writing style. For one the module contains insightful "When things go Wrong" sections and DM guidance for sticking close enough to the rails for the story and fun's sake. Lots of DM hints about how to handle PCs' choices. Overall the story is fine too - a traditional hook, a mystery, some twists. There's a tower, a surprise pocket-dimension context, and a dungeon. It's mirror of life trapping, isn't it? Well, yes and no. People go in, and they don't come out. Nor can you talk with anyone inside. Somehow, that's not quite the way you remember those mirrors work. This Skarda fellow showed up a few years ago with a band of raiders, and no one in the land has been safe since then. Whole villages have disappeared into this Skarda's mirror. Your band is approached by relatives of one of the victims?and adventurer like yourselves. You have to get into that mirror of whatever-it-is, find this man, and get him out in one piece. The reward is more that adequate. Only problem is, no one out here can tell you what to expect once you get in? or even how to get there. TSR 9188

The renegade magic-user Bargle is wanted, dead or alive. Rumor holds that he dwells in the bowels of a nearby abandoned keep, performing all sorts of foul sorcery. Only the truly brave, or perilously foolish, would dare to challenge Bargle in his own domain. Expanded dungeon of the BECMI red box sample dungeon.
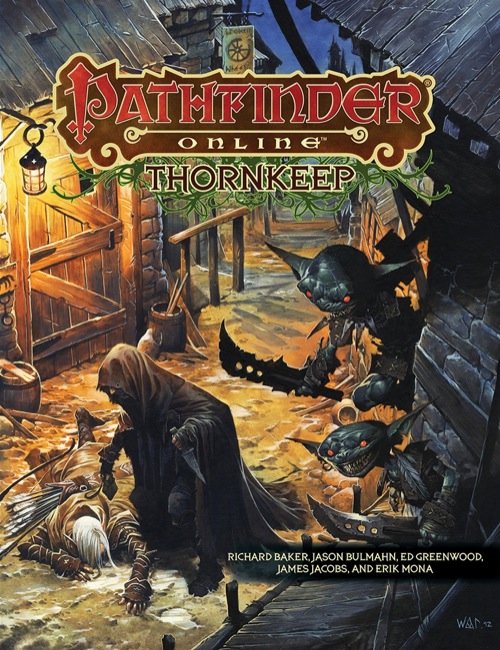
Uncover a world of adventure and claim your fortune in Pathfinder Online: Thornkeep! This detailed sourcebook contains everything a GM needs to run adventures in and around the dastardly town of Thornkeep, as well as several deadly dungeon levels and a sneak peek at the upcoming massively multiplayer online game Pathfinder Online.
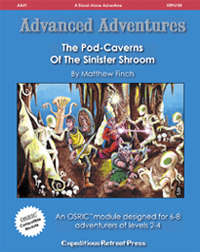
Strange doings are underfoot in the wild hills bordering the realm of decent and civilized folks. Villagers and cattle have gone missing; woodcutters have disappeared; misshapen beings have been seen shuffling through the forests. Some brave villagers have tracked a group of stolen oxen as far as the rocky banks of a small river in the hills. The trail disappeared down into a fissure in the limestone rock, where a fast-running stream plunges down to the dark caverns below. Gird your loins, stand behind the dwarf, and get ready to face The Pod-Caverns of the Sinister Shroom!

Centuries ago, a beholder named Yeryl fled from the place of his birth and wandered the countryside in search for a place to call home. After many sleepless nights spent carving out a safe nook for himself in the wilderness, he at last slipped into slumber. In his dreams, he found an ideal place for his lair: long-abandoned ruins hidden amidst a dull and barren valley. Yeryl spent years transforming the place to suit his paranoid designs. Visitors were rare enough, and the few that made it to Yeryl’s lair were quickly destroyed or forced into the beholder’s service, building the lair ever deeper and more magnificent. As time went on, Yeryl finally completed his task. Safe at last, but with nothing to occupy his mind, Yeryl was struck by melancholy; was this lonely and empty life truly what he had chosen for himself? On that day, Yeryl made a decision: next time an adventurer came to his lair, he would welcome them in. With this resolution in mind, Yeryl began to dismantle his traps and replace them with ones he considered to be more fun. Unfortunately, for all his good intents, Yeryl has not yet realised that killing people is a bad way of getting them to like him. Yeryl's Super Happy Fun Murder Dungeon is a highly obnoxious and mildly ridiculous collection of traps, combat and puzzles designed to test your players' wits and patience. It is optimised for a group of four to five 3rd level players, but the text also contains a guide for level adjustments for different sized groups.

Fort Akor has come under attack by a dragon, but when the PCs seek out the beast in the surrounding jungle they discover the dragon may be the least of the fort’s troubles. The Pcs travel to Fort Akor, where they learn that the fort has been under attack by a dragon (which is really a tyrannosaur). Prince Henri asks the PCs to slay the dragon attacking his fort before it causes further damage. If the PCs investigate the fort before setting out after the tyrannosaur, they may discover the hidden corpse of its hatchling. They may also discover the truth behind the fort's dark history. Tracking the "dragon" to its lair and slaying it for Prince Henri forces the characters into conflict with a faction of the centaurs living in the jungle, who disposed the hatchlings corpse at the fort. Discoveruing the truth of the prince's conflict with the jungle natives might lead to an alliance. Pgs. 16-41

Elanil Elassidil, an elf bard of no small legacy, has put out a call for trustworthy agents. It is time, it seems, for a quietly hidden piece of elven history to become known to the world. Meira Faerenduil, lost knight of Myth Drannor, has been dis-covered, and must be brought back to civilization. A four-hour adventure for 5th-10th level characters. **NOTE** As of August 30th this adventure no longer grants an Oathbow in Adventurers League play. It has been changed to award a +2 Longbow per the Adventurers League Content Catalog.