
A Planescape adventure for 4-7 PCs of levels 9-12 (about 60 total levels). While the module begins in the planar city of Sigil, most of the action takes place in Vudra, a layer of the Abyss. The PCs start in Sigil, tasked to find a vanished brother, and the trail leads to Vudra where the layers demonic ruler gathers magical blades for a terrible vengeance plot. Pgs. 32-58

The Sword of the Dales, an icon of the Dalelands symbolizing the unity and strength of the people, has reappeared! Created by Shraevyn the weapons-mage hundreds of years ago, the lost Sword had become nothing more than a fantastic children's tale - until now. A group of warriors led by Randal Morn, rightful ruler of Daggerdale, rushed to the Sword's resting place to recover it, but dark forces awaited them, and Randal and his men fell to an ambush. Only one man escaped, yet he brought with him the hope that Randal Morn yet lives. Resolved to rescue his leader, that lone survivor turned to the great Elminster of Shadowdale for aid. But Elminster is gone, off plane-hopping while the fate of Daggerbale hangs in the balance. Hence, it is up to Lhaeo, scribe to the old mage, to find a group of heroes who have mettle enough to face down the menace which claimed Randal Morn and his hearty followers... This is the first of three adventures that grant player characters the opportunity to determine the fate of Daggerdale. The saga continues with "The Secret of Spiderhaunt" and concludes with "The Return of Randal Morn." TSR 9484

The Thieves Guild Ebonclad has welcomed its newest team to the fold, assigned to the Keeper Reese Kincaid for instruction. The recruits are green, but capable. Their Keeper has devised a job for them to assess their talents. If his new team is successful, he gets some insight as to how his new Scraps operate, in addition to scratching something off his to-do list. If they die trying, well, then Reese has one fewer thing to worry about. The party must track down the slum thief Dale E’ssio, and reclaim valuables marked for the guild. Should anything unfortunate happen to Dale, there must be no evidence tracing things back to Ebonclad. The mission will require the party to enter Kintalla’s sewers to ultimately confront Dale E’ssio in a ruined slum house. Characters may have to explore the city while trying to get a lead on him.

*THIS IS A D&D NEXT/5E PLAYTEST ADVENTURE* Imani, a Turmishan wizard and former adventurer, seeks the aid of heroes to infiltrate Dretchroyaster’s lair and recover the Diamond Staff of Chomylla—the key to powerful magic and wisdom locked away for thousands of years. In addition to his own sagely interest in the lore of lost Uvaeren, Imani recognizes the dangers of such powerful magic falling into evil hands. The dracolich has secured the staff in his lair’s cen- tral chamber, using ancient wards of protection that can be bypassed only by four artifact-idols once belong- ing to a cult of Bhaal. Each group of adventurers enters the dungeon through a different section of the dun- geon—a forgotten temple of Bhaal, a vast underground lake, a troglodyte village, or Dretchroyaster’s vaults. Dretchroyaster’s lair is no simple set of caverns and ancient ruins. It sits atop a source of great power and energy, which the dracolich and his Cult of the Dragon allies hope to use to unlock the secrets of the staff. Only by undertaking a unified assault against Dretchroyas- ter’s lair can the adventurers hope to recover the Diamond Staff and survive the dracolich’s fury. The adventurers must make their way through the lair and recover the Bhaalite idols that will help unlock the Diamond Staff, all the while dealing with the lair’s creatures and avoiding the dracolich as he pur- sues intruders. Entering the Chamber of the Diamond Staff, the heroes must overcome its magical wards and claim the staff before being slain by the dracolich and his servants.

Irtep’s Dish is an adventure for characters from 6th to 8th level. This adventure requires the skills of a rogue or some other expert at traps, a cleric or character that can heal allies and offer beneficial bonuses to the team, a wizard or other master of the arcane arts, and a fighter to take care of “the heavy lifting.”

In this adventure for four to six 2nd level characters, you will search the Witchwoods for missing people, overthrow a tyrant, and bring peace and justice to a small frontier town by the name of Bromwich. The Biraven Chronicles are a series of three adventures linked together by an overarching plot. The campaign will take characters from 2nd level all the way to 10th level. FELL DEEDS IN FELFAIR GROVE revolves around the northern region of Biraven, a place called the Felfair Grove and will see the characters advance to 4th level. FELL DEEDS IN FELFAIR GROVE is a fully illustrated 54 PAGES adventure complete with maps, NPC portraits, and more. In it, you will find new monsters and new magic items. Furthermore, every creature encountered in this adventure is included in the appendix so you do not have to look elsewhere for monster stat blocs! FELL DEEDS IN FELFAIR GROVE is made for 5e. It is in its own self-contained setting, but can quickly be adapted to any setting.
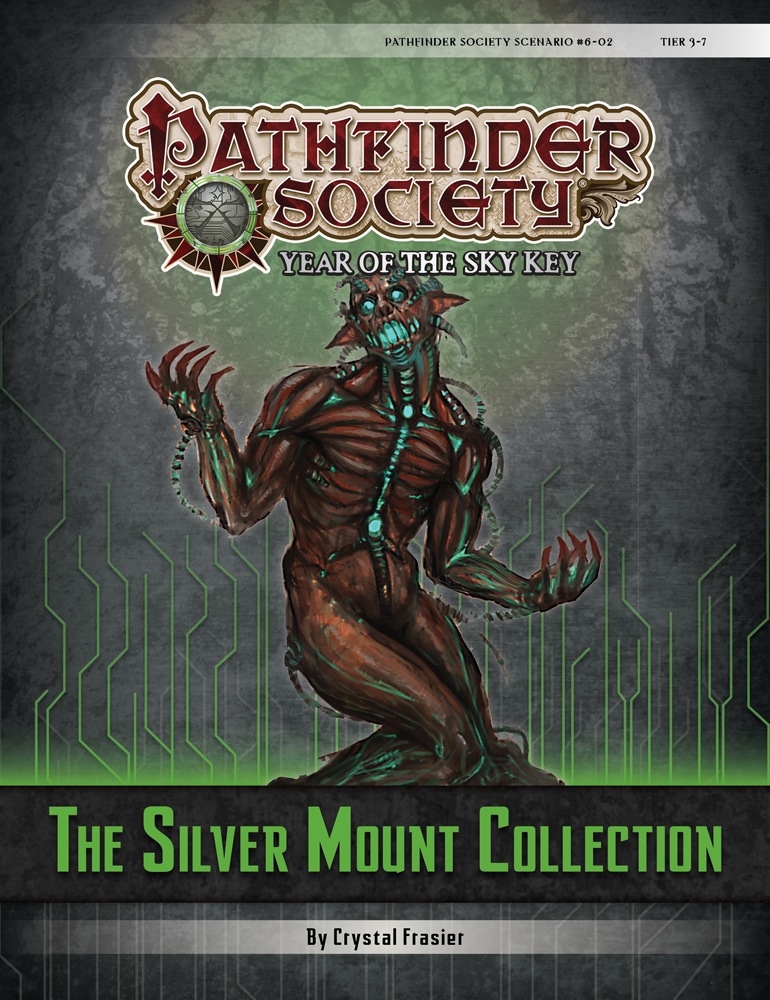
The esteemed Blakros family—famous for their museum in Absalom—receives a large shipment of artifacts from Numeria but fears that the ever-vigilant Technic League will attack to reclaim its "stolen" property. When they request the help of Pathfinders to help guard the collection, the PCs discover that the Technic League is the least of their worries. Content in “The Silver Mount Collection” contains faction missions for the Dark Archive.
The PCs find themselves besieged by marauding elves in a wilderness trading outpost. Can they organize a defense of Outpost Three against the elves and their sinister allies—and figure out why the elves attack night after night? Pgs. 32-50

Waves of supernatural darkness sweep over the subterranean city of Stoneholme, quenching lights and bringing with it foul creatures of shadow. After heroically defending a group of dwarven children being ravaged by a group of these shadow beings, the PCs are approached by Shtawn Deppenkhut -one of the king's own advisers- and are offered the task of finding the source of the darkness that threatens the city. The PCs investigation takes them through the Underworld to hidden caverns, where demon worshiping priests offer living sacrifices in an attempt to plunge Stoneholme into everlasting darkness, a first step in destroying the hated city once and for all, but as it turns out the priests aren't the only ones behind this unfolding plan to destroy Stoneholme. Dark Days in Stoneholme is ideally suited for a group of dwarven adventurers. It is recommended that you have access to the Stoneholme section of the Rise of the Drow revised & expanded edition (2014) but it is not necessary to run the adventure. Also available for Pathfinder. Published by AAW Games.

The Assassin's Knot is a sequel to The Secret of Bone Hill, picking up on themes from that module and shifts them to a new locale. The player characters must solve the mystery of who killed the Baron of Restenford, with evidence pointing to somebody from the town of Garrotten. The scenario describes the town and its castle. The Assassin's Knot module is different from most of its contemporaries in that it contained no dungeon or dungeon-like area. The longer the players take to find the murderer, the more unfortunate events occur in the village. The village, Garrotten, is reputed to be the place to go to have someone killed. The entire village shuts down when the Baron of Restenford is found dead, mutilated beyond the possibility of magical restoration. Three small clues are all the player characters have to unravel the mystery. TSR 9057

Picking up where Chapter 33: Adventures in the Ptolus book leaves off, the adventures in The Night of Dissolution cover an arc that pits player characters against the darkest foes the city of Ptolus has ever faced. Following the threads of a hidden conspiracy, the characters find themselves up against insane cultists, wild chaos magic, and horrors from the primordial days of the world. This adventure book is laced with urban intrigue, high action, and even some dungeon exploration. Some highlights include: A description of Pythoness House, a haunted oracle/brothel that hides a trove of weapons vital in the fight against the Cults of Chaos. A huge secret temple of chaos where insidious fanatics worship the dreaded Galchutt. Details of a city-wide network of covert spies and agents that extends even into the highest echelons of Ptolus’ elite society. These adventures culminate in the player characters’ attempt to stave off the Night of Dissolution, a dark time long foretold when the slumbering Galchutt will awaken in their hidden lairs deep below the city—and bring catastrophe and woe to the world. Published by Malhavoc Press

A derelict raft drifts into Mulmaster’s harbor carrying a young woman. Delirious with hunger, the only words she seems able to speak so far have been “ash and fire.” The only other clue to her identity is an ornate tattoo. Is the woman insane, or is something nefarious at play?
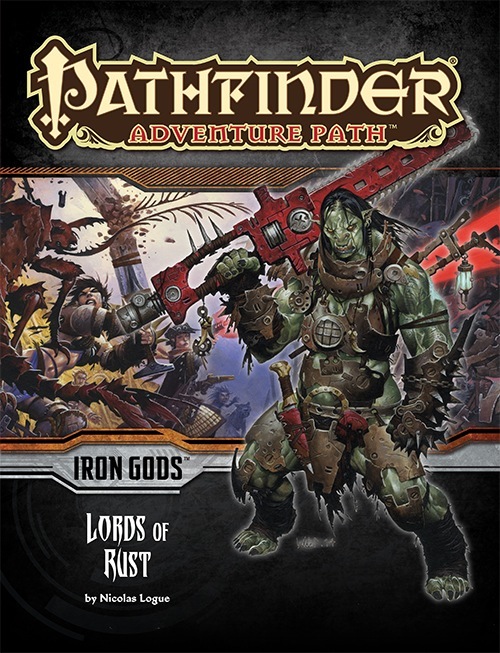
The heroes of the town of Torch follow a trail of clues to the sprawling junkyard known as Scrapwall, where bands of desperate and violent brigands vie for control of the technological remnants found within. The Lords of Rust dominate Scrapwall, and their swiftly rising power threatens more than just the town of Torch, for this gang has the support of one of the terrifying Gods of Numeria. What slumbers fitfully beneath the wreckage of Scrapwall could catapult the Lords of Rust into a new level of power if they're not stopped!

In ages past, the wizard Karavakos made a deal with devils, which resulted in him being trapped in an extradimensional pyramid, unable to escape. His only hope for escape is to lure adventurers into the Pyramid, in hopes that they will destroy his splinters and return his power to him. But his wife Vyrellis, whom he slew in a rage when the Pyramid formed, still lingers in spirit and wants nothing more than to see him laid low... Although set to allow PCs to just fight through each encounter, tips are included for PCs negotiating with the factions trapped in the pyramid.

Legends of a "mountain of gold" provoke a mad scramble for a mysterious book laden with clues to find certain statues around the city, which themselves hold additional clues leading to the hiding place of the fabulous treasure. An adventure for using old-school advanced rules with twists and open-ended problem-solving in a city rife with overt treasure-hunting and covert Byzantine plotting by multiple factions. Published by Coiled Sheets of Lead
A very big problem from a very small source. Pay the toll or feed the troll' seems pretty obvious. Too bad that it isn't. A tricky gnome has used illusions to fleece anyone crossing a bridge, posing as a fearsome troll. To direct more traffic across his bridge, he has also set fire to the Great Bridge downstream. The players find the Great Bridge burned and follow this detour. At the bridge, the players will fight with the illusory troll. After a few rounds, it flees back to the gnome's lair under the bridge, and the players will need to deal with a combination of the gnome and his traps if they investigate. Pgs. 22,23 & 69

A few weeks ago, a neogi flying ship met with misfortune in a furious thunderstorm as it was setting out on a long journey. Heavily damaged, it crashed on an isolated rocky beach. Several neogi and their slaves were killed or injured in the crash, but five of the small monsters survived, along with four umber hulks and a handful of other useful slaves. Under the leadership of the sorcerer Neex Hist, the neogi are working to repair their ship so they can continue their interrupted voyage. In the meantime, they have set up camp in a large sea save close by the site of the shipwreck. While the repairs continue, the neogi and their minions are scouring the area for anything of interest - there's no point in leaving potentially valuable merchandise in the vicinity of the crash site, after all. Pgs. 101-106 Suitable for lvls 6-8 in 5e, using 5e stats.

This module is designed for characters who have made their way through the Freeport Trilogy. Characters new to Freeport are at disadvantadge, however. Hell in Freeport sends the characters to the depths of the Hell as pawns of an undead duke. When they discover the truth of their mission, they must race against a sinister clock to save two cities. Act 1 kicks off with a battle against a cornugon on the Freeport docks. The characters are hailed as heroes for defeating the fiend, and are summoned to the Church of Retribution to help in the battle against Hell. Tee old inquisitor who greets them is actually Jalie Squarefoot, an infernal lich who took this form to search for the perfect cat's-paw. Squarefoot wants to take the souls of Freetown, a city in Hell, but must first get around a contract poin: he can't take the city until the Tyre tower clock-now stopped- strikes midnight. He sends the party to Devil's Cry, an inslan off the coast of Freeport, with instructions to close the gate to Hell hidden inside. In truth, he knows the party will be transported straight to the Third Circle when they try. Inside Devil's Cry the party finds the remnants of a great battle fought between an invading devil's army and the Church of Retribution, and battle their way past undead defenders until they reach the gate itself and unwittingly trigger it. Act 2 begins with the party in a twin of the complex they explored in Devil's Cry, but now they are deep in Hell. They fight their way back to the cavern entrance, only to find that they are not on the Prime anymore. When they voyage back their homeport, they instead find themselves in Freetown, a city of scaped slaves in a dark mirror image of Freeport. Once in Freetown, they make the acquaintance of the city's mayor Wycleffe-a servant of Jalie Squarefoot-who persuades them to go on a quest to Tyre to restart the tower clock. They travel the Styx to the Eight Circle and fight their way into a long-buried vity, and then into the tower clock itself. They restart the clock and begin the trip home, but are waylaid by devils and taken prisioner. Act 3 opens with the party naked and in chains in the infernal prison called the Forge. They learn that Jalie Squarefoot and Wycleffe have duped them, and that the supposed rebels of Freetown are actually its protectors. The characters must escape or win their freedom in the gladiator pits before the tower clock they restarted destroys both Freetown and their home city of Freeport. They battle back to Freetown, taking revenge on their captors in the process, and capture the city from Wycleffe with the help of the rebels. Finally it falls to the PCs to enter the tower clock and stop it and Jalie Squarefoot before the fiend's plan can come to fruition. After being tricked and manipulated throughout the adventure, the party finally has their revenge on the duke and his minions.

“Siege of Bordrin’s Watch” is the sequel to “Rescue at Rivenroar,” continuing the unfolding story of the Scales of War campaign. This adventure features exploration, roleplaying opportunities, and combats in dynamic environments. In this adventure, a new threat looms to the west: A vast horde of orcs and their despicable kin emerge from the barren lands bent on plunder and conquest. While the Elsir Vale and other lands mobilize their meager forces to respond to the danger, a call has gone out to those heroes of the Vale to join forces and help to push back this new evil before it’s too late. Pgs. 4-55

Part 1 of an Expert-level quest into a hostile wilderness. This adventure takes place in the Known World of the D&D game, as outlined throughout the D&D game rule books and modules. The DM may find it useful to consult the Companion and Masters Sets, as well as most of the X-series of Expert Set modules. D&D Expert Set module X9, The Savage Coast, would be especially helpful, as Tortles of the Purple Sage could easily serve and continue that module's direction and plot like, adding a previously undescribed area (the Great Northway) to the Known World. The DM may also place the areas and events of this adventure within an existing campaign setting, as long as the geographical areas of the campaign match those set forth here. Pgs. 40-62