
A small band of centaurs have seen their water source fouled by unknown magic. When word of their plight reaches the party, they embark on a day's travel to the centaur camp. Along the way, they encounter injured wildlife and panicked bugbears. Terrifying storms beset the region, raining down acid and oozes. Agreeing to investigate the small corrupted lake, the adventurers discover a long buried evil has awakened—bringing with it oozing undead. The party must navigate the wilds, face the ooze storms, and confront a reanimated warrior who betrayed her god.

A hobgoblin force is expanding and threatening the land. Confronted with the relentless advance of Azarr Kul’s horde, the characters must undertake vital missions to influence the outcome of the war. Can they shatter the armies of the enemy, or will Azarr Kul’s dreams rain destruction upon the human lands? The adventure is fast-paced and time-sensitive, and requires almost constant movement by the party. WoTC 95385

The Forbidden Book - Caverns of Kehill is easy to implement in any setting and provides tools for real player motivation, interesting NPC interaction, exploration and meaningful combat by context and engaging situations. This adventure can be run in one session. The Forbidden Book is an old demonic artifact, that was destroyed and is manifesting after two hundred years. Cults are practicing rituals all over the world and the heroes will find one of them. It is the story of a group of adventurers, that stand valiantly against the darkness, rescue and old friend and if they succeed, become heroes of the small town of Kehill. Complete and ready to play with dungeon maps, a village map of Kehill and stat blocks directly on the pages. Featuring an additional print friendly version, all hand drawn maps (included additionally as separate files), beautiful artwork and two all new magic items. Published by StLion

Having put down a rising of giants, it was discovered that the motivating force behind their depredations was that of long-forgotten evil - the Dark Elves. Determined to seek out these creatures, a body of doughty adventurers mounted an expedition to learn the strength of the Drow and bring retribution to them (DUNGEON MODULE D1, DESCENT INTO THE DEPTHS OF THE EARTH). This module contains background information, a large-scale referee's map with a matching partial map for players, referee's notes, special exploration and encounter pieces, a large map detailing a temple complex area, encounter and map matrix keys, and an additional section pertaining to a pair of unique new creatures for use with this module and the game as a whole. A complete setting for play of ADVANCED DUNGEONS & DRAGONS is contained herein. This module can be played alone, as the second part of a series of three modules (with DESCENT INTO THE DEPTHS OF THE EARTH, D1, and VAULT OF THE DROW, D3), or as the fourth part of a continuing scenario (DUNGEON MODULES G1, G2, G3, D1, D2, D3, and Q1, QUEEN OF THE DEMONWEB PITS). TSR 9020, From 1978

Written by the setting’s creator, incomparable RPG author Monte Cook, Ptolus: Queen of Lies is an action-packed fantasy adventure painstakingly re-designed for Ptolus: Monte Cook’s City by the Spire. Involving numerous challenging scenarios for characters of 11th level, Queen of Lies is filled with dozens of dark elf personalities, cunningly showcasing their alien culture—a world of merciless betrayal and sinister lusts. Deep below the surface, in the sunless lands of the Netherdeep, creatures of darkness build weapons and amass armies, dreaming of invasion. An attack on a peaceful elven shrine in Emerald Hill sends the heroes on a quest to retrieve stolen artifacts and kidnapped friends. All signs point to the actions of the dark elves of Ul-Drakkan, far below the city of Ptolus. However, even within that ancient fortress, there exists a deeper darkness.... Underground enemies lurk beyond every twisting passage, and strange creatures abound. The foul culture of the dark elves is both decadent and cruel, and the heroes may discover that they’ve stumbled into a web of deceit and treachery spun by the self-styled queen of the dark elves. Can the player characters complete their mission without being discovered, or will they find out, perhaps too late, that their actions been orchestrated all along by the wicked Queen of Lies? Published by Fiery Dragon Productions

Many Cannith creation forges were lost on the Day of Mourning, but a rogue artificer has uncovered one of those that pursued some of the most experimental and dangerous research during the Last War. But while seeking the forbidden knowledge in the forge, this explorer awakened a dark power that was more than she could handle, and that now threatens the region. Pgs. 4-34

For months, the dreams of the people of Emystrell have become dark and terrible. It seems their nightmares have come to life as in recent weeks, people have mysteriously gone missing, vanishing in the night without a trace! Everyone is too paralyzed by their own despair to do anything or venture far from the safety of their homes. Emystrell is on the brink of collapse. The baron is offering a handsome reward to anyone who can show proof of the end of whatever evil curse that has taken hold of their town. This adventure is designed for a party of 3-5 heroic characters from the 2nd to 3rd level. It has elements of mystery and investigation in the first section which can be detailed and highly involved for groups that enjoy the process of searching for clues and solving mysteries or just as easily glossed over for groups that are more tactics focused. The second section of the adventure features the dungeon: a labyrinthine complex of an ancient elven crypt which the thieves guild has used as a base of operations for a decade...until the serpent worshipping cult arrived. The third section of this book is the detailed map and notes on the town and surrounding area of Emystrell. Roleplaying notes are kept light to allow for room for your own interpretations and details to NPCs remain as free to do with as you choose unless I felt inspired and hoped to give you a cool idea. This adventure has hooks for Dungeon Masters interested in a larger campaign involving the sinister plots of the Yuan-Ti (snake people) as well as other interesting adventure hooks (such as the giants in the nearby mountains or the stolen gem: The Eye of the Dragon). These plot points are intentionally left vague for you to fill in the gaps based on what your players seem interested in. You are invited to use this as a launch point adventure to lead your heroes on a larger adventure that might someday set them against an Anathema Serpent demigod, or it may simply be the adventure that begins their journeys and the evil of Yargoth stops here at Emystrell. If your campaign is set in a pre-published setting, this town of Emystrell can be replaced or fit into any campaign with a few tweaks to local gods and names. If you are playing in Dragonlance, you could replace Yargoth the Dread Serpent with Tiamat, or Dendar in Fearun. The local goddess, Tyr, could be the Tyr from the Forgotten Realms or even Norse myth if that is your campaign setting.
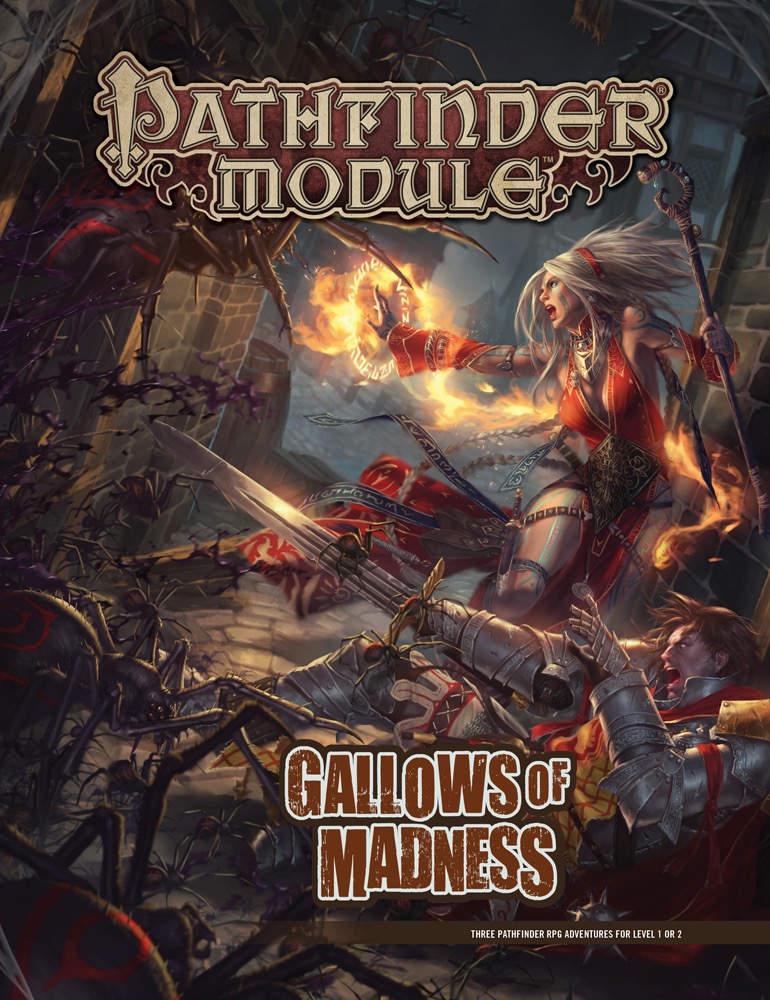
The Abyss Approaches! Something wicked—and monstrous—stirs around the rugged Isgeri town of Saringallow, where the hated legacy of noble Chelish diabolists runs deep. With the recent disappearance of several apprentices, the nearby menace of particularly grotesque goblins, and the unsettling rumors about the old Sarini Estate, Mayor Sandra Trinelli knows that she needs help, and she needs it fast! The heroes must confront one of these crises, or all three, if they hope to stem the tide of darkness that looms. Before too long, the heroes discover that villains with ties to the Abyss have set their sights on Saringallow, and won't rest until the settlement and all its innocent inhabitants fall victim to their madness-inducing predations! Gallows of Madness is a 64-page, highly versatile collection of three adventures for 1st-level characters. Each adventure also includes scaling information for parties of 2nd-level characters. Written with beginning Game Masters and players in mind while also providing challenging content for veterans, these adventures can be prepared quickly and run separately or in any order. For GMs who wish to run a deeper, more narrative game, this volume also offers an overarching timeline of events and detailed tips for running these adventures as a cohesive whole. Bonus content includes new monstrous foes and a gallery of NPCs to help easily connect the adventures, plus a gorgeous double-sided poster featuring an overview of Saringallow and a miniatures-scale battlemap!

The Village of Hommlet has grown up around a crossroads in a woodland. Once far from any important activity, it became embroiled in the struggle between gods and demons when the Temple of Elemental Evil arose but a few leagues away. Luckily of its inhabitants, the Temple and its evil hordes were destroyed a decade ago, but Hommlet still suffers from incursions of bandits and strange monsters. TSR 9026

A silent threat grows in Freeports streets. One of the pirate city's own leaders brings Freeport ever closet to war, lining his pockets eve as he plans for eventual invasion by the foreign power Mazin.

Under the Temple Crypt is the first in a series of site-based, Swords & Wizardry** compatible, “micro modules” that can be dropped into just about any campaign (especially a sandbox-style campaign). No underlying story-hook or rationale for exploring the site is given here. This dungeon assumes that there is a temple somewhere with a mysterious walled-in doorframe in the basement crypt. The walled-in doorframe predates the temple itself and leads to ancient subterranean structures that hint of an older civilization as well as an expansive underworld.

Into the Drachensgrab Mountains! Hot on the trail of the marauding slavers, you and your fellow adventurers plunge deep into hostile hills. Spurred on by your past success, you now seek the heart of the slaver conspiracy. But hurry! Your must move quickly before the slavers recover from your previous forays and attack! This module was originally used for the official Advanced Dungeons & Dragons Tournament at Gen Con XIII and is the third of four in a series of related tournament modules. This module contains a challenging scenario, the tournament scoring system, plus nine pre-rolled, playtested tournament characters. Also included are large scale referee's maps, notes, and background information. A3 is a complete adventure in itself, but it is also a companion to A1 (Slave Pits of the Undercity), A2 (Secret of the Slavers' Stockade), and A4 (In the Dungeons of the Slave Lords). TSR 9041

The battle against the slavers continues! You end your fellow adventurers have defeated the slavers of Highport, but you have learned of the existence of another slaver stronghold, and you have decided to continue the attack. But beware! Only the most fearless of adventurers could challenge the slavers on their own ground, and live to tell of It! Second part of Scourge of the Slavelords (A1-4) TSR 9040

A series of small earthquakes have brought a sense of disquiet to the town of Daern Kelton and Roslof Keep. Against these strange earthly portents, the members of the Ivory Scimitar have claimed their place as a true Mithel Company, but even greater danger now awaits them in the second level of the Dungeon of the Black Fey Mithelvarn. What lost secrets will be revealed as they journey below? What new threats and adventures can be had in Daern Kelton? The town opens its doors to the brave new heroes of the Company of the Ivory Scimitar. Here continues the Roslof Keep Campaign in the pages of ROS2, The Tremors in the Machine. This adventure is formatted to both 1E & 5E gaming rules. Also available in PDF.

To Kill A King Death to King Ovar the tyrant! Life to law and order! Four characters are charged with a mission so insane, so daring, that terming it an assassination does not do it justice. Are the four volunteers who would lay low King Ovar killers or heroes? If murderers, how are they better than the madman theyre assigned to kill? And even if they are mere assassins, are they determined enough to overcome the Maze of Zayene? Snared in the Wizards Web

This couldn’t get worse. The key you are searching for has fallen into the hands of the eye tyrant of Skullport himself. Now you just need to rob Xanathar without getting disintegrated. Part Three of the Skullport Shakedown trilogy. A 2-4 Hour Adventure for Tier 2 Characters. Optimized For: APL 8
Ambushed on the road by goblinoids and then follow them to their lair in an old, abandoned hunting lodge in a forest. This is a short adventure that can be played in a session. The Goblins’ Gambit is perfect for situations where the party suddenly decides to go completely off the rails and the gamemaster does not have anything prepared for the destination. It is designed to be simple and the gamemaster is empowered to read and run it quickly. A 3rd level party is ideal for this adventure, but it can be easily tuned up to 5th level or down to 1st level by adding or removing a few simple enemies. This adventure can be used in three different ways - The starting adventure - This is a great adventure to start a new campaign with. A good option to use for a brand new group of players A random encounter - This is perfect for use for a random encounter along the road A retrieval mission - This adventure can also be used as a low level mission from a patron What is included? The adventure pdf DM's map of two different locations Two high resolution (8192x6144) maps for an abandoned hunting lodge and a roadside encounter (grid and gridless), which can be printed out as a tabletop map to play on.

The characters, members of the Clifftop Adventurers’ Guild, have been tasked with acquiring the Chains of Mur’taal, an artifact tied to Thelanis, by their guild handler, Lhara. This artifact is the latest in a series that Provost Nigel Faurious has commissioned the Clifftop guild to retrieve for him. The adventure starts when the characters arrive in Rhukaan Draal via Orien caravan. They’re given a chance to explore a small portion of the city before they head to a local bar to meet their contact provided by Lhara. Accompanied by a local guide, they make their way to the Seawall Mountains, where they’ll have to follow clues and their intuition to find the Valley of the Hero, which conceals the artifact that they’ve been hired to obtain. In order to earn the artifact, characters must first pass three tests laid before them by the Story: The Test of Courage, the Challenge of Wisdom, and the Trial of Honor. Once they finish the tests and collect the artifact, the party heads back toward Rhukaan Draal. But there are Marguul forces in the area, and they don’t intend to let the heroes escape with a priceless piece of their folklore…

Your party has just spent the better part of the day travelling in dismal weather and you've just located an appropriate place to camp when, out of the drizzle filled sunset, the terrifying screams of a woman can be heard through the patter of rain through the trees. Great! You're cold, miserable, and now you have the moralistic compulsion to investigate and render assistance to a damsel in distress. What you don't realize is that morals and damsels always means more trouble than what you may be willing to pay. Will your party survive long enough to see the dawn through the Screams at Sunset?

Agents for the Mayor of Kleine have discovered the stronghold of the Red Hand goblins deep within the Burning Hills. They have also discovered that the goblins are forming an alliance with local hobgoblin and bugbear tribes to sweep the humans out of Thunder Rift forever. The PCs must reach the lair before the hobgoblin and bugbear agents return to their own tribes. if the envoys do not return, the tribes will assume that the goblins murdered them and attack the goblins instead of the human settlements. In this way, the humans of Thunder Rift gain some unexpected allies against the Red Hand goblins. This is the most dangerous and demanding of the three adventures in this set. It is recommended that you play it after Red Hand Trail and Trouble Below. However, it can stand alone as an adventure in its own right if you wish. Part of TSR 1076 The Goblin's Lair