
The king summons the heroes to investigate the death of a knight, and the final fate of the king's long-missing son. The knight and his entire order was killed by a Dragon! Yay we get to fight a dragon in the first issue of Dungeon Magazine! Much travel over many different terrain types featuring avalanches, volcanoes spewing lava, and many random encounters (not detailed here) before the heroes reach their real goal: A lake with a ruined wizard's tower and dragon's cave. Opens with a particularly byzantine Background section for the DM involving a prince you never meet, pirates you never meet, knights you never meet, and deep gnomes you never meet. See Out of the Ashes in Dungeon #17 for sequel to this adventure. Pgs. 42-60

Retrieve the bones of a dracolich to save the life of a paladin. The epic conclusion of the Mere of Dead Men series. Set in the Mere of Dead Men region of the Forgotten Realms.

Your sleek cloudskate skims across the Skysea. It is midnight. All day long, the glass sea soaked up the scorching desert sunlight. Now, that heat lifts your ship a few inches off the glass and fills its sails. The only sound you hear is the soft swish of the diamond-edged rudder as it cuts a path across the Skysea. One thousand years ago, the wizard Martek knew that you would come to find his Sphere of Power. Now, one of his glowing Star Gems shows you the way. The starlight, reflected in the glass beneath you, flickers peacefully. Suddenly, the Skysea before you bursts up into a thousand shards of splintered glass, showering into the moonlight! A horrible creature is silhouetted against the moon. You strain against the rudder to keep your ship upright. Too late! Your cloudskate tips onto one runner, and then tumbles over, skidding to a stop on the glass. As your companions struggle to right the ship, you turn and face the monster. You must hold the creature back to give them time. Without the ship, none of you can get off the glass before the sun rises in the morning. Martek's prophecy spoke of heroes, tests, and dangers. Are you the heroes? What are the tests? What dangers and riches lie ahead? This adventure can be played by itself, or as the third and final part of the Desert of Desolation series. For character levels 7-9. TSR 9054
The giants are only a half-mile away - straight up. Giants and humanoids that sail down from the heavens? Where could they be coming from? No base town or general area map has been provided, as this adventure can take place anywhere and can be easily integrated into any existing campaign.The DM should make sure that the town in which the PCs start is large enough to provide most anticipated supplies, spells, and services. This module is not a simple hack·and slay expedition. It also involves diplomacy and wit; if the PCs attack everything in sight, they may be destroyed. But the adventure is not entirely negotiation, for it has a good share of hearty dungeon exploration as well. Pgs. 4-23

Welcome to Invidia, where Vistani curses come to their terrible fruition. As a young girl, Gabrielle Aderre was warned by her mother never to have children: "A man, a babe, a home - these things can never be for you, for tragedy will be the only result." Now the witch Gabrielle has disobyed her mother and borne a child, an abomination that could spell doom for Vistani everywhere. Gabrielle has learned too late the truth of her mother's prophesy. The Evil Eye is a series of six scenarios involving the Vistani and their most hated nemesis, the legendary Dukkar. The adventurers uncover the hidden secrets of Karina, the largest town in Invidia and home to the most terrifying festival in Ravenloft. The heroes will arrive to see a town in the throes of Carnival - a time when ghosts and madmen, werewolves and gypsies all mingle under the waxing moon. TSR 9497

The door to the Abyss can be opened with good intentions. An act of mercy released a creature of unspeakable evil. Now, only you have a chance to stop it. A vrock has been trapped inside a stone circle outside the village of Sundown. This stone circle remained untouched for thousands of years, until an unwitting mage decided to depetrify one of the standing stones that he mistakenly thought was a helpless farmer. This released the vrock, who killed the mage and has been trying to regain enough power to plane shift back to its home. This module primarily is based on investigation and problem solving, with a final fight with the vrock at the end. Roleplaying should be emphasized. The town of Sundown is fleshed out with NPCs and stores for player exploration. Pgs. 4-16

Somewhere under a lost and lonely hill of grim and foreboding aspect lies a labyrinthine crypt. It is filled with terrible traps and not a few strange and ferocious monsters to slay the unwary. It is filled with rich treasures both precious and magical, but in addition to the aforementioned guardians, there is said to be a demilich who still wards his final haunt (Be warned that tales told have it that this being possesses powers which make him nearly undefeatable). Accounts relate that it is quite unlikely that any adventurers will ever find the chamber where the demilich Acererak lingers, for the passages and rooms of the Tomb are fraught with terrible traps, poison gases, and magical protections. Furthermore, the demi-lich has so well hidden his lair, that even those who avoid the pitfalls will not be likely to locale their true goal. In the far reaches of the world, under a lost and lonely hill, lies the sinister TOMB OF HORRORS. This Labyrinthine crypt is filled with terrible traps, strange and ferocious monsters, rich and magical treasures, and somewhere within rests the evil Demi-Lich. TSR 9022
With the Heart of Light secured, the adventurers now pursue the Ebon Stone, hidden in a remote keep. Part 2 of 2. Part 1 titled The Heart of Light. Pgs. 43-52

Lots of stronghold assaults and shipboard travel/encounters in this one. This adventure's deep political basis might be seen as an introduction for the domain-focused adventures of Companion-level play. This adventure is for use with the Dungeons & Dragons Basic, Expert, and Companion Rules, and includes the intrigue of engaging with nobility's lands and agendas. Intro: All is not well in the kingdom of Vestland. Not only is the king dead and the holy Sonora Crown missing, but the heir to the kingdom was lost at birth and no on knows where to find him. As if this wasn't bad enough, the forces of the Ethengar Khanate, never on the best of terms with Vestland, are now massing on the borders, hoping to take advantage of Vestland's plight. To complete the rosy picture, traitors from within also threaten to speed the downfall of the High Kingdom. Sounds like a job for you. You must find the long-lost heir to the kingdom and recover the Sonora Crown, the mystical device without which a king cannot be crowned. Standing in your way are traitors and spies from within and invaders from without the kingdom of Vestland. Time is running out! Can you save Vestland from disaster? TSR 9218

X11 Saga of the Shadow Lord consists of two linked adventures as a mini-campaign: In the first adventure called Elvenstar, PCs try to steal a magic item from the Shadow Lord to thwart his planned invasion of a peaceful neighboring kingdom. Encounters in this adventure include a village populated by adventurers, and a cloud giant living in a small castle, before the party reaches the Shadow Lord's lair for the final encounter. In the second adventure, also enclosed in module X11, The Halls of Drax Tallen, the Shadow Lord returns more powerful than ever. His undead minions are searching for another magical item to give him immense power and the PCs must find this item before he does. Player characters must get past the undead army of the Shadow Lord and infiltrate his haunted fortress to retrieve the magical Elvenstar. TSR 9165
A search for the ghostly dragon of the Deadwaters. The sage's deal is simple: The more you learn about the dragon, the richer you get. In this adventure, the bard Rondelle offers players rewards for learning all they can about a mysterious dragon that has been sighted in the area. Pgs. 22-38
It's only a flesh wound. This roadkill isn't as harmless as it looks. Reports abound of brigands and hobgoblins attacking travelers in the area. Though there were brigands, the attacks are the work of a Thoul (magical combination of a hobgoblin, ghoul, and troll). The Thoul is playing dead in the road to attract prey. It has been doing this successfully for a number of days now with the help of its mate, a second Thoul hiding nearby. The PCs must defeat the Thouls to keep the road safe for travelers between the local towns. Pgs. 26-27
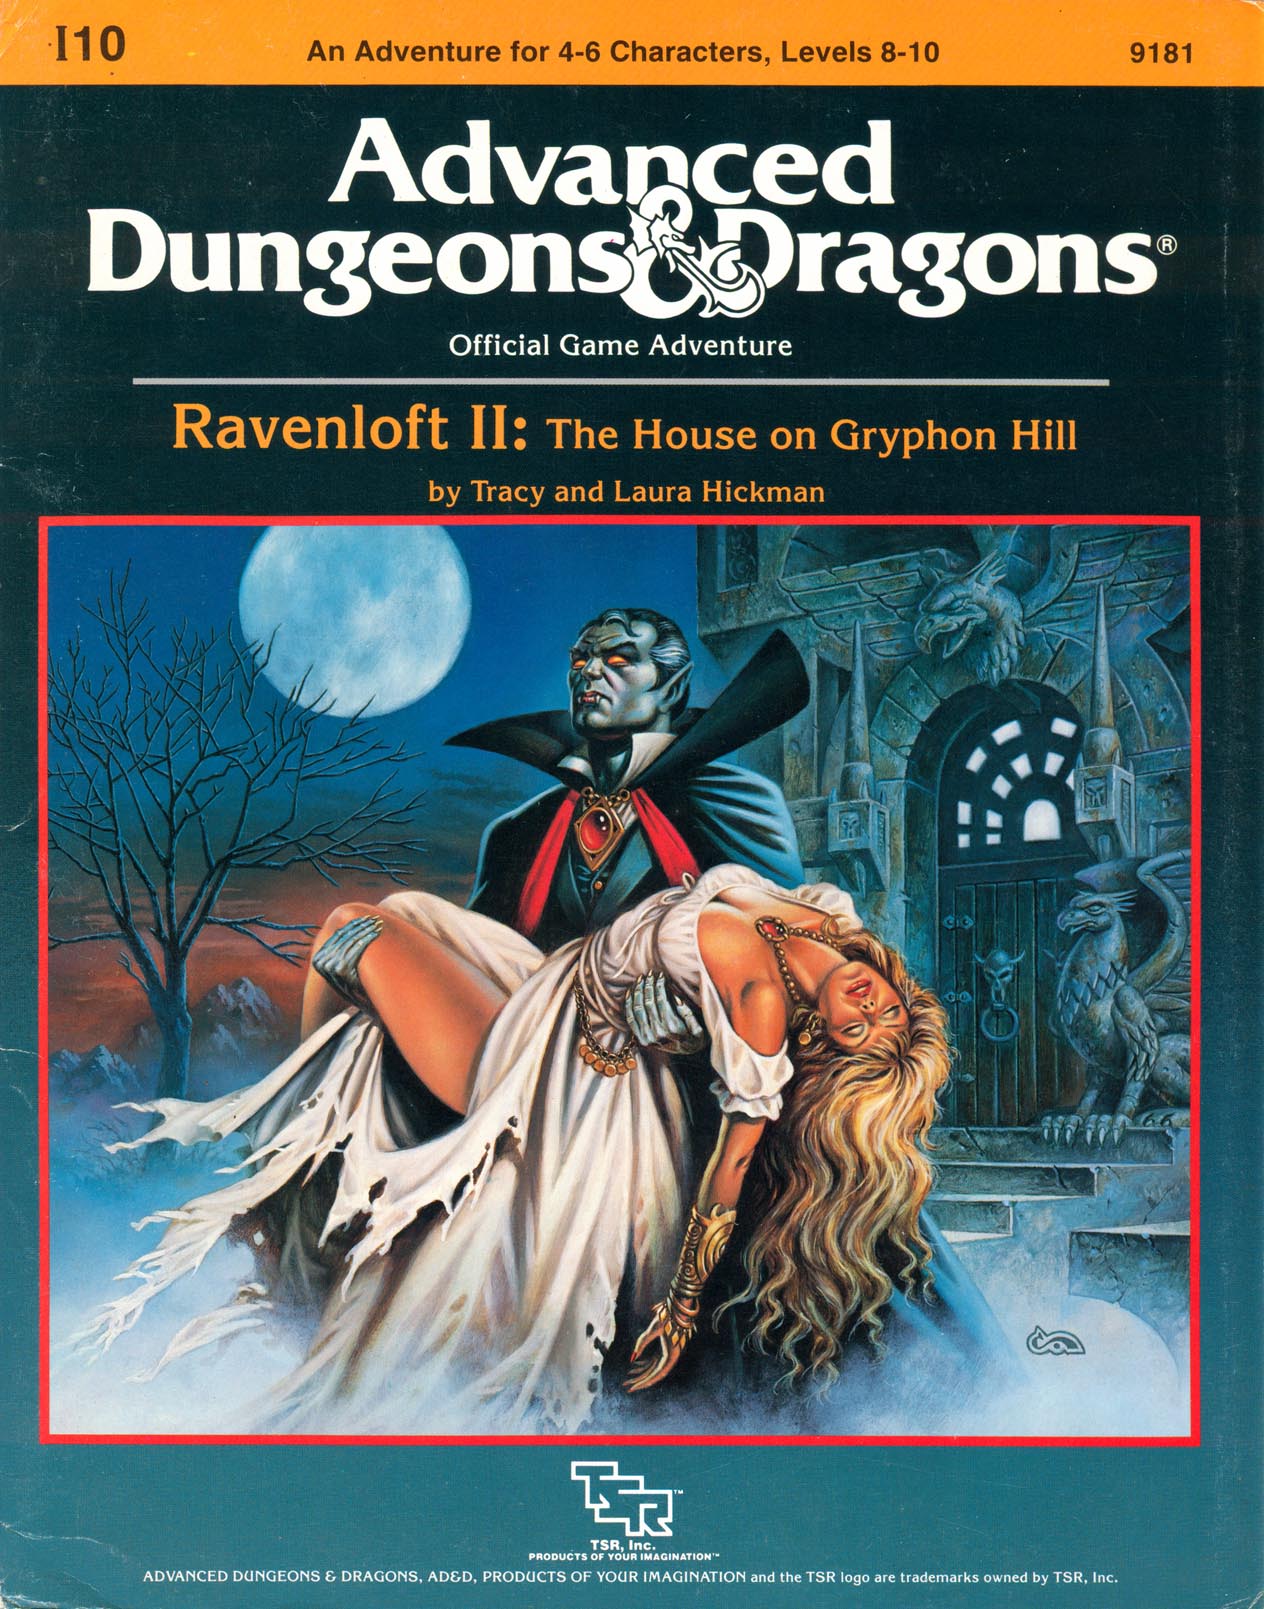
"I AM THE ANCIENT ... I AM THE LAND ..." Your screams still echo in your room. Cold sweat soaks the bedsheets and trickles down your back. It seemed so real! The great towers of a darksome place called Ravenloft ... it's misty vales and the terrible tragedy of a man who had sold his soul to unlife. Now the sunlight streams through the window with the promise of a new day. The dread nightmare at last is over. In the cold sunlight of a dying autumn, you step from your room at the inn and stroll along the friendly streets of Mordentshire. But, from the back of your mind the dream creeps forward to haunt you. Why do the faces of those who have befriended you now seem those of strangers? Why do those who called you here in terror, now seem to dismiss your task as a folly? More .. why are you advised so strongly, to forget about the House on Gryphon Hill ... the domain of the fair haired Count Von Zarovich, a name that cries out from your dark nightmare? You halt, as the swirl of events grow more confusing with every passing minute. Which is the dream ... and which the reality? TSR 9181

"The adventure begins shortly after the PCs arrive in the village of Whitebirch, located just one mile outside Bunglewood, a thick forest. Unless the adventurers prefer to camp by the side of the road, the only rooms in town are available at The Swanmay's Song, a local inn. Shortly after nightfall, a wounded traveler staggers into the inn." -- from the module. Includes overland map, ambush site map, and cave system map.

For thousands of years a great and terrible secret has lain hidden in the depths of the Sea of Silt. In the heart of this vast dust basin, an endless storm of ash and shrieking wind guards the deadliest concentration of evil and power found on the dying world of Athas - The Valley of Dust and Fire Valley of Dust and Fire more than doubles the known portions of the world of Athas. Intrepid explorers will discover new wonders and perils within the deadly Sea of Silt, from the beautiful island of Shault to the savage Mountains of the Sun. New rules for traveling the dust basin and surviving its many dangers are included. With luck and determination, a skillful and well-prepared party just might pass through the Great Ash Storm and enter the Valley of Silt and Fire. But this realm of shattered badlands and awful monsters is so deadly that only one man has ever reached the valley and returned to tell the tale. TSR 2413

A simple trip from Urik to Raam: What could be easier? But unexpected encounters and freakish sandstorms conspire to make this journey more dangerous than imagined. Lost and dying of thirst, your characters unwittingly involve themselves in a strange mission-the motivation behind which lies hidden. On the adventurers' trail are enraged dragons, desert fiends, and a curse that threatens to drive them mad-or make them one of the walking dead. Their only hope is to enter the ancient ruins of Yaramuke, site of a great battle between sorcerer-kings of ages past. Yaramuke?City of Black Waters. The very name curdles blood. Designed for four to six characters of 3rd to 6th level, Black Flames is set in and around the remains of Yaramuke and the cities of Urik and Raam. Let your Dark Sun game characters experience new adventure among the ancient ruins of Yaramuke! TSR 2417

A combination wilderness/dungeon module, first searching for then exploring the temple of Tharizdun. Tharizdun is long gone from the place, so there's no epic final fight. Rather, a mysterious Black Cyst waits at the bottom of the dungeon. The encounter with it is almost scripted, having no hazard except for careless/foolish players. Contains several monsters from the Fiend Folio. Loosely follows Lost Caverns of Tsojcanth. TSR 9065
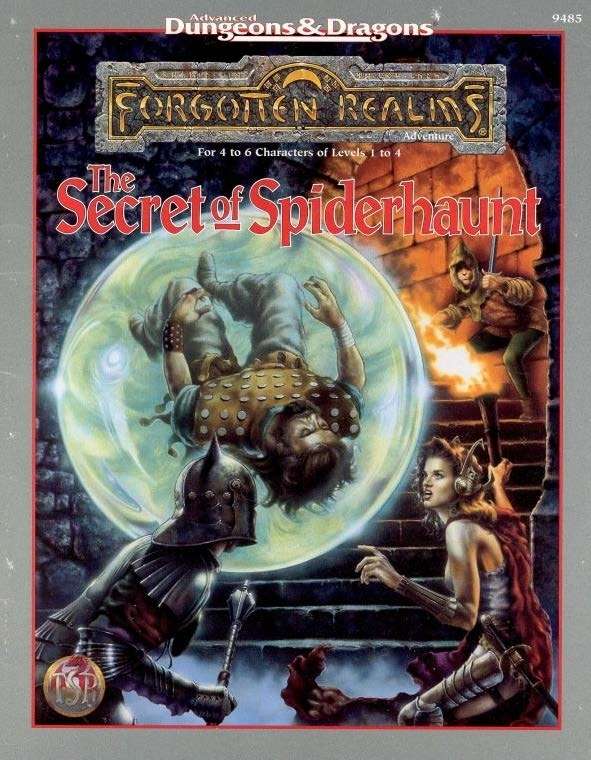
The infamous Sword of the Dales has always held a certain fascination in the eyes and hearts of the citizens of the Dalelands. Thus, it was no surprise when Randal Morn, rebel leader of Daggerdale, led an expedition into the crypt of a long-dead wizard to recover the weapon. Shaevyn the weapons-mage had created the Sword long ago, and it stood to reason that the blade would be waiting within his tomb. Perhaps the Sword of the Dales woulld allow Randal Morn to rule Daggerdale once again. But Randal Morn never returned from that fated party. Only tales of terror told by a lone survivor held any clues as to Randal's fate. A brave hand of heroes accomplished what Randal Morn's group failed to do in part one of this adventure trilogy, "The Sword of the Dales." Battling through the tomb's undead inhabitants, those heroes reached the burial crypt of Shraevyn. There, resting in the center of the coffin, was the Sword of the Dales, its azure glow filling the chamber. However, there was no sign of Randal Morn. Only a note signed by his hand held any clue as to his fate. "Seek me in Spiderhaunt," it proclaimed. "The fate of Daggerdale is in your hands." This is the second part of a trilogy of modules that began with "The Sword of the Dales." The saga concludes with "The Return of Randal Morn." TSR 9485
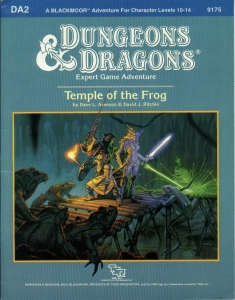
Green Death... That's what old hands call the Great Dismal Swamp. For centuries, this tangled maze of sluggish watercourses, stagnant ponds, and festering marshes has defended Blackmoor's southwestern frontier. Large armies and smaller parties have disappeared altogether inside its vast, dripping, claustrophobic corridors. Among those who have dropped from sigh in this arboral hell is young Rissa Aleford, one of Blackmoor's most important leaders. Carried off to the sinister City of the Fron, she is now being held by the eccentric Monks of the Swamp. By making the baroness captive, the deranged monks have serioulsy weakened Blackmoor at a time when enemies already threaten it from all sides. Yet, even as the Froggies gloat, the king of Blackmoor dispatches a small band of bold adventures to the rescue. Deep into the Great Dismal Swamp they must go - far from sunlight and sanity - there to seek and save the swamp, there to find the Temple of the Frog. TSR 9175

THE NEXT MARCH WASN'T DUE FOR ANOTHER 189 YEARS. TRY TELLING THAT TO THE MODRONS! On a regular schedule, the Great Modron March spills out of Mechanus, and the lawful automatons files their way around the Great Ring. No one knows why they do it, but everyone stays out of their way - because when the modrons march, they'll walk right over a berk who doesn't know enough to move aside. But this March has started decades before it was supposed to begin, and that's even more of a mystery. Caught unprepared, the planes shudder under the modrons' collective footsteps - and even the modrons themselves seem a little out of sorts. The Great Modron March anthology features 11 adventures for characters ranging from 1st to 10th level, as well as new information about the modrons of Mechanus. Each adventure can be played separely or linked together to form an extended campaign. The modron procession touches every Outer Plane in turn - and it isn't always welcome. On their unswerving path, the clockwork creatures will destroy celestial towns, be attacked by evil knights intent on using modron parts in foul experiments, and lead characters onto the deadly plains of the Abyss and into the famous prime-material labyrinth of Undermountain. Without help, they'll be lost in the swirling chaos of Limbo or even fail to complete the March entirely. And along their route, every blood on the planes seeks the answer to the most important question: Why have the Modrons abandoned their normal, lawful schedule to march years before they're due? TSR 2628