
Who could know what is hidden within the secluded mansion of the crazed mage? Well, now, when nobody has seen him here for more than a year, it’s the best time to find out! A 4-hour adventure for two 1st–2nd level characters. Small Party Adventure: Though the party size of 3–5 characters is considered optimal in D&D, there are times when you can only gather one or two players at most. This adventure is designed exactly for such occasions.

Hidden deep within The Reaching Woods is a swamp grotto known to the locals of Hardbuckler as Whiskaway Wood. The townsfolk know to keep their distance from this place as few make it back. If they do, they come bearing toxic diseases that place the entire town in jeopardy. This is the situation the town is dealing with when the adventurers come knocking on the outer gates of Hardbuckler. In this adventure, the party must go forth into the swamp in search of Rotwood Maggie, a hag priestess of Talona who calls Whiskaway Wood her home. She possesses information on how the adventurers may go about saving the town, but her secrets don’t come cheap. In addition, some of the information she possesses may leave the adventurers questioning whether the town deserves to be saved at all. Features a disorienting swamp dungeon bolstered by several new magic items, creatures and diseases! Be sure to check out the full preview of the adventure when you visit the page!

It all begins with a simple request (doesn’t it always?) from an old farmer. The request – protect his cattle herd from vicious wolves. Simple enough for the brave adventurers, right? But it doesn’t stay that way. Not at all. Soon, the adventuring party will find themselves in the thick of it as they solve puzzles, avoid traps, fight for their lives, and endure witty taunting. And in the end, they discover an artifact that may, or may not, be useful to them. This adventure includes a cursed shield, a new undead creature, and a new artifact. Total party experience earned is approximately 14,500.

Our heroes are approached by Tristan Harpell, an entitled young mage and heir to a suite of rooms in Ivy Mansion, the ancestral home of the Harpell wizard dynasty. His inheritance is “infested” with the wacky experiments of his dead great-uncle, Siegfried Harpell, and Tristan needs the party to clean things up. The party will have many wild and bizarre encounters while digging through Siegfried Harpell’s derelict magical concoctions - and along the way they might even discover the astonishing truth behind Siegfried's disappearance! Into Ivy Mansion is a Dungeons and Dragons one-shot adventure for a 3rd-4th level party. It features exploration, role-playing and thrilling combat encounters...

Hundreds of years have passed since the great war of Valhalla, but the repercussions are known throughout the lands. The Valkyries were once Odin’s greatest warriors who ferried the dead to the eternal resting place of Valhalla. Odin tells it that their duties asked too much of them and their minds were corrupted. In fits of uncontrollable rage and anguish, they began to slaughter the warriors they once protected. Only four Valkyries survived the war; in their cowardice, they fled to Midgard and hid amongst the mortals. You have been tasked with finding the last Valkyrie and destroying her, once and for all ending the Madness of the Valkyries. But there may be more to learn in the once-great halls.
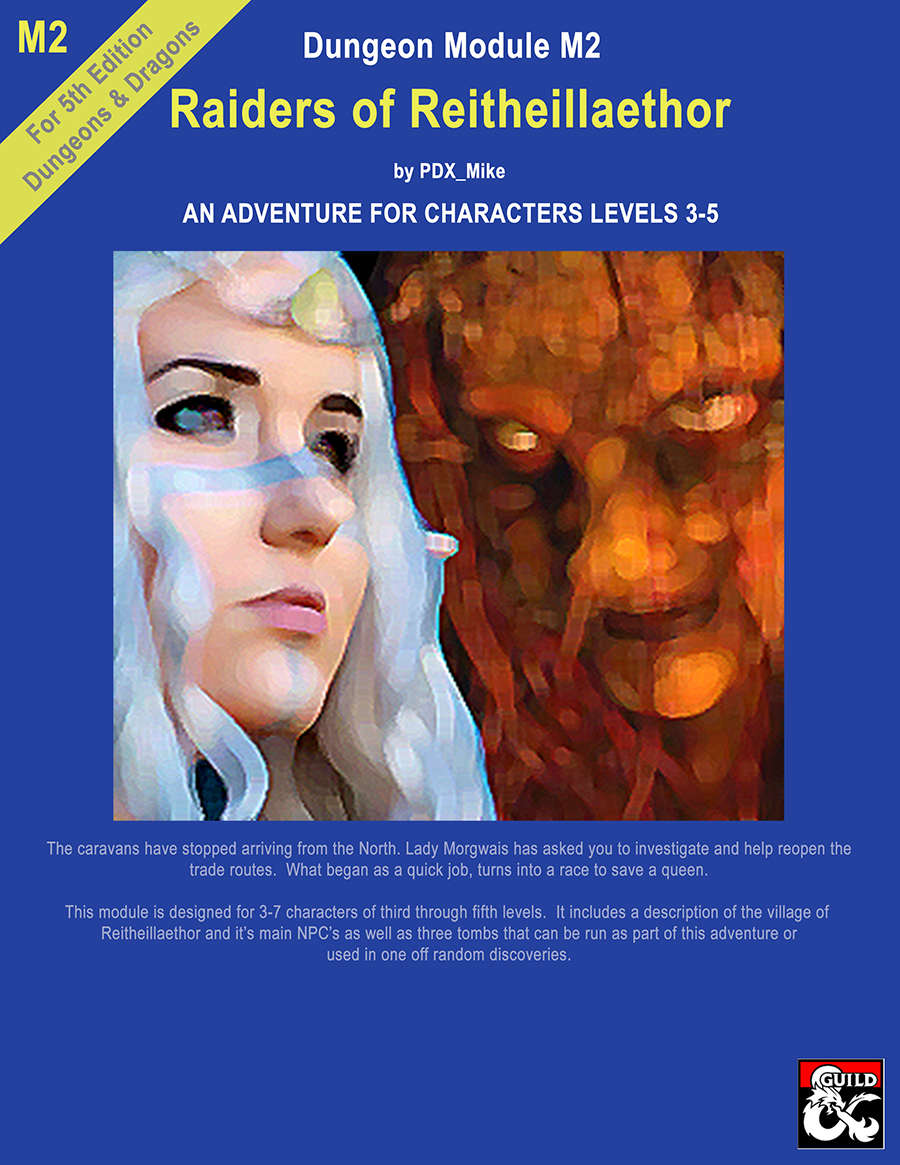
This is the second of the "High Forest Factbook" adventures series. The caravans have stopped arriving from the North. Lady Morgwais has asked you to investigate and help reopen the trade routes. What begins as a quick job turns into a race to save a queen. This module includes a detailed description of the Elven village of Reitheillaethor including it's NPCs. It can be run either as a continuation of the adventure started in "Menace of Merric", as an extended stand alone adventure or the three individual tombs included in it can be run as short one-off adventures.

Not every journey follows a simple road, and some groups find themselves needing to take the path entirely untraveled to reach their next destination. There are rumors of a treasure deep within the forest, but no one has made it out alive to recount their tales. Compelled by the prospect of a quick journey and the chance of treasure, the party decides to risk a journey through the forest. Little do they know that their chosen route is ruled by a trio of lilitu, who are eager to play with the new toys walking willingly into their grasp. Wits, wiles, and wind hide in the forest, and the lilitu are eager for amusement. This adventure is intended for 5th level characters but can be scaled up or down. It is setting-neutral, and can fit into any published or homebrew location. This is intended as a puzzle-based adventure but could be used as a combat encounter. Pgs. 129-135
Can you navigate fairy-tale intrigues among fey and living nightmares without getting trapped in the tale? Fight your dreams in the twelfth adventure of the Across Eberron: Convergence Manifesto adventure path with this adventure for 7th level characters. Written for use with either Eberron: Rising from the Last War or the Wayfinder's Guide to Eberron by Keith Baker. Adventure Summary: Using his recently acquired Aethervane, Provost Faurious locates the only connection between the material plane and Dal Quor, a feyspire called Taer Lian Doresh that exists simultaneously in both planes. The player characters are sent to retrieve a powerful artifact, the Mind’s Eye, the petrified eye of a kalaraq quori. As the party enters the feyspire and negotiates with its eladrin lord, what are they willing to give up in return? Negotiations unveil a far deeper story, centered around the machinations of the Inspired of Riedra and the kalashtar they persecute. Can the characters navigate the shifting stories of nightmares and dream-touched fey for possession of the Mind’s Eye?

Azaketh, a sly and industrious devil, prepares his revenge against his bitter enemy Zirkex. Naturally, the mortals affected by his schemes are mere pawns to further his goals. It is up to the heroes to stop Azaketh in his tracks before he takes control of a powerful weapon – Logrimm’s Tower Golem. The Tower Golem is an adventure designed for 3-7 2nd to 4th level characters and is optimized for five characters with an average party level (APL) of 3. It's the second and final chapter of the saga about Logrimm’s Tower Golem. The first chapter The Soulmonger isn't necessary to play The Tower Golem but it sets up the villian Azaketh and introduces NPCs that can help the characters conquer the Tower. The focus of The Tower Golem is set on roleplaying and interesting fights. In theory, the Tower is an infinite web of rooms and portals that the characters may never escape. However, eventually, the characters reach the end for one final encounter. You can change, interweave, or exchange the different parts as you see fit. There are several proposals and fully fleshed out levels in this document, but you may add your own adventures to the list!

The door slams open so hard that the wall shakes and the hinges groan. To everyone’s astonishment, a goblin staggers in. He is badly wounded, with dried blood covering about half of his body. Only a moment before the air was full of the rattle of dice, the slap of cards, and cries of victory and defeat. Now the Gambling Golem is dead silent. The goblin lurches toward your table then collapses right in front of you. “Help me,” he croaks, looking up at you with bloodshot eyes. “I’ll make you rich!”

The Case of the Kidnapped Cartographer A dear friend of the party has gone missing; Boddyknock the gnome cartographer, supplier of maps and charting equipment. Can the party solve the mystery of his disappearance? Do they have the bravery to delve deep to recover their lost ally? What horrors will they uncover in the cavernous expanse beneath their feet?

The Director of the precognitive mages puts out a call to the Guilds for assistance in investigating a new threat which would disrupt an upcoming annual celebration along the Transguild Promenade in Precinct Four and cause the deaths of many Ravnican citizens. The Adventurers must find the evidence pointing to the perpetrators and stop the oncoming riot during the celebration in 24hrs. This is a One shot adventure for a group of four, at 3rd level. It could possibly be the first of many other adventures you might run in Ravnica!

𝐓𝐡𝐞 𝐬𝐞𝐜𝐨𝐧𝐝 𝐚𝐝𝐯𝐞𝐧𝐭𝐮𝐫𝐞 𝐢𝐧 𝐭𝐡𝐞 𝐔𝐩𝐫𝐢𝐬𝐢𝐧𝐠 𝐒𝐚𝐠𝐚. An orcish emissary is travelling the lands south of the dwarven stronghold of Nirzumbil, attempting to keep the tribes in line and focused upon harassing the dwarves. If the PCs can defeat the emissary before he can complete his rounds, they might be able to splinter a part of the orcish alliance. A sandbox-style adventure for a party of 4th level player characters. Includes 5th edition writeups of the giant stag beetle and the krenshar.

While exploring for hints of the Kobolds lair, an unexpected plea changes everything. This is the fourth and final adventure in a miniseries with the following adventures being: A Chance Encounter The Mystic Circle An Urgent Rescue In addition to the adventure, there are a few of maps of the adventure area as separate jpeg files. There is also a printer friendly version of the adventure.
The increasingly erratic behavior of Lady Selyse, Knight Captain of the small, but strongly held frontier outpost Fort Selsmire, is provoking unrest among her soldiers and fear from passing supply caravans. Many whisper of how the Captain now goes without sleep for days at a time, pacing the walls of the keep long into the night. Despite these rumors, the party has found employment at Fort Selsmire, conducting additional patrols of the nearby forests. While patrolling, they find evidence that may lead to the strange creature who seems to be provoking the Captain to madness. Pgs. 69-73

This adventure is written with the intent that it takes place in the subterranean world called the Underdark in the world of Forgotten Realms, although it may be placed in other settings. Within the Underdark, Cyrog's lair can be placed anywhere though it is stated to be thousands of miles east of Gravenhollow. If you are running Out of the Abyss, you may want to have your players see the vision Cyrog Lives! Hail Orcus! (OOTA, 158). Additionally, it is recommended that this adventure be used for a party of 4 to 6 players, level 9 to 12. While merely hinted at through visions in Out of the Abyss, Orcus is roaming the Underdark unchallenged with an army of mind flayers at his disposal. Cyrog, the elder brain of a mind flayer colony in the Underdark has died. The demon lord Orcus has reanimated and taken control of it. The hive of mind flayers is now bent to Orcus's will through Cyrog as he strives to make all life in the multiverse into a vast undead horde under his control. The adventurers are contacted by a patron who gives them a special item (such as brain worms) to suppress their brain waves and make it possible to infiltrate the Cyrog's Lair without immediate detection. The adventurers must defeat or otherwise subdue mind flayers and a few guards, override the elder brain's mechanical defense system, and slay Cyrog.
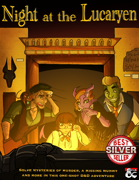
An exclusive party at an illustrious antiquities museum. A missing benefactor and host who turns up dead. A missing mummy, the crown jewel of a new exhibit, and a hardboiled detective trying to make sense of it all. And a party of adventurers caught right in the middle! Welcome to the Lucaryen Museum of Antiquities, enjoy your visit. We recommend for your safety not to wander the halls at night; some of our exhibits have a habit of coming alive and attacking the unwary. Not to mention other guests who may have something damming to hide, and a loose set of morals. Don’t worry - I’m sure you’ll be fine! In this pulp thriller mystery one-shot, your players will be thrust into the role of Occult Detectives, investigating the murder of the museum’s namesake and searching the premises by night to uncover clues and the whereabouts of a missing mummy. Inspired by films such as Night at the Museum, The Mummy, and classic ‘Whodunnit’ murder mystery tales, your players are sure to have a killer time! Featuring: 15 pages of content, comprising 4-8 hours of play A full-scale, two story museum for your players to explore Shady NPC suspects and unlikely allies, complete with unique stat blocks Myriad potential encounters and one epic final Boss Fight, with 46 unique creatures from the Monster Manual, Volo’s Guide to Monsters, and Mordenkainen’s Tome of Foes Helpful tips for newer DMs

This heist adventure that takes place almost entirely at Fort Bones. It is split into five scenes: Karrnathi Opening. The characters meet Vedim ir’Durna, a noble from the region who is willing to help the player characters infiltrate the Fort. Guild Handler Lhara introduces their prize: a necromantic artifact called the Queen of Night, tied to the plane of Mabar. Valenar Gambit. Whether by wit or stealth, the characters find their way inside the walls of Fort Bones. They might use the incoming Valenar attack as a distraction, find a secret entrance, or plant themselves on a visiting dignitary’s staff. Castling. Safely inside, the characters must figure out when the artifact is unguarded, and find their way into the castle’s inner sanctum. Check. The characters must navigate their way past a magical vault door, then descend into the crypts. The Queen of Night is guarded by a terrifying construct. Endgame. With the artifact in their hands, will the characters be able to escape with their lives?

Mystery in the Moonsea! Disappearing shipments, missing alchemists—and proven musical acts whose rehearsals sound terrible! Instead of showing off Thentia to potential trading partners and giving the locals something to celebrate, the pall over this year’s Magic and Gold Festival threatens to drive business to Melvaunt and give the locals a reason to riot. Combat optional but possible. Role-playing opportunities abound.

The characters, members of the Clifftop Adventurers’ Guild, have been tasked with acquiring the Chains of Mur’taal, an artifact tied to Thelanis, by their guild handler, Lhara. This artifact is the latest in a series that Provost Nigel Faurious has commissioned the Clifftop guild to retrieve for him. The adventure starts when the characters arrive in Rhukaan Draal via Orien caravan. They’re given a chance to explore a small portion of the city before they head to a local bar to meet their contact provided by Lhara. Accompanied by a local guide, they make their way to the Seawall Mountains, where they’ll have to follow clues and their intuition to find the Valley of the Hero, which conceals the artifact that they’ve been hired to obtain. In order to earn the artifact, characters must first pass three tests laid before them by the Story: The Test of Courage, the Challenge of Wisdom, and the Trial of Honor. Once they finish the tests and collect the artifact, the party heads back toward Rhukaan Draal. But there are Marguul forces in the area, and they don’t intend to let the heroes escape with a priceless piece of their folklore…