
Beneath the blood moon, a dark monastery appears for one night atop a high plateau. Inside its walls, the mighty black lotus flower reaches its full bloom. Can the characters steal inside the monastery, defeat its sorcerous guardians, and claim the blossom before the sun rises? Monastery of the Shadow Sorcerers is a fiendish sword-and-sorcery adventure and includes: -An extra-planar monastery brooding beneath the blood moon -Sorcerer-monks who move like smoke and strike with fire and blade -Combat cards for each monster, PC, and special treasure -High-quality digital maps for use with virtual table tops
Can you stop the haunting before tea? The ghosts of two warring wizards are trapped in the basement of the house. It is up to the party to end this old feud. Pgs. 68-70

In this level 3 adventure, the heroes face off against a band of orcs who live on islands in a pool of their orc god's blood. Warpath of Gruumsh is part 2 of the Litany of Arrows adventure path, following up on the platinum-selling Castle of Corellon adventure. This can very easily be run as a standalone adventure. Warpath of Gruumsh contains three versions of each full-color map (untagged, player's map and DM's Map), original artwork, one page of new magic items, and full entries on 6 new monsters, including mithral dragons and blood moon harpies.

The End of the World Is at Hand! A hideous death cult has seized control of an ancient artifact-monument known as Tovag Baragu. The power behind the cult is the Old One himself, Iuz the Evil, demonic master of an empire. He's on an all-or-nothing quest for supremacy over the world—and the heavens beyond. To stop him, heroes must face horrors never dreamed of, journeying to a shadowed city where Death rules and the living cower. Here, Iuz will achieve his mad dream by destroying the imprisoned master of that alien citadel: Vecna, the mightiest lich, an immortal demigod. Two items exist with the power to stop Iuz—the Eye and the Hand of Vecna—but using them carries fantastic risks. Not even the gods know what will be unleashed when these items are fully activated. Die Vecna Die! takes the heroes from the Greyhawk campaign to the demiplane of Ravenloft and then to the Planescape city of Sigil. However, none of the material from those settings is required for play. TSR 11662

With your last adventure complete you head to town to sell off loot, replenish supplies and to find a bard to tell your tale to so that your fame can increase. As the group goes their separate ways you are wandering through the muddy streets when a shriek is heard. You see a man stab a merchant and attempt to escape. With no time to gather your associates you call for your mount (or borrow one) and give pursuit! This scenario is a true solo meaning you don’t need a DM to officiate. It is suggested that a 4th level be used for “meatier” characters or 5th for those of less daunting stats.

Escape from Elturel is a 6-8 hour Dungeons & Dragons adventure for characters of levels 1-2, for use as an introduction to Baldur's Gate: Descent into Avernus. Pilgrims and travelers flock to the holy city of Elturel to bask in the light of its second sun. But when the Companion starts to malfunction, the characters must escape the doomed city before it is pulled down to the Nine Hells. In the aftermath, a caravan of refugees needs their help to find a safe haven in that notorious hive of scum and villainy, Baldur's Gate! The adventure has everything you need to start a new campaign in Elturel, including: - a new adventure hook for Descent into Avernus - short introductory encounters set during and after the fall of Elturel - a skill challenge for escaping Elturel as it is pulled down to Avernus - resources, encounters, travel activities, and NPCs for a caravan to Baldur's Gate - notes for transitioning into Descent into Avernus - two creature and NPC stat blocks - a map pack with two maps by Dyson Logos Escape from Elturel also includes suggestions for combining this adventure with Burial in Baldur's Gate if you want to run a mixed party of characters from Elturel and Baldur's Gate.

Auction fever can empty anyone's pouch of coins. An Arch-Mage is retiring and selling his possessions - and you're at the auction! Pgs. 19-23

During a summer drought, Mulmaster is threatened by a series of arson attacks. As the populace riots, accusations fly blaming Thayans, residents of the ghettos, rowdy sailors, the refugees from Phlan and dozens of others. Can you solve the mystery before the city burns?

After a drow girl goes missing, characters must delve into the depths of the Underdark to bring her back. As they journey through the dark, characters discover not all monsters are monstrous and webs are capable of restraining all manner of creatures; in fact, they can capture magic itself.

A Little Bit of Thievery is an unconventional freeform adventure for level 1 characters. The players are contracted to steal a magic item at a noble's fancy party, and are forced to abandon their weapons and rely on their wits to survive. Mayhem required and violence (mostly) optional. Success might bring the ire of an elite with a panache for vengeance and money to burn. Beats killing giant rats in the safety of a basement for a few silver pieces, right? Although it is specifically written for the 5th edition’s basic rules, the adventure can be dropped into any rules system or campaign with minimal modification. (Pay What You Want)

Centuries ago, the priest-king Kyuss sacrificed his nation to fuel his lust for divinity. He left legions of the hungry dead in his wake, along with a ruined city that now hides the truth behind the coming apocalypse. A man became a god in this worm-eaten city, and the secrets hidden there may hold the key to his defeat. "The Spire of Long Shadows" is the seventh installment of the Age of Worms Adventure Path, a complete campaign consisting of 12 adventures, several "Backdrop" articles to help Dungeon masters run the series, and a handful of poster maps of key locations. For additional aid in running this campaign, check out Dragon's monthly "Worm Food" articles, a series that provides additional materials to help players survive this campaign. Issue #339 of Dragon presents a magical pool owned by Manzorian that can give the PCs just the edge they need to survive what awaits them in the "Spire of Long Shadows." Pgs. 59-89

For the past several nights, drums have been heard on the wind, coming from the Twilight Marsh. Each morning, more turn up missing from the nearby farms, leaving only muddy, clawed foot prints heading towards the marsh. Can you help find the lost and bring justice to the abductors?

Greetings! I've created a sea-themed supplement that you might find uuseful: Encounters on the Savage Seas is a 100-page supplement containing mini-adventures, NPCs, new ships, locations, and magic items. In all, the writers have produced 19 unique encounters, NPCs, and locations for you to add to any nautical campaign. We’ve even included scaling suggestions so they can be used with different party levels. •Visit the township of Badu - the village riding on the back of a gigantic dragon turtle •Encounter space pirates •Interact with goblin pirates commanding strange water vehicles •Roleplay with Loan Sharks •Endure the Fog of Horrors •and so much more.... You can view the 30-page preview by clicking this link:https://www.dmsguild.com/product/270757/Encounters-on-the-Savage-Seas Also, go grab my FREE playable race: Otterfolk: https://www.dmsguild.com/product/267692/Otterfolk I hope you enjoy the content if you pick it up!

Shall you claim the glory of heroes, or accept your doom? You have raised the ire of the goblin warlord, and now you flee his kingdom with war parties hot on your trail. You must reach the borderland town of Felsentheim, for if you do not, no alarm will sound to hearken the coming of the Dogs of War and your bodies will lie in the forest grass, forgotten by all but the worms! Shall you claim the glory of heroes and warn the people or accept your doom and suffer death in the Treklant? Enter again the World of Inzae, where all things slip into the Maelstrom, and from hence true heroes are born.

"Ribbons of blood dance through the air, tracing wide crimson arcs before fraying into thousands upon thousands of bright red droplets. The cheerful tavern atmosphere evaporates in a moment, rent apart by screams and cries. A woman with grey hair stands near the bar, grasping at the dagger in her throat with fingers made slippery by blood. She sways and collapses. More screams. A man stands before her. He is holding the hilt of the dagger, but lets it slip from a gory hand as the woman falls. He freezes for a moment, then spins and sprints away, knocking aside people as he goes. A young, flaxen-haired woman at the back of the tavern cries out, “Stop him! Stop him!” as he approaches the entrance – the entrance where you and your comrades are standing. What do you do?" A lonely outsider murders a popular village local before a room full of witnesses. But could he be innocent? The Lurker Beneath Red Larch is a 4-6 hour adventure for characters of 3rd-4th level. It is full of roleplaying, problem solving and challenging combat encounters.

The Tranquil foothills of the Sword Mountains are quickly plunged into chaos, as a series of earthquakes spread their way through the region. Adding to this danger, bands of vicious, flesh-eating monstrosities have clawed out of the shattered earth, attacking travellers and local residents. Rumours of wealth and riches have drawn the adventurers to the area; little do they know that it is not gold and jewels these monsters protect, but a volatile portal into the Underdark with a disturbing secret.

Something strange lurks within the stony confines of an abandoned wizard’s tower. The sole surviving member of a forlorn adventuring party is desperate to find out what happened to his friends and is willing to provide a generous reward to anybody willing to launch a second expedition. Will the heroes uncover the secrets of the tower, or will they also disappear into the darkness?
The interrogation of the rogue wizard, Askalan, by the magocracy of Bemmea exposed his creation of unstable magical artifacts built in a ruined ley-line conduit. This Leystone, built by the mages of Vael Turog, had been dormant for centuries until Askalan discovered a way to power it. Now, after his untimely death, the Leystone's unstable power continues to grow at the edge of the Western Wastes. The magocracy hires the characters to find the awakened Leystone, uncover the mystery of this growing power, and return the source of the power to Bemmea for study.
A very big problem from a very small source. Pay the toll or feed the troll' seems pretty obvious. Too bad that it isn't. A tricky gnome has used illusions to fleece anyone crossing a bridge, posing as a fearsome troll. To direct more traffic across his bridge, he has also set fire to the Great Bridge downstream. The players find the Great Bridge burned and follow this detour. At the bridge, the players will fight with the illusory troll. After a few rounds, it flees back to the gnome's lair under the bridge, and the players will need to deal with a combination of the gnome and his traps if they investigate. Pgs. 22,23 & 69
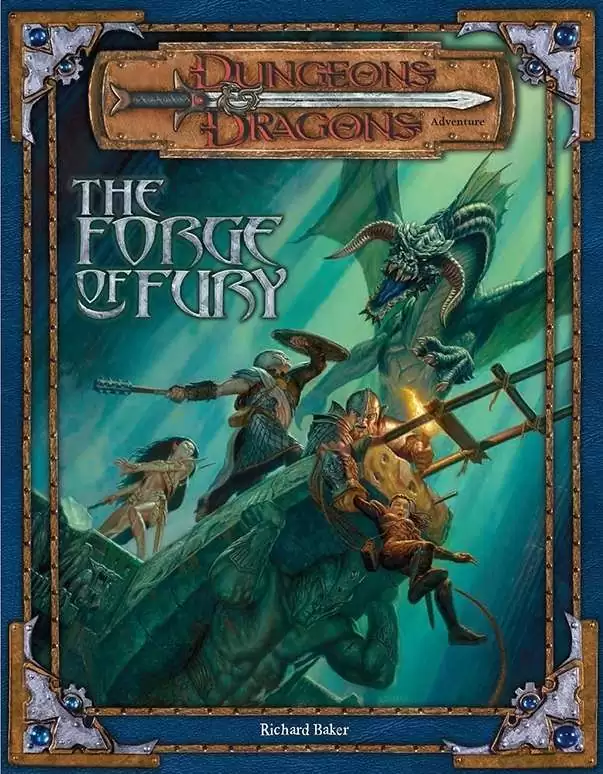
Two centuries past, the dwarven smith Durgeddin the Black carved a secret stronghold from the caverns riddling a hill known as the Stone Tooth. Laboring ceaselessly in their halls under the mountain, Durgeddin’s clan forged enchanted weapons for use in their vendetta against the orcs that had driven them out of their old homes. Durgeddin and his followers are long dead, but the dwarf-hold is not empty. Deadly peril waits in the caverns beneath the Stone Tooth, as well as Durgeddin’s hidden armory of matchless weaponry. The Forge of Fury is a dungeon crawl, or site-based adventure, describing the ruined stronghold of Khundrukar. The characters come to the Stone Tooth in search of a hidden cache of Durgeddin’s superior blades. They find the old stronghold inhabited by a number of dangerous monsters.