
Venzor Trench is set for a group of characters hired to deliver a magical item between two warring countries. The sea voyage becomes tumultuous and the ship goes down. With the mission unfilled the players utilize the magic item to survive on the bottom of the sea floor and continue to trek their way towards completing their misson through the legendary Venzor Trench!

Tired and sore, you struggle over the burning sands toward the long-forgotten city. Will you reach the place in time to save yourselves from the evil efreeti? The sun beats down, making your wounds stiff and worsening the constant thirst that plagues anyone who travels these waterless wastes. But there is hope - are those the ruins over there? In the midst of broken columns and bits of rubble stands a huge statue. This is the place! You've found it at last. Gratefully, you sink onto the sand. But there is no time to lose. You must hurry. So with a quavering voice you say the magic words. And then you wait... A hush falls over the ruins, making the back of your neck prickle. Then, out of the east, a wind rises, gentle at first but quickly growing stronger and wilder, until it tears at your clothes and nearly lifts you off your feet. The once clear sky is choked with white and grey clouds that clash and boil. As the clouds blacken day turns to night. Lightning flashes followed by a menacing growl of thunder. You are beginning to wonder if you should seek shelter, when all of a sudden there is a blinding crash and a bolt of lightning reduces the statue to dust. For a moment, silence. The, out of the statue's remains, soars a blue flame. Its roar deafens you as higher and higher it climbs, until it seems about to reach the clouds. Just when you think it can grow no larger, its shape begins to change. The edges billow and soften, their roar lessens, and before your eyes materializes a gigantic blue man. This adventure can be played alone or as the second part of the Desert of Desolation series. For characters level 6-8. TSR 9053

A chance encounter on the road leads to the beginning of a grand adventure. It is very much a first time adventure for new characters to dip their feet in. Can easily be adjusted to a bigger or smaller adventure. This is the first adventure in a miniseries with the following adventures being: A Mystic Circle An Urgent Rescue A Dark Veil Falls

Beneath the blood moon, a dark monastery appears for one night atop a high plateau. Inside its walls, the mighty black lotus flower reaches its full bloom. Can the characters steal inside the monastery, defeat its sorcerous guardians, and claim the blossom before the sun rises? Monastery of the Shadow Sorcerers is a fiendish sword-and-sorcery adventure and includes: -An extra-planar monastery brooding beneath the blood moon -Sorcerer-monks who move like smoke and strike with fire and blade -Combat cards for each monster, PC, and special treasure -High-quality digital maps for use with virtual table tops

In an age obscured by mist and memory, Sir Galen the Brave and his knights struck down the Drake of Crestmoor with steel and flame. But as the years turned, and the heroes returned to dust, their deeds faded into myth. Doubt lurked where awe once dwelled, and in time, the bards sang of lesser deeds. In the hollows of the wilderness, the stones of their forgotten tomb crumbled beneath ivy and shadow. The Cursed Knights of Crestmoor is a short dungeon crawl for four characters of levels 1-2 using Shadowdark RPG ©. The adventure is designed to be easy to run for new game masters. Players should not be cavalier in their approach to this dungeon. There are threats in the tomb which could easily kill foolhardy player characters. Long ago a band of knights led by Sir Galen slew the black dragon known as the Drake of Crestmoor - a malevolent creature whose true name was Morghast the Black. With his dying breath, the dragon cursed Galen and his friends that they would never find rest in death. Today, the once well-kept tomb has fallen into ruin. Some time ago a band of kobolds moved into the subterranean mausoleum and began using it as a base of operations. More recently, a lizardfolk shaman named Kall’eth and his warband arrived and took over, pressing the kobolds into their service. Kall’eth came to Galen’s tomb to recover the knight’s Fireblade - a sword of dwarvish make used to slay Morghast long ago. The tomb is crawling with kobolds, lizardfolk, and the restless husks of Galen and his compatriots. A magic sword, a missing wedding ring, and plenty of adventure await you in…The Cursed Knights of Crestmoor!
From time immemorial, the rulers of the mortal world have been counseled and tempted by capricious primordial spirits who rule over the elements. The greatest and most sinister of these was a half-kraken medusa known as the Maelstrom Queen, who sought to supplant the mortal races with her own line of immortal tentacled monstrosities. On the verge of her ultimate triumph, when the leviathans at her command rose from the depths, a legendary assassin murdered the Maelstrom Queen in her half-submerged palace with her own weapon. But the primordial mistress refused to let something as trifling as death put an end to her designs. Every 13 years, she regenerates enough mystic power to rise again, and the world’s greatest heroes are sent to murder the Maelstrom Queen once more.

An injured young fisherman stumbles into Elventree with a brightly colored egg in his arms. He claims it fell from the sky and broke his rowboat. When he swam to the shore an elf with skin of ash attacked him and tried to take the egg. Will you help him keep it safe, Adventurers? The Module This module is 35 pages of adventurer's league fun centered around a mysterious egg that has fallen from the sky, a journey into the Feywild, and a meeting with an Archfey. It rewards exploration, social bravery, and the combats are well tuned for the tier with interesting enemies. Also Included! There are 15 map files included with this document that cover Dungeon Master, Player, gridded, gridless (for use with your Virtual Tabletop of choice!), and greyscale! In addition, there's a high resolution artwork of the Archfey present in the module.

On moonlit nights in the Land of Fate, many adventurers hear the call of long-forgotten cities rich with burial treasure. But is it bravery to breach the tombs of Zakhara's ancients and risk the ire of vengeful spirits, or is it greed? Fate knows the answer and will guide all to their destinies in the Cities of Bone! Shifting sands conceal much from the eyes of man. Winds howling across the rolling dunes peel back the veil of time to reveal aeonic ruins or crumbling tombs, long preserved by a shroud of sand. Wrecked and forbidding, monoliths command attention in many unpredictable locales. The remnants of antique civilizations litter the Land of Fate, where time-ravaged towers and decaying shrines hide in the arid wastes. I am but a humble efreeti, a creature of fire and spirit, but what little I know of theses places of danger and mystery I pass on to you, O' Master of Dungeons Unfathomable. Inside this enchanted box lies my gift to you: an Adventure Book holding six plots of deception and many creatures of intrigue with which to challenge and entertain the players under your care; six cards and a poster, all inscribed with carefully drawn maps; and a short booklet detailing new characters to encounter. This Campaign Guide lying open before you contains background needed to lead the adventures in the official Land of Fate. TSR 9467

An expansion on the original Tomb of Horrors with plot and explanation. Contains a facsimile of the original adventure. The Dark Intrusion is causing the dead to rise from their graves. This is linked to a being known as the Devourer. Following the trail of Desatysso, a wizard who followed a similar quest, the players must enter the Tomb, and beyond that, the cursed City that Waits and the Fortress of Conclusion.

In this adventure the heroes must brave the perils of the Innenotdar, whose trees and other vegetation has burned with an undying flame for 40 years. They do this to throw off the dogged pursuit of the Ragesian Empire, who seek to stop them from delivering information crucial to the war effort. Along the way the heroes will face monsters that have been afflicted with this undying flame, a demon that has made a contract with the Ragesian Empire, and potentially solve the mystery surrounding this burning forest. This is the second adventure of the War of the Burning Sky adventure path from E.N. Publishing.

Meaningful decisions, unexpected twists and memorable characters are the foundations of this dark 4-hour adventure for 5th to 10th level characters. A chance encounter on an unassuming road leads to a dangerous and lucrative opportunity. But what seems simple on the surface turns out to be much more below. Thrust into a world where every enemy has an enemy and everyone has their own dark motive, the only chance to survive is to ally with the right foe. Sometimes “doing the right thing” comes only in shades of black. Six Summoned Swords is a stand-alone adventure that begins on the side of the road leading to Phlan and can be easily accessed by any adventurers traveling through the Moonsea region. In addition to a world full of intrigue and complex character choices, purchasing this adventure includes: An Official Adventurers League magic item certificate Printable portrait cards with roleplaying tips for important NPCs Gridded reference maps for combat encounters Condition icons to help track character status Special Certificate Holder ideal for event play NEW: Season 8 Item Unlock Handout - prints 9 to a page, one for every player! * Looking for an adventure to run at your special game day or convention? This adventure includes a “certificate holder” that features specially created art of the adventure’s magic item. When printed in colour and on card stock, it perfectly frames the official AL magic item certificate from this adventure and makes for an unforgettable souvenir. About the Swords Below the Moonsea Saga The saga consists of three adventures, with this adventure serving as a stand-alone prelude. The series continues with Six Striking Swords and Six Swords Unbound, the two of which should be played in tandem.

Buried in the desert sands of Mulhorand, near the city of Mishtan, lies an ancient stone statue of a sphinx queen. After a fierce sandstorm reveals a huge tablet etched with hieroglyphs between the statue’s paws, the PCs must translate the strange writing to find the secret entrance into the Temple of the Sphinx Queen. The conclusion offers three optional endings for DMs to choose from to suit their players, including a wicked trap, a twist that leads to further adventures, or a tough climactic combat suitable for a one-shot. Included are: Five new Egyptian-themed monsters: The Sphinx Queen, Black Lion Guardian, Zombie Scarabs, Snake of Set and Desert Spirit. A new weapon, the khopesh Four new magic items: Statue of Set, Guardian Khopesh of Set, Warded Puzzle Box and Minor Concoction of Healing Two hieroglyphic puzzle player handouts and a DMs translator sheet

A magical conk is stolen and planted by an unsuspecting pawn. The tree which grows from this 'tato threatens the whole village of Hempholme and the characters have to take matters into their own hands. There are a number of threats to deal with and number 3 will shock you!

As the party relishes in the accolades of their achievements word of a Dragon nearby reaches their ears! Apparently a similar adventuring party stumbled upon the Wyrm by accident and was nearly wiped out. With the townspeople in fear, it is time again for the PCs to step up and perform heroic deeds! I wonder if there will be any pages from the mysterious Codex of Gamber Dauch will be around. With only one more adventure in the quest series the PCs must be getting close!

The Land of Ash and Smoke. Once a hellish landscape of volcanic activity, now a nightmare region that hosts one of the scattered Soulmonger fragments. The fragment’s burgeoning power attracted the attention of the Red Wizards of Thay and, thankfully, adventurers who are willing to risk life and limb to keep the fragment from these vile arcanists. Can you reach the fragment before the Red Wizards make off with it? The hunt is on. Part Two of the Broken Chain Series. A Four-Hour Adventure for 17th-20th Level Characters

Arson, rioting, sabotage, murder - and no suspects. Watchmen are murdered, ships explode and sink in their berths, and savage monsters are summoned in the streets - but no one can catch the killers. The party must navigate the growing tensions between rival factions in the city. After following clues to a tavern, The Flying Hamhock, the party will need to defeat a powerful Hivemind which is behind the attacks. Pgs. 47-64
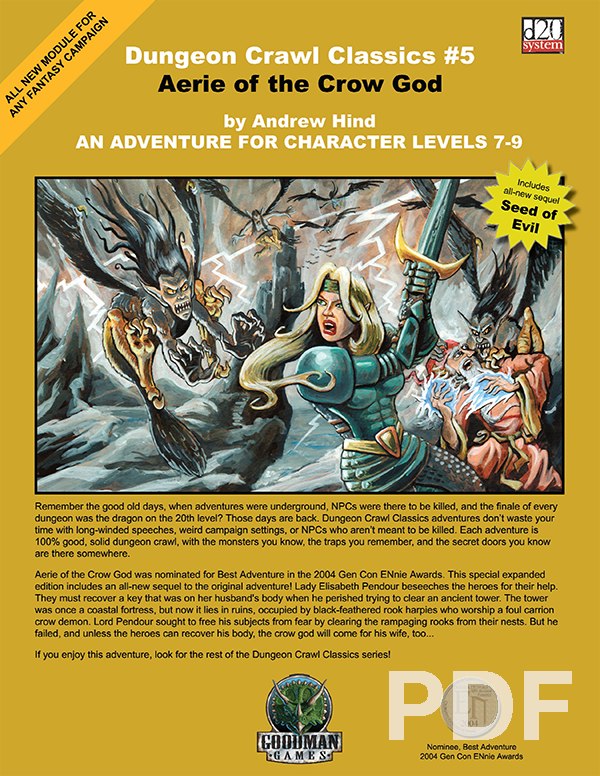
Lady Elisabeth Pendour beseeches the heroes for their help. They must recover a key that was on her husband’s body when he perished trying to clear an ancient tower. The tower was once a coastal fortress, but now it lies in ruins, occupied by black-feathered rook harpies who worship a foul carrion crow demon. Lord Pendour sought to free his subjects from fear by clearing the rampaging rooks from their nests. But he failed, and unless the heroes can recover his body, the crow god will come for his wife, too…

The Zhentarim ask the party to investigate what happened in one their most important underdark outposts. If the party accepts, they'll have to deal with maddening darkness, grimlocks, an insane kenku assassin and unpredictable mixtures of potions. A short, fun dungeon romp that is easily adapted to other settings and other patrons. The combination of utter darkness and a villain based on sound makes for fun shenanigans on the side of the DM. Feasible as a one shot for an efficient party. Two tendays ago, Zhentarim agents were to transport a shipment of rare potions between their Underdark outpost and the surface world. The shipment has yet to arrive, and the outpost is not responding to any sending spells. Growing worried, the outpost’s overseer sends a group of hireswords to investigate and return it to Zhentarim hands. This particular adventure deals with the delusions of madness of Fraz Urb'luu. It also features Muurmic, the mad kenku first described in the December 2015 issue of Dragon+.
Freeport is a fantasy “free city” you can place in a fantastic setting. Its basic premise is a pirate city gone legit… at least on the surface. In truth, the pirate tradition is alive and well in Freeport, but camouflaged by a veneer of respectability. These days the city’s pirates are privateers, legalized pirates Freeport loans out to the highest bidder. You’ll learn more in the short history of the city that follows. This should help give you a taste of the flavor of Freeport before the adventure begins and the given background is all you need to run this adventure. It is an ideal starting place for a new campaign as the player characters find themselves stranded in Freeport after a deal goes sour. A seemingly simple job plunges them into the strange underside of the city, where they uncover secrets worth dying for. Death in Freeport is the first from the Freeport trilogy, together with Terror in Freeport and Madness in Freeport. Synopsis: Death in Freeport drops the player characters into the midst of political and magical intrigue, as the hidden Brotherhood of the Yellow Sign manipulates events to bring its dread god to the world. Freeport is still a bustling center of trade, but evil currents run beneath the surface. There are secrets here, and questions unanswered. The characters will undoubtedly learn there is more here than they expect in a simple seaport. The question is, will that knowledge kill them? As the adventure begins, the player characters (PCs) have just come to Freeport on a merchant ship. While on the docks, the PCs are attacked by a press gang, who mistake them for easy marks. The press gang is handily beaten off; since they are unused to real resistance. A bookish young man named Brother Egil then approaches the PCs. He says that he’s been looking for a group that can take of itself, and that he has a job for them if they are interested: finding a missing librarian. The missing man, Lucius, disappeared two days previously, and Egil is eager to find him. Egil gives the PCs some background on Lucius and his strange behavior. The PCs are then free to investigate: They are likely to visit Lucius’s home, the temple to the God of Knowledge, and an orc pirate ship. This should form a picture of Lucius as a man searching for his own past—who found something he wasn’t counting on. Following a trail of clues, the PCs learn about the Brotherhood of the Yellow Sign. With a little luck, the PCs can trail the cultists back to their hideout, penetrate the lair, and discover secret tunnels underneath it. Deep underground they find degenerate serpent people, and eventually Lucius himself. The librarian has been tortured badly and will die without aid. The PCs also have to deal with the leader of the cult, a man they may recognize from the temple. When the cult priest is slain, they are in for an even bigger surprise. He was not human at all, but a serpent man in disguise. What this means for Freeport only the gods can say.

The Haunt Unlock the secrets and drive back the evil from Montarthas Manor In ages past, an ancient town was lost and destroyed to a seige of orcs. Only one building survived and to this day, the manor is the only still standing building to be seen for miles around. Some say it is haunted, a few whisper of great treasures within, whilst others whisper that it is the manor itself that lives! No one knows for sure, only that a great evil haunts its halls. Do you dare enter Montarthas Manor? Published by P.B. Publishing