
Blinsky's Toyshop is our take on what happens to Blinsky and Piccolo during, or after the Curse of Strahd campaign. Blinsky, the toymaker in Vallaki with the cute monkey wearing a pink tutu, received a large inheritance from a long-time client. The client, Obtavius Swat, a retired adventurer and avid collector of toys, left his entire estate to Blinsky. The estate included coin, precious gems, art, and his collection of toys, some made by Blinsky and others he acquired during his travels. Blinsky used the fortune to pay a wizard to create a small island in the middle of Lake Zarovich, located just outside of Vallaki. He then paid masons and workers to build a fantastic new toyshop, which he designed to be an experience for both the young and old alike. Though the number of children in Barovia was increasing, mostly imparted to the devil Strahd’s downfall, Blinsky wanted to touch the inner child of the adults in the city. He wanted happiness. He wanted smiles. He named the castle Blinsky’s Toyshop of Marvels. One of the toys, a small silver tiara kept in a black satin-lined ivory jewelry box, was such a lovely piece. Blinsky couldn’t stand the thought of leaving it in the box. He already had enough gold and losing the small tiara wouldn’t be a large loss, so he decided to give it to his monkey – Piccolo (see Creatures of the Toyshop). He smiled at the thought of her running around in her pretty, shiny tiara. Sadly, as Barovian luck would have it, trapped inside the tiara is the sole of an evil gnome wizard named Aribetha Strangge. In his old age, Obtavious Swat forgot that he and his fellow adventurers used the tiara to imprison the gnome’s soul. Yesterday, when Blinsky placed the tiara on Piccolo’s head, silver tendrils cascaded from the tiara and into poor Piccolo’s skull, allowing Aribetha to control the monkey. Now, Aribetha has incapacitated Blinsky in the toyshop’s tower, brought many of the toys to life, and imprisoned or killed many of the workers and customers. The adventure includes costumes (which the character may wear), Strahd Hand Puppets, and a possessed Piccolo.

Devastated in a war with a nearby wizards' school, the Fighters' Academy has since been surrounded by a foul and dank swamp - the Gloomfens. Since the climatctic battle between the wizards and fighters, the tower has decayed. The spirit of the head of the academy haunts the building, eternally plotting his revenge on the wizards who killed him. his loyal sutdents remain faithful to him even in death. Other foul undead have made their home in the rotting, spacious academy. From their lair, they make forays into farmsteads near the swamp in search of victims to feed their unspeakable appetites. The Problem of these terrible attacks by the savage undead will not stop until the evil that has found a home at the tower is burned from the face of the land forever. Will your party heed the call and help the town of Melinir? Will they be able to clear the former Academy of its undead? The Fighters' Academy is the first in a three part adventure, The Haunted Tower. Or, it can be ran as a stand alone adventure. The choice is up to you. Part of TSR 1081 The Haunted Tower

The Lamenting Lighthouse is a four-hour adventure for 5th-10th level characters, designed for Dungeons & Dragons 5th Edition, with a nautical theme, heavy undead and horror elements, and mysteries to solve! One lonely lighthouse shines the way through the rocks and shoals that deny entry to the northern Moonshae Isles. But when the party’s transport approaches, a horrific gale at their backs - no light is in sight... The party must venture ahead of their vessel in a race against the storm to the restore the beacon before their ship is lost. What has befallen the keepers, and what dark secret does the lighthouse hold? Will the heroes prevail, or will they join the lighthouse's lament? This adventure can easily be inserted into a run-through of Ghosts of Saltmarsh. This one-shot can also serve as a nautical interlude in any on-going campaign where the characters have to take to the sea. Included with this adventure are: + 6 original custom creatures, the dread wraith, the dread wight, the swarm of seagulls, the captain, the rating, and the sailor + 12 player hand-outs with notes that shed light on the mystery of the lamenting lighthouse, with a randomization mechanic that ensures a degree of replayability + 9 original fleshed out NPCs, including personality traits and roleplaying tips + 2 original magical artifacts + 7 hand-drawn maps of important locations + a story reward and 2 story hooks for continuing the adventure (depending on how the adventure resolves)

Sharn is paralyzed. Half of the council was under the control of roach thralls for the last 20 years, and with the conspiracy revealed the government apparatus is at a standstill. The criminal organization Daask rises from the underbelly to take control of the chaos and further destabilize the city.

The PCs are looking to gain entry to the Glantri School of Magic, after the initial admission tests they are drawn into a commotion where one of the other students is being attacked by an evil sorceress. He tries to flee but but is killed, and the PCs are framed for the murder. The authorities are called and bribed to just kill the PCs, they flee and are chased and taunted by the evil sorceress. Eventually, during one of her attacks, she opens a weak spot in the ground and the heroes are dropped into the warrens under the school. They must navigate the warrens, which are shrouded in magical darkness, defend against further attacks, and find escape where they can prove their innocence.
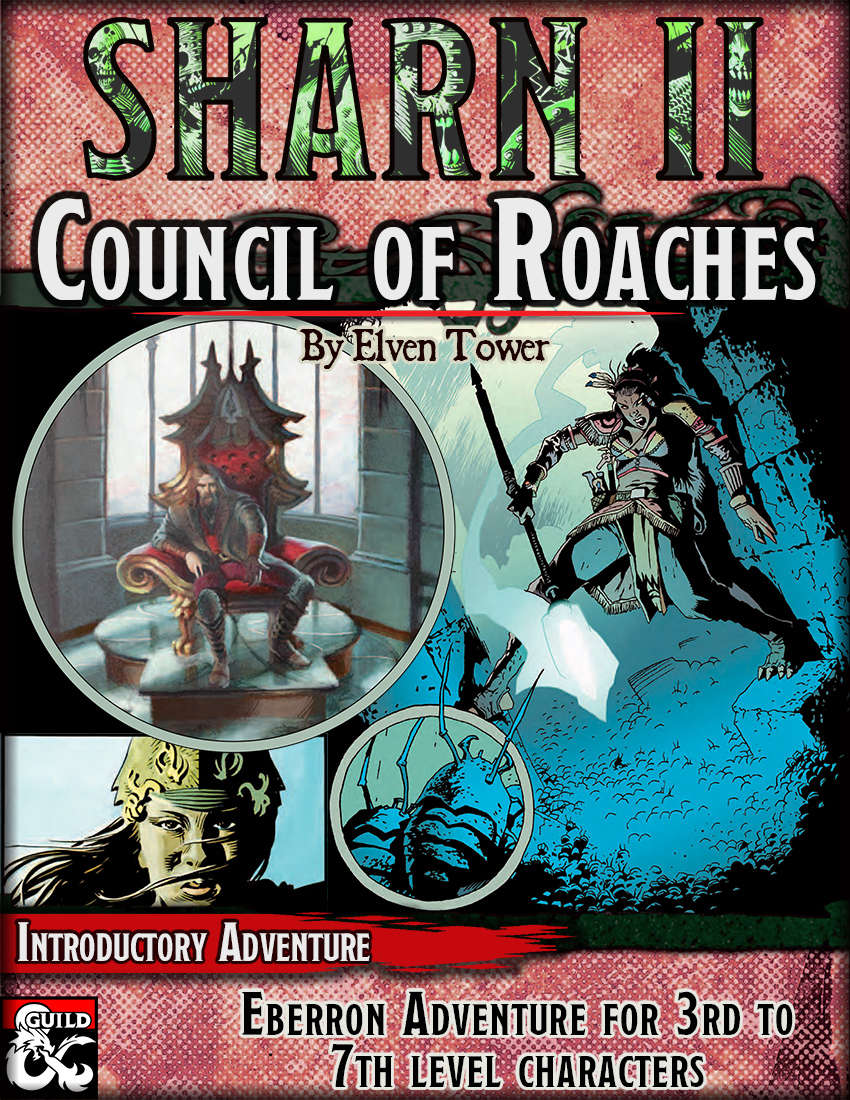
A roach thrall has infiltrated Sharn's highest circle of power, the council, and few have noticed. It's up to our adventurer's, with a little help from a perceptive councilor, to rid Sharn of the growing infestation.
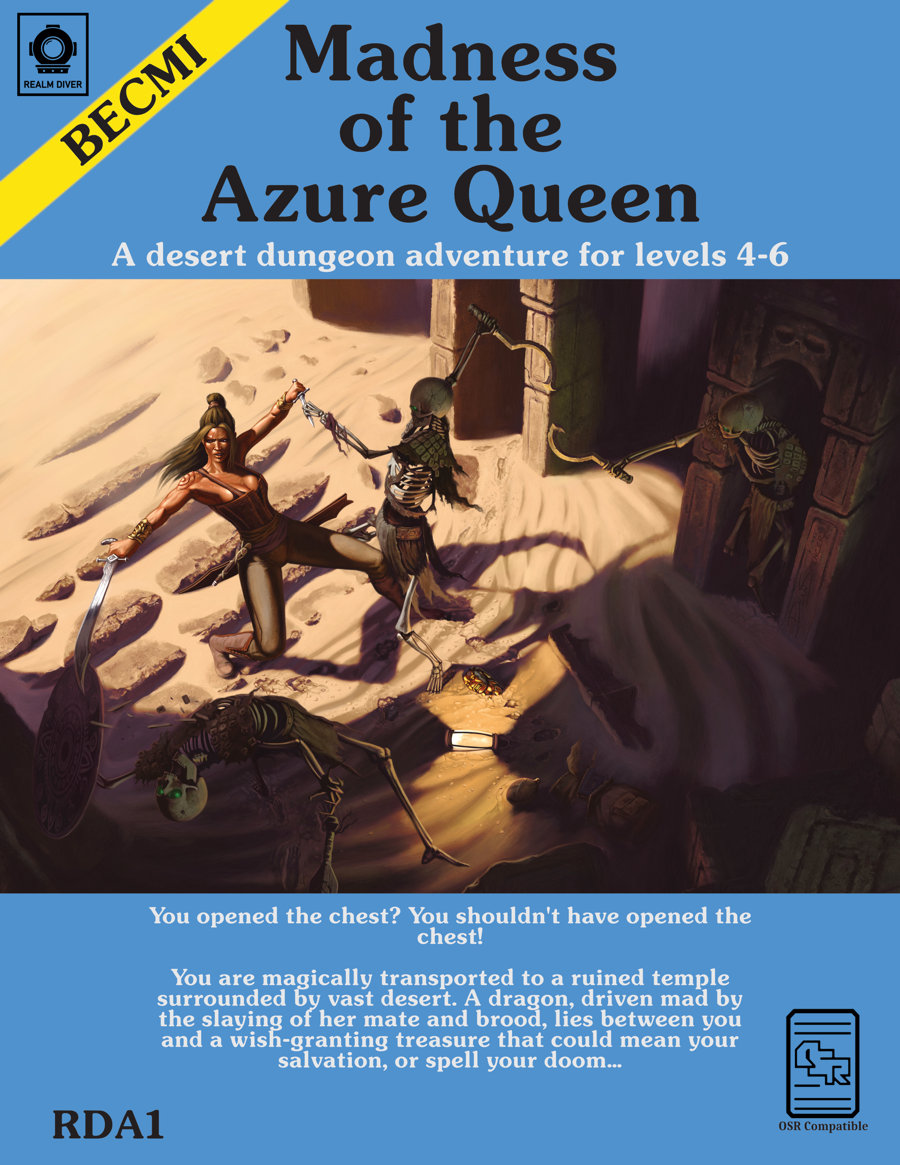
"You opened the chest? You shouldn't have opened the chest! You are magically transported to a ruined temple surrounded by vast desert. A dragon, driven mad by the slaying of her mate and brood, lies between you and a wish-granting treasure that could mean your salvation, or spell your doom…"
The hamlet of Thistle has a problem. The river they depend on for trade and food was recently poisoned with a tide of filth, and a goblin named Belig has claimed responsibility. If the people of Thistle don’t pay a ransom, Belig has promised them much worse will come with the next poison tide. A Forgotten Realms adventure for 1st-level characters.
Skelg the Ripper, envoy from the Land of the Linnorm Kings, lies wasting in his villa on the outskirts of Absalom. A frigid curse followed Skelg from his northern homeland and grips his bearish heart in its frosty embrace. As the bizarre freezing ailment pushes Skelg to the brink of death, the Society dispatches you and your fellow Pathfinders to uncover the secrets of the freezing curse before Absalom falls to its icy grip.
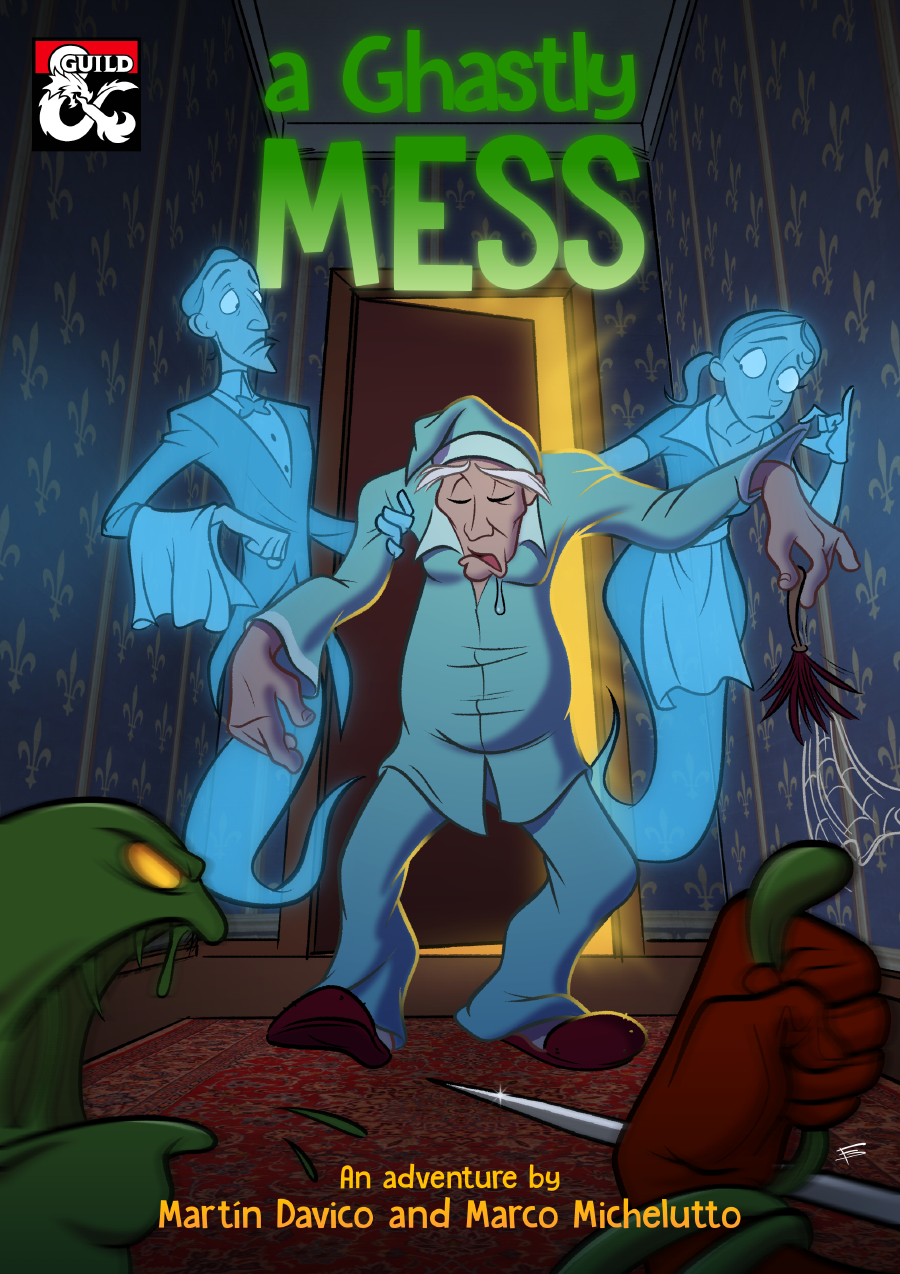
A Ghastly Mess is a one-shot adventure for a group of 3rd-level characters that takes place in a haunted mansion Unlike your regular haunted house, the inhabitants of this building are far from scary. The ghosts of the former staff still live in it—or, well, unlive—not realizing they’re deceased and unable to move on because of it. The Lord of the mansion still awaits the return of his beloved, Lenore, for which he has commanded the staff to have the house in pristine condition. Help the only alive member of the staff, a sleepwalking old-man, clean the house, defeat any and all monsters that might be lurking in the somewhat abandoned building and help the ghosts pass on to the great beyond in this short but exciting adventure! The story includes a host of interesting characters for your players to meet, each with their own unique personalities and accompanying art; an array of unique monsters specially designed to challenge your party in more ways than one; and an intriguing mystery surrounding Lenore’s fate and what happened to the members of the staff. Now, you might be thinking “hey, this ain’t spooky at all, what gives?” and to that I say: how dare you?! Nothing is scarier than doing your chores! That’s why we built an adventure around it! That being said, A Ghastly Mess is not meant to be a scary story, but rather an interesting mystery-type of social adventure. Most combats can be resolved by running away, the stakes are low, and the NPCs don’t think of the situation as anything more than a normal day in their lives. The tragic aspects of the story have already happened by the times the characters show up, and the intent is for everything to go well from there.

An ancient legend, a missing wife, and a broken heart that time won’t mend. Part 4 of the Evenflow Saga

The Hag's Hexes is a 66 page guide designed by Dungeon Masters Guild luminaries like JVC Parry and Janek Sielicki alongside rising stars and old stalwarts like Matt Butler, Matthew Gravelyn, and Tim Bannock. It was created with one thing in mind: to make hags more than the sum of their (often meager) Challenge ratings, giving them the mechanics, roleplay potential, and weird magic that can inspire campaigns, lay low kings and warlords, and potentially ensnare unwary Player Characters into campaign-changing curses or long-term bargains that force them into terrible moral quandaries! Split into five chapters, the authors have provided everything a DM needs to terrify their players for years to come. The Bestiary features over a dozen monsters; some are new hags, some are their minions or even their mobile lairs, and one of them -- the Shaitan AKA Desert Hag -- was featured in Monsters of the Guild! Bargains & Curses is a chapter filled with ideas that can kick-start campaigns, threaten valued NPCs, or put Player Characters' very existence and morality at stake. Chapter 3 includes two dozen items of wonderment, weirdness, and dread, ranging from fairy tale-inspired items of whimsy to terribly cursed items of horror. Chapter 4 is titled "Filthy, Vile & Downright Dirty" and provides dozens of roleplaying tips to make hags come alive, new mechanics inspired by and expanding on Volo's Guide to Monsters (coven spell lists, aunties, grandmothers, alternative coven members), and ends with useful combat tactics for each of the hags from the Monster Manual and Volo's Guide, as well as tactics for covens. Finally, Chapter 5 presents five encounter groups (with sub-encounters) to give you quick story seeds and monster lists that you can put together in minutes to create a single encounter or to inspire a full campaign, and ends with three full-length adventures -- each with 3-5 encounters -- that showcase many of the new monsters, rules, magic items, and so on that appeared in earlier chapters. Each of these adventures comes with an encounter map meant to act as inspiration for hag lairs, and they include useful mechanical ideas for terrain effects and descriptive keywords listed directly on the map for added inspiration and easy customization! Designed by Tim Bannock. Written by Matt Butler, JVC Parry, Janek Sielicki, and Tim Bannock. Edited by Matthew Gravelyn and Tim Bannock. Cover Art by Elena Naylor. Cartography by Tim Bannock using Inkwell Ideas' Dungeonographer (Dungeonographer is copyright Inkwell Ideas). Layout & Graphic Elements by Elena Naylor with Tim Bannock. Interior Art by Arcana Games, Bruno Balixa, David Lewis Johnson, Dean Spencer, Earl Geier, Filip Gutowski, Jacob E. Blackmon, Joyce Maureira, Petr Kratochvil, Jayaraj Paul, Brian Brinlee, and Wizards of the Coast.

While investigating rumors of a dangerous blue dragon wreaking havoc in the deep desert, the heroes tumble under the sands into the magically sealed dome of an ancient palace. The temporarily weakened dome reseals above them, and they are left to explore the golden palace of Zahadran, once seat of power for the legendary Caliph Ardishir the Magnificent. But the dome is weak because it has been assaulted by the mythical storm demon Azi Dahaka and his trapped minions, evil creatures that were sealed under the magical dome to keep them from ravaging an unsuspecting world.

The adventurers are tasked with rescuing a group of heroes who vanished in the pearlescent fortress that manifested on the border between the Kroth Magg kingdom and the Varkonin empire in the Steppes of Thar.

Amid the gales and snowy Earthspur Mountains, the tumbling ruins of the ancient Tempest Mage's tower brood over the village of Windy Valley. When a kidnapper flees into the ruins, it's up to a group of adventurers to apprehend the rogue and save his victim from the vault below. Published by Cold Iron Conventions and Draxtar Games.

Yonder lies the Shrine of Lucien Harpell, greatest mage of this or any other age. In the arts of golemancy, artificery and necromancy, his equal has never been known, nor will be again. Cursed are those who enter this tomb. Cursed are those who look upon this statue. Cursed are those who seek his riches. Know that your demise is certain – your lives will be short, and your deaths slow. Read this, fools, and despair! The Shrine of Lucien Harpell is the stuff of legends - full of hideous traps and strange monsters, but guarding fabulous treasures. It was lost for generations beneath the grim and lonely Starmetal Hills, but has now been found again. Will any dare enter? Little Shrine of Horrors contains over 20 encounters and is full of puzzles, tricks, traps, roleplaying and combat. Do your players have what it takes to outwit Lucien Harpell?

The locals are spreading rumors of the emergence of an age-old relic in a remote farming village. Surely you won’t be the only one to seek it, but can you afford to not be successful in this mission? And why haven’t they claimed it for themselves? Part Three of Misty Fortunes and Absent Hearts.

Ragvala, also known as the "Coinmaker," is an ancient gold dragon who wishes to mend his broken friendship with his old adventuring buddy. Recently, there are rumors that his friend’s old magical instrument has resurfaced in the Quivering Forest. Unable to change shape anymore, the dragon needs the help of skilled adventurers who can join him on his quest.

A powerful artifact lies deep in the vaults of a House Kundarak bank. Can the PCs steal it without getting captured in the process? "You'd be mad to even try it. Assuming you could get inside the compound, somehow avoid the guards and traps, and open one of the best vaults in Khorvaire, you'd still need to get back out. And then, even if you succeeded, the dwarves would still hun you down!" Tergil, commissioned salesman of exotic pre-owned goods. Bank heist adventure with lots of guards. Pgs. 16-29

The battle between the mighty undead army of the Witch-King of Vaasa and the forces of Bloodstone has come to a standstill. As long as the source of the Witch-King's power is at work, his evil forces will never be defeated! As the rulers of Bloodstone Pass, it is up to you to find and destroy the sources of Vaasa's power. All you have to do is journey to the Abyss, confront the mightiest demon of all, steal the Wand of Orcus, and take it to the Seven Heavens to be destroyed. The Throne of Bloodstone is the fourth and final installment in a series of modules specially designed for high-level characters. While it is not necessary to have played any of the three previous modules, The Throne of Bloodstone is the climax of an epic struggle for a kingdom against the forces of darkest evil. Recommended for characters of levels 18-100, The Throne of Bloodstone is the highest-level adventure ever published by TSR! TSR 9228