
All ocean voyages are fraught with peril, yet a voyage to the infamous Isle of Dread might seem to some old salts to be a deliberate goading of the gods of the sea. Many of those who have attempted the voyage before managed to return to civilization often choose not to speak of the trials they experienced on that dangerous route, yet those whose lips can be loosened by a draught of grog whisper amazing stories... tales of pirates, sea monsters, terrifying storms, and perhaps most harrowing of all, of a strange and sinister land without land, a floating graveyard of dead ships mired in a sargasso the size of an island. This place has many names, but its most well-known may be it's most apt - Journey's End. "The Sea Wyvern's Wake" is the third chapter of the Savage Tide Adventure Path, a complete campaign consisting of 12 adventures appearing in Dungeon magazine. For additional aid in running this campaign, check out Dragon magazine's monthly "Savage Tidings" articles, a series that helps players and DMs prepare for and expand upon the campaign. Issue #350 of Dragon magazine features a regional guide to the seafaring environs the PCs can expect on the journey to the Isle of Dread. It’s time to bid farewell to the city of Sasserine as the PCs board the Sea Wyvern for a 3,000-mile voyage south into the uncharted waters of the Vohoun Ocean. Their destination: the Isle of Dread. Pgs. 16-48
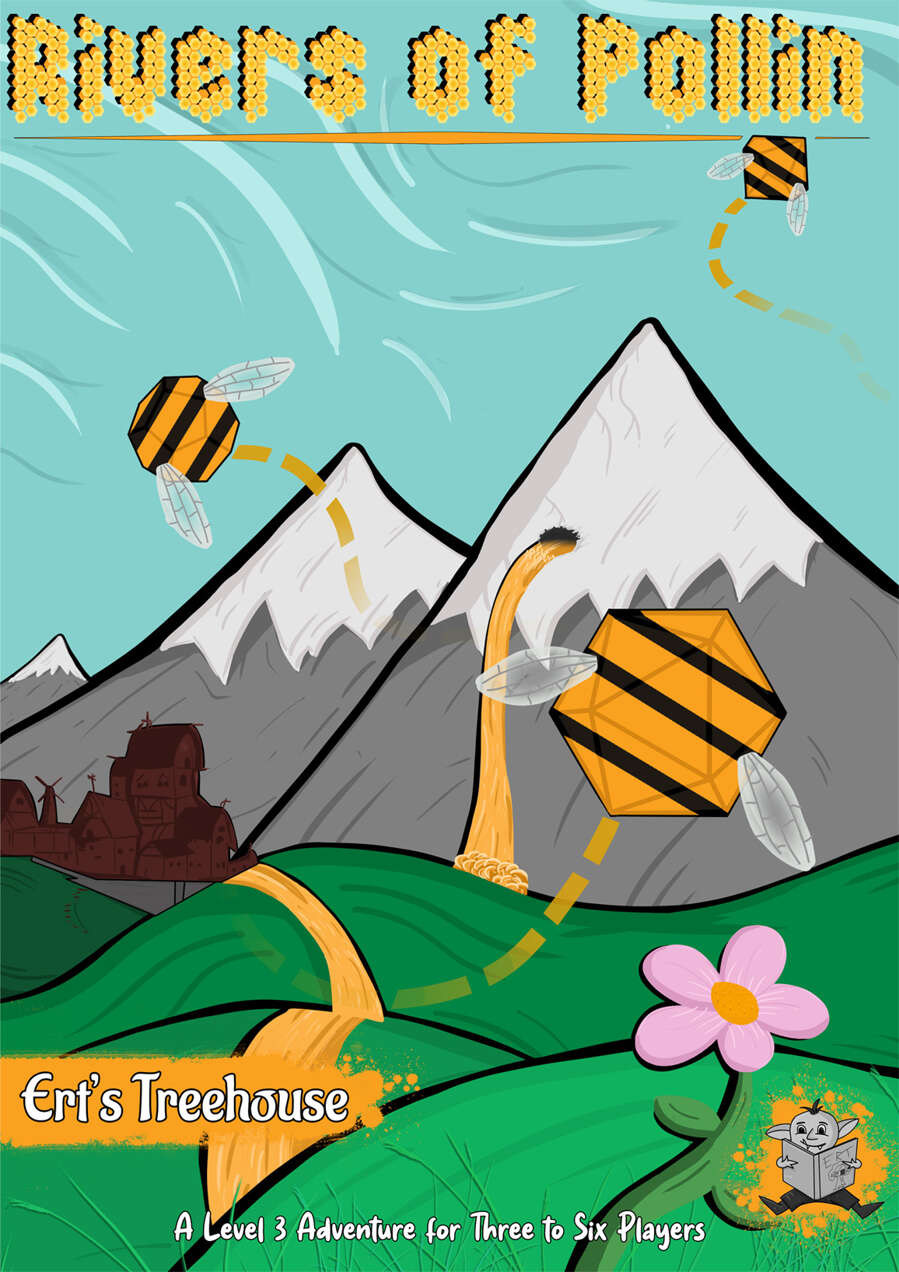
The characters have been summoned to Pollin, a dwarven industrial city which prides itself on innovation and invention. When the Honey River which is source of all the power in the city runs dry they call for the aid of adventurers. The characters are brought before the Industrial Minister as he needs their help to solve the issue and fix the problem.

Madness in Freeport, the final part of the Freeport Trilogy, details the final confrontation between the PCs, the Brotherhood of the Yellow Sign, and Sea Lord Milton Drac. In Part One, the Drac invites the PCs to the Grand Lighthouse Ball. Careful investigation can reveal the secret purpose of the lighthouse. In Parts Two and Three, the PCs must recover a powerful artifact to thwart the Brotherhood's plans. They must pass through an infamous pirate's hidden caves, then search a sunken temple of the serpent god Yig. In Part Four, the heroes must enter the Grand Lighthouse, AKA Milton's Folly, in a race against time to stop the Brotherhood's world-shaking master plan from coming to fruition. (Bibliographic note: This adventure was originally written for v.3.0, and later updated to the v.3.5 rules. The revised versions of Death, Terror, and Madness in Freeport were reprinted in an omnibus edition, along with two shorter filler adventures, as The Freeport Edition: Five Year Anniversary Edition.)

Clues discovered in Diamond Lake lead to the Dark Cathedral, a forlorn chamber hidden below a local mine. There the PCs battle the machinations of the Ebon Triad, a cult dedicated to the three vile gods. What does the Ebon Triad know about the Age of Worms, and why are they so desperate to get it started? "The Three Faces of Evil" is the second installment of the Age of Worms Adventure Path, a complete campaign consisting of 12 adventures, several "Backdrop" articles to help Dungeon masters run the series, and a handful of poster maps of key locations. For additional aid in running this campaign, check out Dragon's monthly "Worm Food" articles, a series that provides additional materials to help players survive this campaign. Issue #334 of Dragon provides comprehensive lists of all the things you can find for sale in Diamond Lake's (often) dubious shops. Pgs. 16-47
As the City of a Thousand Forges perseveres in the face of threats both internal and external, the effects of the planar portal continue to make everyone uneasy. When unusual individuals are drawn to the city because of the portal’s power, heroes are asked to keep the peace and ferret out anyone intending to bring harm to Melvaunt. A D&D Adventurers League adventure set in Melvaunt. The characters investigate six groups/individuals to work out their real purposes in Melvaunt.

Bloodpurge, a bayou village in the Flooded Forest, has come under siege by malevolent powers. Many hunters in this shanty-town have gone missing. Desperate folk murmur rumors of evil lurking in the willow groves.

None know from where the Heresiarch first came, but all remember the night that it did. It rode down from the bleeding stars on a great serpent, hurling bolts of obsidian lightning that shattered the monuments and capitols of every nation. Its infernal army swept aside the defenses of the mortal empires in a single hour, decimating legions once thought to be the invincible fist of humanity's god-kings. Faceless priests - each bearing the symbol of the trident - drifted through the fallen cities and scorched villages on a frigid wind, and when they rose to greet the huddled men and women ringed by their festering, bloated dead, they spoke a single, simple offer: worship the Heresiarch or die. Thousands of crusaders fell tonight so that you might be given this chance. In a last stand that, for the first time, united all of the empires of humanity as brothers and sisters, a way was cleared into an infernal stronghold said to contain a gate to the Heresiarch’s fane. All is silent save for the clangor of distant battle. Surrounded by grim-faced knights and teary-eyed peasants – their hands clasped in desperate hope – you step through the glowing, churning doorway, knowing there will be no help and likely no return. Published by Defy Danger and Save Versus Death

"Tyr is free! Tyr is free!" Such is the heady cry that echoes from the darkest warrens to the gleaming chambers of the Council in that ancient city. Now is your chance to savor life released from the oppressive gloom of the sorcerer-kings-but for how long? New forces threaten the newly-born independence of Tyr, as outside forces march upon the city. King Tithian is determined to resist, but there are others on the Council of Advisors less eager to risk their wealth and lives for the cause of independence. It falls upon you to help mobilize and lead the citizen-army of Tyr on the road to Urik. In Road to Urik, the city-State of Tyr has thrown off the yoke of the sorcerer-king Kalak and declared all slaves free, but the neighboring city-state of Urik is amassing its own armies to conquer Tyr. In the first part of the adventure, the PCs must negotiate with various factions of the city in order to win their support for the war effort. In the second part the PCs leading a scouting force ahead of the main army, and the choices and successes in the first part will affect the troops they lead here. Finally, they will need to fight and lure away the Urik army's own scouting force, letting the army of Tyr ambush them. The second and third part make heavy use of the Battlesystem rules, which were pushed pretty heavily in the early Dark Sun books. Like many Dark Sun adventures, the module makes heavy use of handouts that come in a flip-book along with the main adventure. This adventure is a sequel to Freedom. It stands on its own, but the plot of the adventure is based on the events of Freedom and the novel the Verdant Passage, so you can't really run them in reverse order. Much like Freedom took place concurrently with The Verdant Passage, Road to Urik takes place just before the events of The Crimson Legion, the second novel in the Prism Pentad. TSR 2406
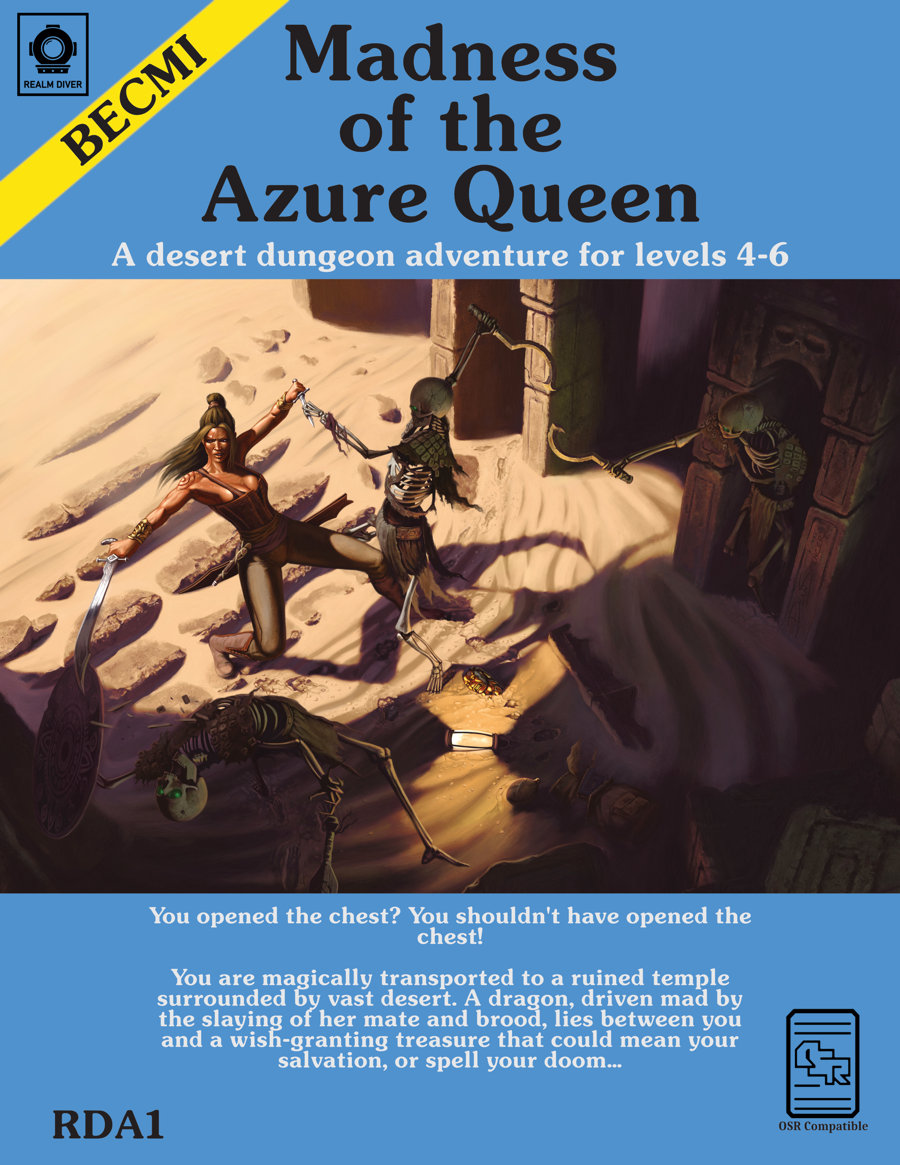
"You opened the chest? You shouldn't have opened the chest! You are magically transported to a ruined temple surrounded by vast desert. A dragon, driven mad by the slaying of her mate and brood, lies between you and a wish-granting treasure that could mean your salvation, or spell your doom…"
Bleak days have come to the Taldan city of Cassomir and nearby settlements, with a wave of depression and rage sparking horrific acts of violence. When retired adventurer Taergan Flinn doesn’t show up to meet with his old companions, the PCs are called upon to investigate, leading them into a swirling maelstrom of horror and tragedy.

Designed to remedy the lack of "end game" content for Old School-style gaming, The Dreams of Ruin is a setting-neutral adventure supplement aimed at characters of level 12 to 16. The material can be used with groups from level 8 to max level (and beyond, if the system supports ascent to divinity for high-level character). Capable of challenging even the most experienced players and most powerful characters, The Dreams of Ruin are an unforgettable addition to any high-level campaign. But beware! The dreams are mighty and can overwhelm even fearsome warlords and powerful wizard-kings. One touch of them, and your campaign world will never be the same.

A madman stalks the fog-shrouded streets of Paridon, killing with gruesome precision - and always at midnight. A party of brave adventurers witnesses the most recent of these brutal murders. Now that they've seen the killer's face, they're sure to be his next targets. Who can be trusted in this city where the residents are not what they appear to be? Those who dare to track the killer will find strange allies - and even stranger enemies. The adventurers must investigate the ancient mystery behind the murders that take place when the clock strikes the "Hour of the Knife." This 64-page adventure includes a full-color poster-sized map of Paridon. The adventure is based on the popular RPGA Network tournament by Bruce Nesmith. TSR 9456

The mining town of Glister has a problem. The latest caravan only arrived with a part of its supplies. Orcs waylaid them, took much needed goods, and are now making demands that the town return an artifact that is theirs, but the town is unfamiliar with. Help track down information about this artifact and possibly defend the city from an orc invasion! A 4-hour Adventure for 1st-4th Level Characters Part 2 of Kossuth's Kiss

Hurry! Hurry! Hurry! Step right up, ladies and gentlemen, and behold the greatest circus in the land! Behold the skilled mummers performing at The Stage; you’ll literally feel like you’re part of the play! Thrill to the death-defying acts (and audience) in the two rings under the Big Top! Laugh at the antics of the baleful buffoons, harmful harlequins, and malevolent merrymakers of Clown Alley! Gaze in wonder at the wild beasts of the Menagerie, (just make sure you know which side of the bars you’re on)! All this and more, for the small price of a single admission, to Bitterbark’s Magnificent Circus! The circus is in town! But there’s something not quite right about it. There are rumors of missing children, evil plots, and more. Can you discover the secrets hidden inside Bitterbark’s Magnificent Circus? Intended as a stand-alone adventure, but there are notes on how to include it as part of the Castle of the Mad Archmage mega-dungeon adventure. Published by BRW Games

Somewhere under a lost and lonely hill of grim and foreboding aspect lies a labyrinthine crypt. It is filled with terrible traps and not a few strange and ferocious monsters to slay the unwary. It is filled with rich treasures both precious and magical, but in addition to the aforementioned guardians, there is said to be a demilich who still wards his final haunt (Be warned that tales told have it that this being possesses powers which make him nearly undefeatable). Accounts relate that it is quite unlikely that any adventurers will ever find the chamber where the demilich Acererak lingers, for the passages and rooms of the Tomb are fraught with terrible traps, poison gases, and magical protections. Furthermore, the demi-lich has so well hidden his lair, that even those who avoid the pitfalls will not be likely to locale their true goal. In the far reaches of the world, under a lost and lonely hill, lies the sinister TOMB OF HORRORS. This Labyrinthine crypt is filled with terrible traps, strange and ferocious monsters, rich and magical treasures, and somewhere within rests the evil Demi-Lich. TSR 9022

This adventure works best after going through the original trilogy (Death, Terror, and Madness in Freeport). After exposing the madness and corruption of the previous Sea Lord, a succession crisis is upon Freeport. There are no heirs to the seat of power, leading the Captains' Council to overturn the Law of Succession. But opening up succession plunges the city into chaos as various factions vy for the title. The PCs will need to survive riots and secret plots to make sure the right man (or woman) ends up with the job.

You have few complaints this night as you rest in the common room of the Crooked Crow Inn. While winter has passed, the night air carries enough of a chill to make any hearth a welcome sight. The village of Havehollow is typical for this part of the realm. Livelihoods made from farming and livestock with a few merchants and the Inn catering to travelers along the kingsroad. Good folk who know that hard work is what's needed to make it through harsh times. As you finish your meal you notice a fellow traveler, a rave haired woman, walk to the front of the common room with lyre in hand. She plucks a few practice cords then breaks into song. Seasons come and go Moons wax and wane Time seems so slow To the spirits of Havehollow... ~~~~~~~~~~~~~~~~~~~~~~~~~~~~~~~~~~~~~~~~~~~~~~~ I am not the original creator! The original can be found here: http://www.enworld.org/forum/rpgdownloads.php?do=download&downloadid=1011 As a note, for Astabar himself I found he was an underwhelming boss for 1st level characters, reccomend making him have Flesh Golem stats Published by One-Shot RPG

Far above the village of Barovia sits Castle Ravenloft, the home and fortress of vampire lord Strahd Von Zarovich. Legends claim that Strahd flies with the bats and runs with the wolves to terrorize the countryside. Ancient tales also tell of dungeons and catacombs deep under the castle. Other stories recall the great halls, treasures, and glory of Ravenloft in centuries past. "House of Strahd" is a revision of the classic gothic horror tale I6: Ravenloft, one of the most popular adventures ever produced for the AD&D game. This version is updated for the AD&D 2nd Edition rules, and those from the Ravenloft campaign set. Count Strahd is now more powerful, and his castle is even more terrifying! TSR 9418

To a wizard, knowledge is power, and the wizard Lirdrium Arkayz wants to know the mysterious secret of The Rock. Many have tried to discover it - but The Rock keeps its secret well. The wizard offers a rich reward to anyone bold enough to solve this dark mystery. But the road to The Rock leads to danger and hidden peril - dangers that have claimed the lives of many brave adventurers. Rashness and folly will lead to quick death, but riches await the clever and brave. Have you the wits, courage and skill to survive the Journey to The rock? TSR 9106

Gray Mountain lies deep in the lush elven forest. The temple there was a haven of meditation and learning - until taken over by an evil cleric known as the Rahib. Far under the mountain, he paces before the temple's great altar. A brown-robed servant rushes in and falls to his knees, trembling at the sight of the Rahib's black panther. "Rahib, adventurers came to the village as the sun rose - the strangers now protect Rahasia." A scowl crosses the Rahib's face. "I must have Rahasia! Attack again tonight." As the servant scurries away, a deep growl rises from the giant cat. Gripping the panther's leash, the Rahib paces again, speaking out loud. "We must dispose of these strangers quickly; the secret beneath the temple will not wait much longer." Note: the setting is unspecified, but certain tie-ins, like the wines, prefigure Ravenloft. See: https://twitter.com/chrisperkinsdnd/status/703751906703749120 TSR #9115