
Children and a cleric have been kidnapped from a small coastal town by undead creatures who crawled out of the sea. Defend the Captain's Folly Tavern, investigate the mystery, swim through underwater caverns, and fight the monstrous denizens of the deep in order to save the kidnapped civilians! This adventure includes: 4 New Monsters, 4 New Magic Items, A Seafaring Skill Challenge, & Complications for an Underwater Chase Encounter!

Deep beneath the surface of a lake flourishing with aquatic life is the Temple of Pure Water. Within its walls your players will encounter dangerous aquatic flora, a deadly submerged temple, a sea dragon statue with power lurking within, and even a rapid downhill boat ride with sharks. Water in small doses is an elixir of life, but it large enough quantities your players may be left in over their heads as they make their way through this underwater adventure.

The sea has many perils. Are the treasures of a sunken pirate ship worth the risk? Arkos Seatamer, a privateer and the sole survivor of a shipwreck has gathered a new crew. He's returning to the wreck to recover the body of his closest friend, Devek Harpwind, for a proper burial. Arkos had rammed the pirate vessel 'Striking Shadow' in combat, shattering its hull. He leapt aboard the sinking ship to take the pirate queen as a prisoner. Shortly after, a sudden storm arose, so violent that it sunk his ship as well. This isn't the whole story. The pirate queen wore a cursed gold armband, shaped like a coiled eel. The sight of the band made Arkos mad with greed and he moved to slay her to take it. Devek tried to intervene but Arkos killed his friend in rage. With his dying breaths Devek laid a horrible curse upon Arkos to become a were-eel each night. The PCs are hired to accompany Arkos and his crew to the wreckage and recover Devek's body from the wreck, along with the armband he still lusts for. Pgs. 18-35
Called by the Elder Elemental Eye to serve, four corrupt prophets have risen from the depths of anonymity to claim mighty weapons with direct links to the power of the elemental princes. Each of these prophets has assembled a cadre of cultists and creatures to serve them in the construction of four elemental temples of lethal design. It is up to adventurers from heroic factions such as the Emerald Enclave and the Order of the Gauntlet to discover where the true power of each prophet lay, and dismantle it before it comes boiling up to obliterate the Realms.

Once every decade, the tides of the Empyrean Ocean recede far enough to reveal the highest eaves of a mysterious undersea tower. Long ago this was an eldritch fastness of Sezrekan the Elder, the most wicked wizard ever to plague the Known World, but now the tower is known simply as the final resting place of the fabled Black Pearl – an artifact rumored to bring doom upon all who dare to posses it. Tonight the moon nearly fills the sky, and the tides have already begun to recede. Adventurers have eight short hours to explore the tower before the dark waters return. The fabled Black Pearl will be theirs for the taking…if they can survive the Pearl’s curse.
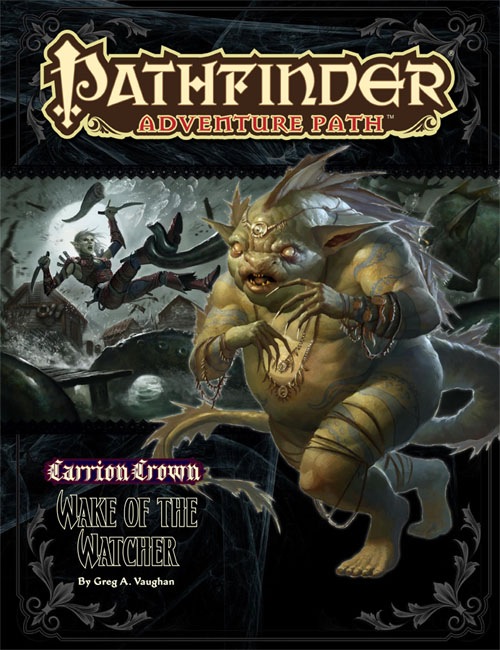
Part 4 of the Carrion Crown Adventure Path brings the heroes to the small fishing village of Illmarsh. The party is searching for a dark rider of the necromantic Whispering Way cult and will discover the strange practices of the deeply religious inhabitants of Illmarsh. Rumors of madness, strange disappearances and human sacrifices to things best left unnamed lead them to investigate the town church and its history. They'll find a desperate people, caught in a war between beings from beneath the seas and invaders from the darkest corners of the cosmos. Can the heroes save Illmarsh from its tradition of terror? It is worth noting that this story is heavily inspired by The Shadow over Innsmouth by H.P. Lovecraft and the role playing game Call of Cthulhu. If you're planning on going through the whole adventure path of Carrion Crown, the module Carrion Hill could easily be fit between book 3 and 4, as the party will travel directly through the area where this one shot adventure takes place. This book includes: - “Wake of the Watcher,” a Pathfinder RPG adventure for 9th-level characters, by Greg A. Vaughan - Blasphemous secrets of the foul faiths known collectively as the Old Cults and sanity-shattering gods such as Azathoth, Nyarlathotep, and Cthulhu, by James Jacobs - A giant bestiary filled with eight classic monsters inspired by the writing of H. P. Lovecraft and the tales of the Cthulhu Mythos, by James Jacobs and Greg A. Vaughan - Laurel Cylphra’s discovery that the dead aren’t the only dangers in Ardis in a new entry into the Pathfinder’s Journal, by F. Wesley Schneider.

Lore of Aetherra: The Lost Druid is an award-winning 5th Edition adventure designed to bring characters from level one to five, and is the first in an expansive 4-book saga of science-fantasy adventures that will take your players to level 20. Fano. Things here haven't always been so grim. Time and chance have conspired to transform this once magnificent city upon the lake into a run-down sanctum for the destitute and depraved alike. Those who would see Fano renewed seek a lost druid who brings with him the hope to restore the city to its former glory and awaken the ancient technology hidden deep within its constructs. Could Fano's awakening usher in a new era of peace and prosperity, or will it unearth a conspiracy lurking in the shadows? Lore of Aetherra: The Lost Druid is a 5th Edition adventure designed to bring characters from level one to five, and is the first in an expansive 4-book saga of science-fantasy adventures that will take your players to level 20. A uniquely immersive RPG experience, The Lost Druid employs a myriad of digital content that can be experienced using the Alchemy RPG platform. Enjoy a cinematic storytelling structure, breaking chapters into scenes supplemented by expansive soundscapes, dynamic musical scores, voice-acted flavor text, and environmental motion graphics. 2023 IPPY Awards Winner: GOLD in Reference Product Contents: Over 250 Pages Over 2 hours of Audio Content 5 Premade Player Characters 6 Side Quests 7 Tavern Mini Games 35 New NPCs and Monsters Maps: 8 area, 1 city, and 1 region New Backgrounds, Spells, and Magic Items Over 60 NPC Profile Blocks AI Combat Tactics for Every Encounter Published by HITPOINT Press

The Sea Witch is a short adventure for four 10th-level characters. The difficulty of the adventure can be adjusted by changing the level of main antagonist (Black Molly, the sea hag pirate) or by altering the number of her ogre servants. To tailor the encounter to groups of different levels, refer to table 4-1 in Chapter 4 of the DUNGEON MASTER’S GUIDE. The adventure is set off a lightly populated coastline known as Misty Bay, but adapts easily to any coastal region in existing campaigns. The sea hag known as Black Molly is a notorious pirate who has plagued the coastal cities for the better part of a decade. A successful Knowledge (local) check (DC 15) will reveal that Molly and her ogre crew have a filthy reputation as merciless killers who delight not only in plundering vessels for their riches, but also in destroying the ships themselves and sending all hands to the bottom of the sea. Now the villain and her followers have seized control of the Old Lighthouse of Misty Bay located off a lightly populated coastline. For generations the lighthouse beacon has protected the fishermen of this region, warning them of the dangerous rocks that lurk just below the level of the high tides. Recently, the hag has put out the beacon, darkening the lighthouse; misery and destruction are sure to follow as ships start to blunder into the rocks. Blackmail is apparently Black Molly’s aim in this venture: She conveyed a message to the nearest shore community, the fishing village of Poisson, demanding the princely sum of 50,000 gp. Until she receives this ransom, she intends to hold the lighthouse and its beacon hostage. The fate of the human keepers who tend the lighthouse is unknown to the seaside communities at this time, but they fear the worst. The Sea Witch is ostensibly a rescue mission: The PCs are pitted against the evil of Black Molly and the brawn of her savage ogre crew. It is the heroes’ task to retake the lighthouse and, if possible, free its captives from the clutches of their jailer. What neither the PCs nor the shore communities yet realize is that while she 1would be pleased to have the gold, Black Molly is in fact after bigger treasure. Molly has no intention of giving up the lighthouse — at least, not until she finds what her master sent her here for. Lying on the sea floor practically at the base of the rock on which the lighthouse sits is the wreck of the war galley Flying Cloud, which according to popular legend was captained by a cleric who wore around his neck an amulet of the planes. Black Molly wants this prize, but so far she hasn’t been able to find it. She’s scoured the wreck without finding any sign of the magic item. Now she’s trying to determine where to search next, for the item might well be somewhere near the wreck. If she can’t find it, she’ll start torturing her captives to find out if they have any useful knowledge about the amulet.
Provost Faurious has procured an Aethervane, an astrolabe-like instrument tied to Kythri that's used to navigate manifest zones. Unfortunately for the Provost, the Riedran ship that was carrying the Aethervane across the Sea of Rage to deliver it to their agent in Regalport fell victim to piracy. The player characters are dispatched to Regalport to meet up with the Provost’s agent there and petition High Prince Rygar for more information about the stolen cargo. When the characters dock in Regalport, they meet the Provost’s contact and are ushered into a meeting with High Prince Rygar. Wishing to show his intolerance for piracy, Rygar charters one of his own ships for the party’s use as they investigate the stolen cargo. Upon arriving at the crash site of the stolen cargo, the party is set upon by a fleet of pirates known as the Wind Whisperers. When things turn sour, a new surprise reveals itself as an unnatural storm rolls in, a stolen airship at its heart. The Wind Whisperers have found a way to convert the Aethervane to serve their own purposes. Seeking aid from Rygar and House Lyrandar, the heroes chase after the pirates by sail and airship. As they do, they are bedeviled by the Chaos Fleet—strange ships sailed by an even stranger crew that are drawn to the Aethervane and the chaos it brings. In a final airborne confrontation, the party boards the rogue airship and retrieves the sought-after artifact, with a chance to salvage or sink the stolen vessel in the process…

Near the jungles of Chult, beneath the waves of Refuge Bay, lies a ruined city. Evil hags and their minions make their home among the ancient relics. Even deeper down, at the bottom of an old undersea lake, an otherworldly monstrosity guards its eclectic hoard of oddities. What does it know about the Soulmonger? An adventure for characters between levels 4-6 Requires the Tomb of Annihilation adventure This 44 page adventure adds Ishau as a location to your Tomb of Annihilation campaign. It describes the city's history and current inhabitants, including maps, new monsters, and treasure. In an undersea temple, characters face off against a coven of sea hags. The sunken wreck of the Decapus is the lair of sea spawn pirates. And among the ruins lurk giant crabs, skeletal sharks, vegetan mummies, and other monstrosities. A second location, complete with keyed maps, is available to characters who wish to dig deeper: the underwater island-domain of a Morkoth, pulled into Chult by Acererak's magic. The Morkoth's home is in disarray. Trophies it collected from across the multiverse are now running wild and its treasures are being looted by marauders from Ishau. If the characters help, it may share its secrets with them.

The unease penetrates deep in the heart of the town of Wildereach. Amalgamous bodies have been found, frozen, roaming, howling. A cloaked figure looms, suspected of snatching townsfolk when the midnight sun hits its darkest points. A creature of the deep tries to stop all that enter it's domain. Many strange happenings, here in Wildereach, is something bigger at play?
Catastrophe strikes the frontier village of Swallowfeld! With a grinding groan, the town’s mill slews into the Kilian River and breaks through the ceiling of an ancient subterranean dungeon. This accident frees a long-imprisoned evil to prey upon the shocked townsfolk. When several Swallowfeld residents—some innocent and some not so innocent—are spirited away into the rapidly flooding dungeon, it falls to a brave group of heroes to venture underground and rescue the missing before dark, rising waters seal their fate.

A museum of the Mad Archmage, it contains curiosities and treasures from all over the multiverse, and the challenges of the Watery Caves, which are a series of living caves connected by an underground river. This adventure can be used as an expansion to the Castle of the Mad Archmage mega-dungeon adventure, or as a stand-alone adventure. Published by BRW Games

The strangest things wash up on the beach sometimes. The inhabitants of the Acitoff coastline are accustomed to storms, but last week the largest hurricane ever recorded swiftly struck a 60-mile stretch of coastline. The first day after the hurricane, mysterious bodies started floating to surface. They bore the symbol of the feared pirate, Jaggertooth Grin! Now it is up to the adventurers to locate the pirate ship and claim the treasure. The adventurers will have to fight the creatures of the deep in this primarily underwater adventure. Pgs. 3-14
This adventure is intended for 2 to 3 3rd-level PCs originally from Lankhmar, but can easily be adjusted to accommodate adventurers from other locales. Guidelines are also provided for scaling the adventure for up to six PCs. The events of this adventure lure the party from their home in the City of the Black Toga to an abandoned watch tower on the coast of the Inner Sea, not far from Ool Hrusp. After completing this scenario, they may find reason to further adventure in the Forest Land.

Strange calamity has come to the Moonstone Reach. What was once a foreboding forest is now completely underwater, the gods Umberlee and Mielikki locked in dispute over the wondrous biome. Umberlee calls forhomage and claims dominion over what she sees as rightfully hers.

So you want to be a Mage of High Sorcery? To join the esteemed organization, you must travel to the Tower of Wayreth and undertake the most important event in your life—the harrowing Test of High Sorcery! If you can survive where so many aspiring mages have failed, you will forever bind your soul to the Gods of Magic and gain access to untold arcane secrets. The Test of High Sorcery is the perfect adventure for new and veteran players looking to experience Dungeons & Dragons in a new way! It is a solo adventure, where your choices have meaningful consequences, but it also provides balanced rules to play with a group or a Dungeon Master. This 154-page tome features: - A sprawling adventure that fits perfectly as an expansion to any Dragonlance campaign, Dragonlance: Shadow of the Dragon Queen, or as a stand-alone replayable experience - A tale full of sorcerous intrigue, featuring many new characters alongside iconic favorites like Fistandantilus, Takhisis, Fizban the Fabulous, and the Gods of Magic - Innovative Destiny and Trait mechanics make your choices really matter—and ensure every mage’s Test of High Sorcery is a unique experience - Over 60 possible outcomes to determine which Order of High Sorcery you join and provide compelling new plot hooks for your character during future adventures - Dozens of unique locations with rich stories and sorcerous challenges that Dungeon Masters can use to create their own version of the Test of High Sorcery - New magic items and stat blocks, with mechanics that support clever use of enemies’ weaknesses and the environment against them - Four gorgeous sample characters, with interactive character sheets designed to be new-player friendly so that you can jump right into the story - A detailed primer on the history of Krynn and how it relates to the Mages of High Sorcery - A community survey when you finish to let you see how you compare to other mages taking their Tests of High Sorcery

The exciting artifact series concludes with AS3 – Peregrination. With a pair of control rods in hand you are guided to an ultimate prize, a Gnomish flying vessel! The rods have directed you to a crashed ship buried in the sandy beach. A check of the debris sheds light on the mystery of the artifact and a description of how to repair the intricate machine. Apparently finding the vessel is just the start!

Mare Vinceret has kept the underwater city of Conatha thriving for centuries. Deep within the Greyspace lurks a force so strong that it could impede their progress toward peace. It dwells in a place beyond where they would ever choose to go, filled with dark aquatic life and a menacing presence that no one could match. Juliya Alastor, the leader of Mare Vinceret, sends her best to dispose of the threat known only as Biandra, the Hag of Conatha (sea hag). The Hag of Conatha seeks to fix what Mare Vinceret has done to the beautiful land that she sees as corruption in disguise, then live in peace. Biandra has taken their forgotten structure and made it her own. She sits within a threedomed greenhouse with walls blanketed by vines of kelp and seaweed and swimming with deadly aquatic creatures. Within the dark, polluted lair, Juliya's team falls into madness. One by one, Biandra's hallucinatory tricks destroy them, leaving each of them within her grasp. Believing all is lost, Juliya finds a glimmer of hope in a crackled communication one of the members of the party must be alive. She must send out one more group of brave adventurers to bring down Biandra for good and reclaim the underwater dome. Will the adventurers find the lost orc rogue, fight their way in, and investigate through the biodome maze? Or will they be confined to the underwater maze of Conatha in madness, trapped with the Hag of Conatha herself? Pgs. 35-41

Bastion Bay has become a bustling trade hub under the guidance of the cunning Capa Meriosa - but all is not well in the former pirate town. A monstrous undead shark stalks the seas, sinking any ship that gets too close; the newly built light house has gone mysteriously dark; and rumours swirl of twisted witches and other horrid things stalking the night. The port has been shut with no ships allowed to leave and tensions are running high. Bastion Bay is on a knife edge, and a new ship is just pulling into port... The Beast of Bastion Bay is an adventure for the 5th Edition of Dungeons & Dragons! It is designed for 3-5 5th level characters, and assumes a wide range of skills and abilities. It is designed to be played across multiple sessions and should take between 5 and 10 hours to complete. The adventure centres on the port town of Bastion Bay but can easily be transferred to any small or medium port town as long there are nearby islands and caves. This adventure was designed to have an equal balance of combat, exploration, and role-playing encounters.