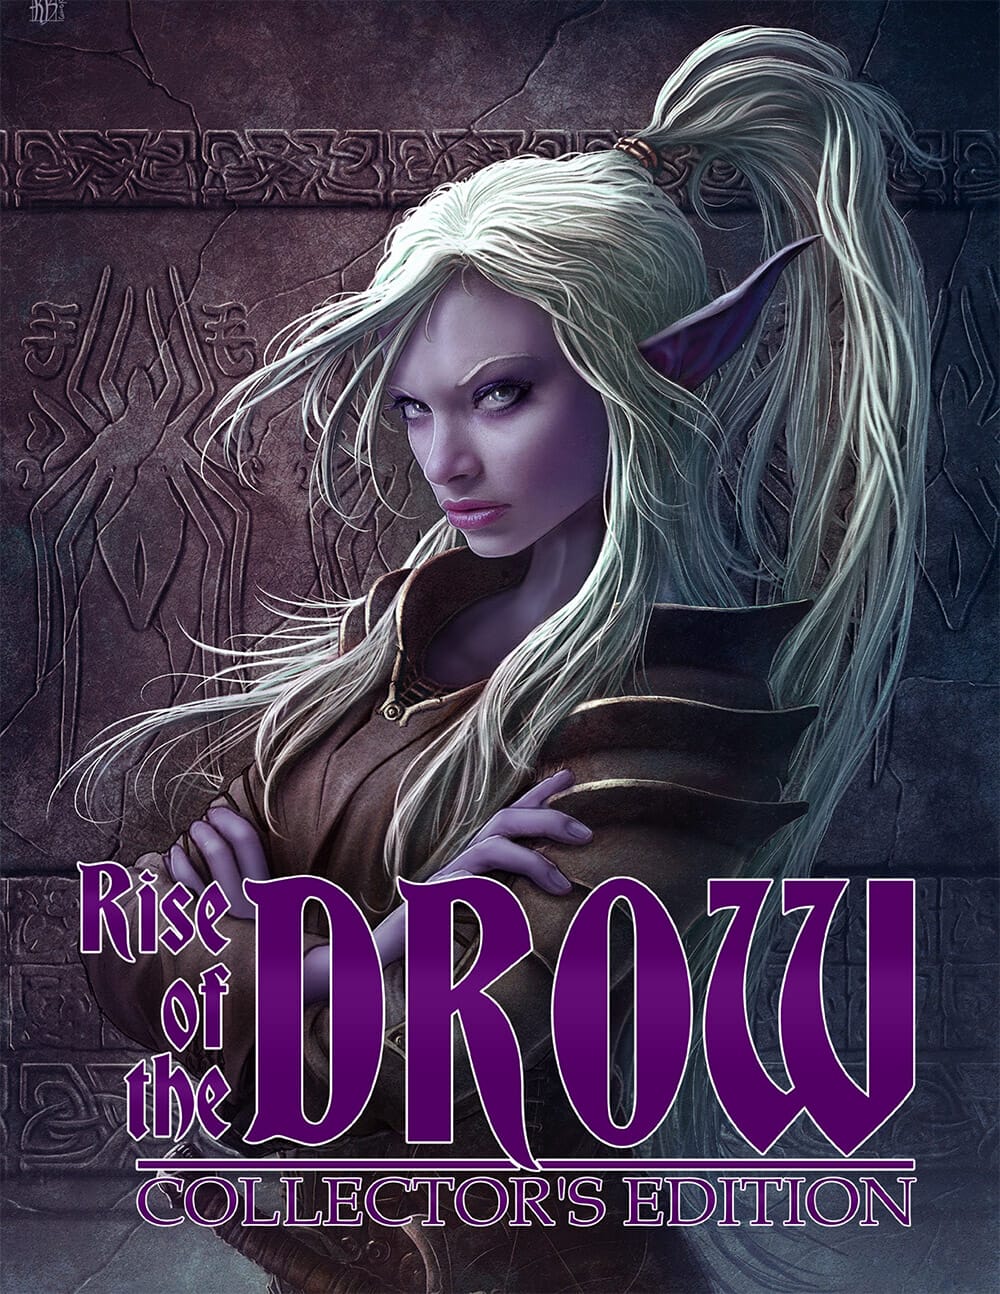
Tonight, a ceremony of light is taking place on the surface. Meanwhile, a world away in the city of spiders, a drow matron solidifies a pact with soul-consuming entities who require great sacrifices in trade for unimaginable power. Drow eyes turn to the surface. This book contains a mega-adventure and setting, taking characters across the surface and into the depths of the world. Adventurers will meet unique denizens, battle horrors of the Underworld, explore epic locations, and fight to stop the rise of the drow.

This is the "Vecna: Eve of Ruin" + "Phandelver and Below: The Shattered Obelisk" crossover you didn't know you've been waiting for. As dusk settles over the village of Phandalin, a palpable sense of unease grips the villagers. Rumors spread that a hilltop keep has inexplicably materialized on the outskirts of town, and worse yet, the sun fails to rise come morning. Unbeknownst to the townsfolk, a powerful cult of Vecna-worshipping vampires has arrived, and the only hope Phandalin has is a ragtag pack of werewolves and a few brave heroes ready to make their mark on the world. While this adventure can be run as a standalone module, it can also seamlessly serve as a prequel to "Vecna: Eve of Ruin" or as a side quest for "Phandelver and Below: The Shattered Obelisk." This module can also serve as a sequel to "Phandalin Werewolves: Beasts of Her Moon" which is exclusively available over at the dmsguild. Designed for 4-6 players with an average party level ranging anywhere from 4 to 7, this adventure aims to create a backstory of bad blood between the cult of Vecna and the PCs. It includes a monster folio, tokens, as well as maps from the esteemed Tessa Create Maps, Dyson Logos, and Elven Tower.

You and your cohorts have pulled into Free Haven, a port city in the northern reaches to settle down for the season. Your respite is short lived as word reaches the city that a small community further north has been attacked by humanoid raiders! Refugees from North Port have arrived and report their community has been sacked. There is little hope of survivors and the fear is that Free Haven may be next. With little else to do, it is time for the party to put on their “hero caps” and save the day!
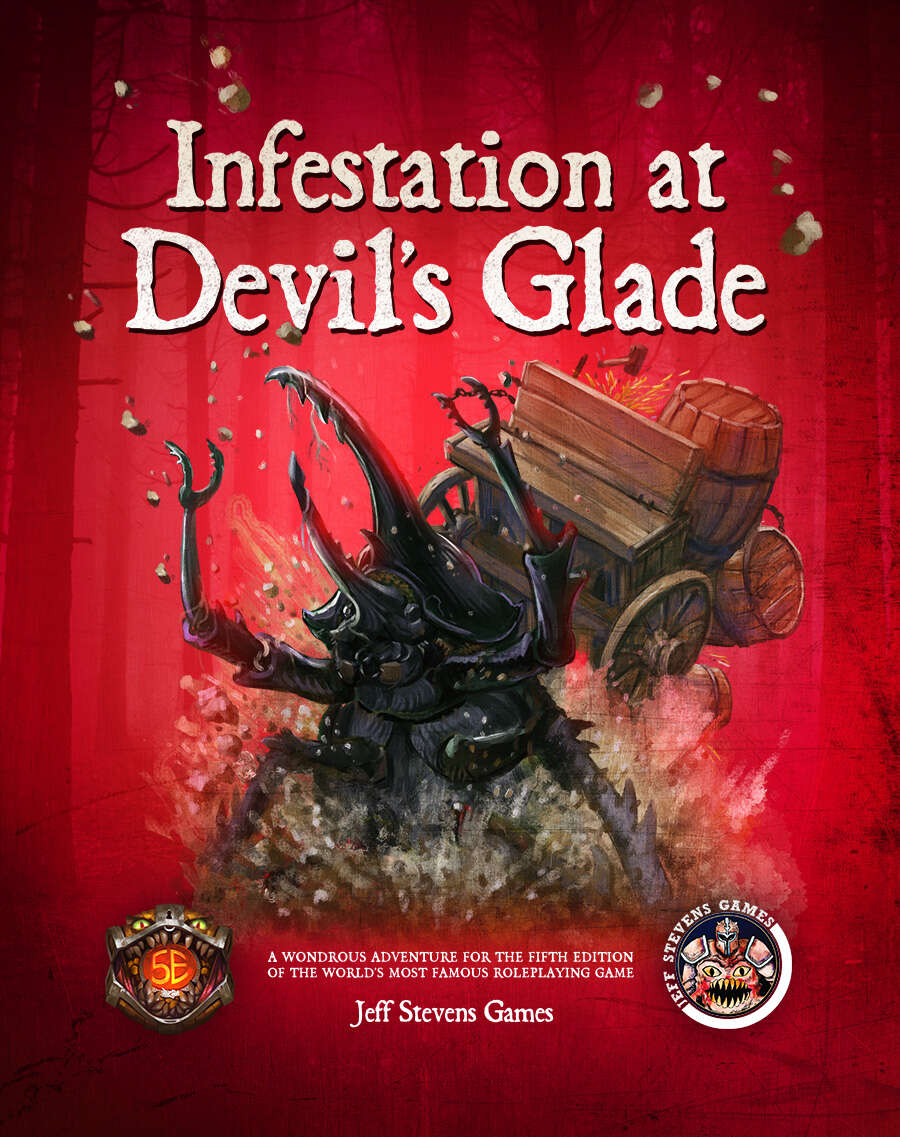
The town of Devil's Glade is under attack! Swarming insects have driven the residents out of their homes and businesses, and giant insects patrol the town square. Who or what has brought these creepy-crawlies to Devil's Glade? What's their motive? Are your heroes brave enough to put an end to the infestation? Infestation at Devil's Glade is a 2- to 4-hour adventure designed for four to five characters of 1st to 4th level, and is optimized for 2nd level characters. Scaling Suggestions are included, allowing you to play this adventure with characters of 5th to 6th level. Infestation at Devil's Glade isn't just a short adventure. We provide you with a location to which your heroes can return, or even use as a home base. The Supplement Includes: Adventure. The main adventure focuses on the heroes cleaning the town of the infesting insects and the villains who brought them. Beginning at The Fork (a tavern where many of the residents have made camp), the characters learn about the infestation of Devil's Glade, and are hired to look into the matter. NPCs. The adventure is filled with fun and engaging NPCs. During the characters' time at The Fork, they have the opportunity to talk with NPCs, help them, and learn more about the infestation. After the heroes return Devil's Glade to normal, the merchants and residents return, giving your characters unique shops to explore and quests to complete. Cursed Mask. The crux of the problem - a cursed mask that slowly transforms the attuned creature into a giant, insect monstrosity, and gives them power over insects. To end the infestation, the adventurers must confront the partially transformed person wearing the mask. Shops & Services. Devil's Glade contains shops and services the characters can explore, including therapeutic mud baths, a diner specializing in eggs, a trinket shop, a candle maker, and a dentist. Side Quests. We provide several side quests for before and after the main adventure, allowing you to increase the main adventure's run-time, and provide you with material for after the main adventure. Maps. The adventure contains maps for the main locations and major side quests. Each map is hand-drawn by Jean Lorber. Art. NO AI! The book is filled with fantastic, original artwork by Matt Morrow Art. Also Included: Map Files. Both grid and non-grid maps are included and available to download. Special VTT Tokens and Assets. Several custom tokens and art assets are included for VTT play.

A plug in adventure that can be used as part of a larger campaign or run as a one shot for 3-4 Tier II characters. A village needs aid, as their small village is under a curse that they have been able to keep hidden from the villagers, but now that clock has run out and the piper demands to be paid. Can they find what is the cause of the curse and finally eliminate it.
Called by the Elder Elemental Eye to serve, four corrupt prophets have risen from the depths of anonymity to claim mighty weapons with direct links to the power of the elemental princes. Each of these prophets has assembled a cadre of cultists and creatures to serve them in the construction of four elemental temples of lethal design. It is up to adventurers from heroic factions such as the Emerald Enclave and the Order of the Gauntlet to discover where the true power of each prophet lay, and dismantle it before it comes boiling up to obliterate the Realms.

A horror fantasy adventure for 3-5 1st level characters The hunched beast prowls the forest, sniffing at the still air. The roiling sky flashes and thunder breaks the silence. The time is near and the beast senses it. The monstrous form bounds toward the darkened village, a demonic howl in its throat... Shipwrecked on a perilous shore, a group of adventurers stumble into a blighted land and come face to face with a great black beast with a terrible curse. Can they unravel the mystery and solve the Barghest's curse before it’s too late? - 58 pages, 10 locations, 10 dungeon rooms - 2 new spells and 5 new monsters - Over 20 original illustrations - Inspired by English folklore - Emphasis on exploration, interaction, and usability

Bale, the kind gnome and owner of Bale's Outfitting Outpost, requests that the adventurers track down a group of youngsters that rented horses from him. The horses are overdue and Bale believes that he may have been swindled. Unbeknownst to the gnome, the party of young adventurers has met a dark fate. Will your adventurers accept Bale's request to track down the youngsters and, in doing so, find out what really happened? Or will they leave more blood on the trail? The module includes an introduction to Bale's Outfitting Outpost, encounter stat blocks, maps, and a battle stat tracker. Note: You do not need the Bale's Outfitting Outpost module to run this adventure.
Tears for Twilight Hollow is about mystery, danger and deceit- the players seek a missing Paladin in an increasingly-troubled town, chasing clues around a village and through a valley only to discover that the Paladin's old friend long ago began worship of an evil S&M goddess. Betraying her friend and trapping her soul in a Devourer, a powerful extraplanar undead creature, the evil priestess continually parades the soul-bereft corpse of their fallen Paladin in front of the villagers in a show of 'sorrow', all the while gaining immense pleasure from the village's pain. Pgs. 62-110
The adventurer is hired by Dawson Beam, the sheriff of the City of Verdant Reach, to investigate a gang of thugs that call themselves the “Rats of the Reach”. This is the second adventure in the 1-on-1 Mini-Dungeon series, but can also be utilized as a standalone adventure. Published by AAW Games.
For better or for worse. It's up to you to make sure this is the happiest day of their lives - not the most embarrassing! A wedding and a jealous lover what could go wrong. A small and light hearted adventure perfect for kicking off a campaign in a city. Pgs. 50-57

A beloved priest has gone missing, and sinister trouble stirs beneath the Church of St. Terragnis. Can the heroes rescue the victims of an age-old evil before it claims more innocent lives?

This 5th edition investigation one-shot is planned to be played by 4 to 6 level 1 characters. The characters will face a spirit in the form of a scarecrow out to wipe out the villagers of a town, the group will discover that all is not what it seems and that this spirit is actually out for justice... or revenge.
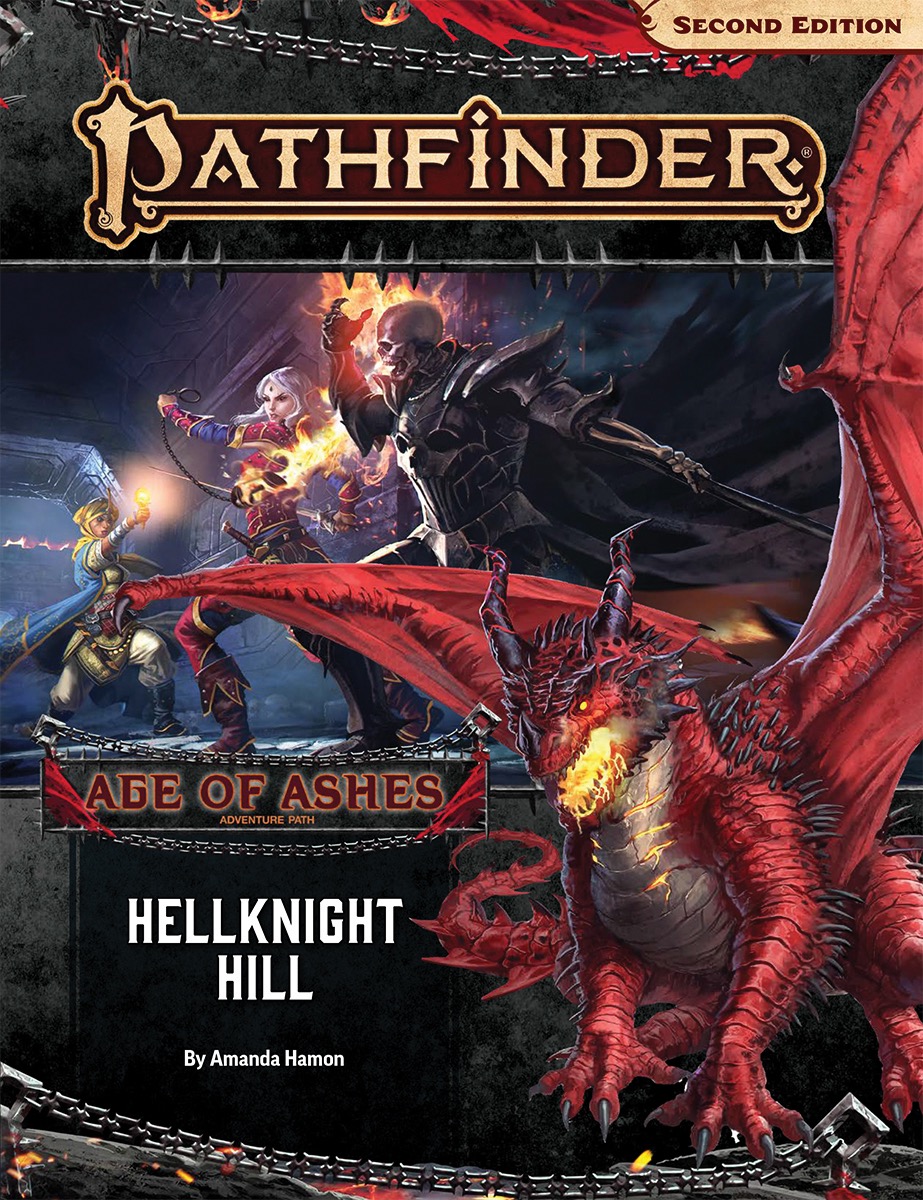
Fires burn atop the ruined citadel on Hellknight Hill, sending plumes of red smoke into the air that could be a call for help. Within the old keep, strange invaders from a distant land, mysterious long-lost ruins, and the machinations of a shadowy organization await discovery. Something dire is building toward an apocalyptic event, and it falls to your characters to stop the end before it begins. The Age of Ashes Adventure Path begins with “Hellknight Hill”—a complete adventure for 1st- to 4th-level characters. Age of Ashes is a 6 part adventure that runs from levels 1 - 20, Maps are available as a separate product Disclaimer: This was the first Adventure Path released for the Pathfinder 2e system as such the difficulty curve is a little on the high end if run as written.
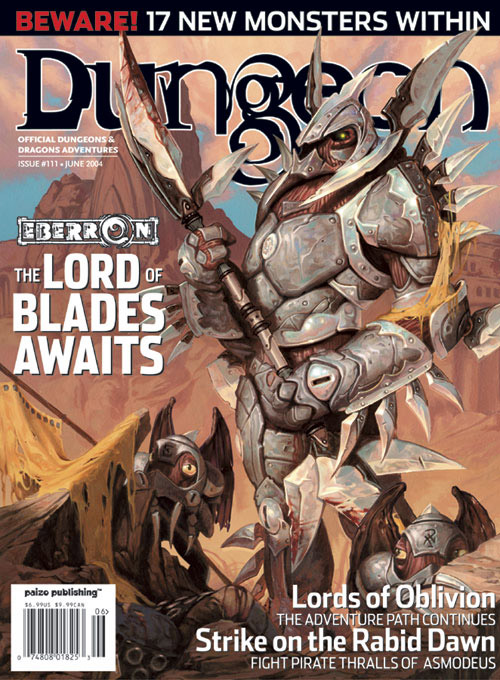
A terrible thunderstorm batters a seaside port, yet thunder and lightning are nothing compared to what is about to be unleashed by the diabolic crew of the Rabid Dawn. Casters with access to control water, control weather, or control winds will prove especially valuable, as will characters with strong Swim skills. The adventure is best suited to a predominantly good or neutral aligned party of PC's. Strike on the Rabid Dawn takes place in the port city of Hardby (Dungeon #109). As most of the action takes place within a lighthouse and on a ship at sea, however, any suitable port from your campaign makes an appropriate substitution for Hardby. Pgs. 12-32

Did you know there’s a skeleton inside each of us? The players will find themselves in a community of scared anthropomorphic rabbits and exploring the lair of undead wizards looking for flesh to wear. There are opportunities for combat, roll play, puzzle-solving and exploration. This was written as a submission for the Summer Adventure Design Contest over at Bryce's Adventure Design Forum.

The outpost of Fort Dolor has experienced an unprecedented stretch of peace in recent times. Then nearly the entire garrison disappears on a supposed routine patrol, and the town— still on the frontier— is left nearly defenseless. Can the adventurers dig to the bottom of the mystery at Fort Dolor before they, too, disappear? Pgs. 82-103

After hiring a group of brave adventurers to help him "acquire" a beholder specimen, the mage Velinax disappears! Rumors blame an insidious thieves' guild called the Unblinking Eye for this turn of events. Why would the Unblinking Eye wish to "take care" of the mage? Why does the guild want to speak to anyone involved with Velinax? Finally, what dark goal does the guild truly intend to accomplish? Finding out the answers to these questions will lead doughty adventurers straight through the shadows of a crafty thieves' guild and onto the threshold of an even deeper and more dangerous darkness. "Eye of Doom" is the second of three adventures featuring the nightmarish beholder. It can be played as an individual mission or as part of the series that began with "Eye of Pain" and concludes in "Eye to Eye." TSR 9530

A fiend lurks among the Black Blade goblins. A shapeshifting barghest fashioned by the General of Gehenna to exact revenge on all goblin-kind. It’s aim: to kill as many goblin leaders as possible… A masked goblin approaches the party asking for help. Two tribe leaders are dead. But a rival for chief has control of the crime scene. Will the party discover the barghest among the goblin ranks? Can they stop this imposter before it strikes again? Adventure Overview The adventure’s story is spread over 4 parts and takes approximately 4 hours to play. The adventure begins with a Call to Action scene. Part 1: Goblin Politics. Krill sends his emissaries to implore help from any strong intermediary. The party is asked to investigate the murder of Thrawn in Dringly’s lair. This is Story Objective A. Part 2: The Opposition. Gain entry into Dringly’s lair and investigate the murder of Thrawn. Gather enough evidence to find the killer. This is Story Objective B. Part 3: To The Lair! Now that the players have determined the barghest (Yeep) is to blame, they need to get to Krill’s lair quickly as he is in imminent danger. This is Story Objective C. Part 4: The Barghest.When the players arrive at the lair, they need to get to Krill and expose and defeat the barghest. This is Story Objective D. Adventure Background A barghest named Yeep has begun its onslaught of attacks against the Black Blade goblins. Starting with Chief Gnar, then his second in command Thrawn, the barghest is moving methodically down the line of command. Krill is now chief. But he has some problems: Two leaders of the Black Blades are dead. Who killed them and why? Is he next? Dringly, the next in command, has decided to take his lair for himself, declaring himself Chief of the Black Blades. Who are the Black Blades? The Black Blades are a tribe of goblins in the local area. They are known for dipping their blades in a dark black substance. It is rumored these blades are poisonous. The Black Blades regularly attack passersby on the road to rob them. The Black Blades have two lairs, one run by a chief who leads the whole tribe, and another overseen by a boss lieutenant. The Black Blades have a well-established pecking order which is how Krill stands to become chief. The next in line is Dringly, who has also declared himself chief and wants Krill dead. Krill suspects that there is something suspicious about two leaders being killed within a day of each other, but he has already burned Gnar’s body without any investigation. He needs to investigate the body of Thrawn, but it is in Dringly’s lair. Krill wishes to avoid direct confrontation with Dringly at the present for three reasons: 1) Any violence would only kill his own tribe members and further divide the lairs. 2) He believes there is still hope for negotiation to reunite the Black Blades. 3) He believes that if he were to attempt negotiations himself, Dringly would kill him. This adventure features: Two maps. Ready for your favorite Virtual Tabletop. A full color pdf. A black and white pdf. One custom monster, a reprint of barghest, all others available in the Monster Manual. Four hours of entertainment involving: roll playing a goblin bard, investigating a murder scene, tracking down a barghest before it strikes again. Applicable to any setting.

Every year, the small town of Whitetree has to sacrifice a child as tribute to a fiery salamander slaver, Zassan. The players must pursue the slaver, attempting to stop him and retrieve his precious cargo before it’s too late!