
The caravan master Santos Boromite was personally assaulted and his Euriduis, the symbol of caravan power, was stolen. The item signifies full authority over all legs of the caravan and in the wrong hands would wreak havoc. You have been summoned to speak with the Governor Lando Shardo at once to save Timel yet again! Can you find the bandits responsible for the theft and bring them to justice. Timel wants a caravan traffic and unless this matter is taken care of quickly that won't happen. Just when you think you have it figured it out it turns out you were wrong!

Noel Needs Elves is our Christmas tongue-in-cheek adventure! While it could be a 'real' adventure it was designed to just have a good time with some holiday strangeness! After getting done with your first adventure you head to a fortress in a canyon to resupply and heal up. There you meet Lady Noel who is involved in a fight of her own. She trades you healing for the promise to deliver a message to the Elves on the other side of the canyon. Happy holidays everyone!

To Hell and Back Again is the perfect adventure for new players and veterans looking to experience Dungeons & Dragons in a new way! It's written as a solo adventure, where choices have gigantic consequences, but it also provides balanced rules to play with a group or a Dungeon Master as well! This 80 page adventure features: - A heart-pounding origins story that fits perfectly as either a prequel to Descent Into Avernus, a stand-alone adventure, or into your ongoing fantasy campaign. - Beloved characters like Lulu the hollyphant, Mad Maggie and her redcap gang, the archdevil Zariel, and many others brand new to this adventure. - Infernal War Machines, and exciting encounters with unique stat blocks. - Innovative Destiny and Traits mechanics that make your choices really matter. - A ton of possible outcomes that will fuel your character's many adventures to come! - Four gorgeous sample characters, with interactive character sheets designed to be new-player friendly so that you can jump right into the story if you'd like. - A community survey when you finish so that you can see how your outcomes and choices compared to other players!
Giants and ghost trees and foul undead beasties... What happens when elves, giants, and a mysterious witch all decide only you can settle their troubles. Strange new tree species! A hobgoblin fort! Unexplained noises during the day and different noises at night! Investigate and explore the Bretonwood to get to the bottom of its problems. The adventure provides an overland open-world style map of the Bretonwood which the players are encouraged to explore. Many set and random encounters are provided. There are opportunities for combat in this area, but players should be ready to handle some problems out of combat to get the most satisfying experience. Pgs. 22-43

A fiend lurks among the Black Blade goblins. A shapeshifting barghest fashioned by the General of Gehenna to exact revenge on all goblin-kind. It’s aim: to kill as many goblin leaders as possible… A masked goblin approaches the party asking for help. Two tribe leaders are dead. But a rival for chief has control of the crime scene. Will the party discover the barghest among the goblin ranks? Can they stop this imposter before it strikes again? Adventure Overview The adventure’s story is spread over 4 parts and takes approximately 4 hours to play. The adventure begins with a Call to Action scene. Part 1: Goblin Politics. Krill sends his emissaries to implore help from any strong intermediary. The party is asked to investigate the murder of Thrawn in Dringly’s lair. This is Story Objective A. Part 2: The Opposition. Gain entry into Dringly’s lair and investigate the murder of Thrawn. Gather enough evidence to find the killer. This is Story Objective B. Part 3: To The Lair! Now that the players have determined the barghest (Yeep) is to blame, they need to get to Krill’s lair quickly as he is in imminent danger. This is Story Objective C. Part 4: The Barghest.When the players arrive at the lair, they need to get to Krill and expose and defeat the barghest. This is Story Objective D. Adventure Background A barghest named Yeep has begun its onslaught of attacks against the Black Blade goblins. Starting with Chief Gnar, then his second in command Thrawn, the barghest is moving methodically down the line of command. Krill is now chief. But he has some problems: Two leaders of the Black Blades are dead. Who killed them and why? Is he next? Dringly, the next in command, has decided to take his lair for himself, declaring himself Chief of the Black Blades. Who are the Black Blades? The Black Blades are a tribe of goblins in the local area. They are known for dipping their blades in a dark black substance. It is rumored these blades are poisonous. The Black Blades regularly attack passersby on the road to rob them. The Black Blades have two lairs, one run by a chief who leads the whole tribe, and another overseen by a boss lieutenant. The Black Blades have a well-established pecking order which is how Krill stands to become chief. The next in line is Dringly, who has also declared himself chief and wants Krill dead. Krill suspects that there is something suspicious about two leaders being killed within a day of each other, but he has already burned Gnar’s body without any investigation. He needs to investigate the body of Thrawn, but it is in Dringly’s lair. Krill wishes to avoid direct confrontation with Dringly at the present for three reasons: 1) Any violence would only kill his own tribe members and further divide the lairs. 2) He believes there is still hope for negotiation to reunite the Black Blades. 3) He believes that if he were to attempt negotiations himself, Dringly would kill him. This adventure features: Two maps. Ready for your favorite Virtual Tabletop. A full color pdf. A black and white pdf. One custom monster, a reprint of barghest, all others available in the Monster Manual. Four hours of entertainment involving: roll playing a goblin bard, investigating a murder scene, tracking down a barghest before it strikes again. Applicable to any setting.
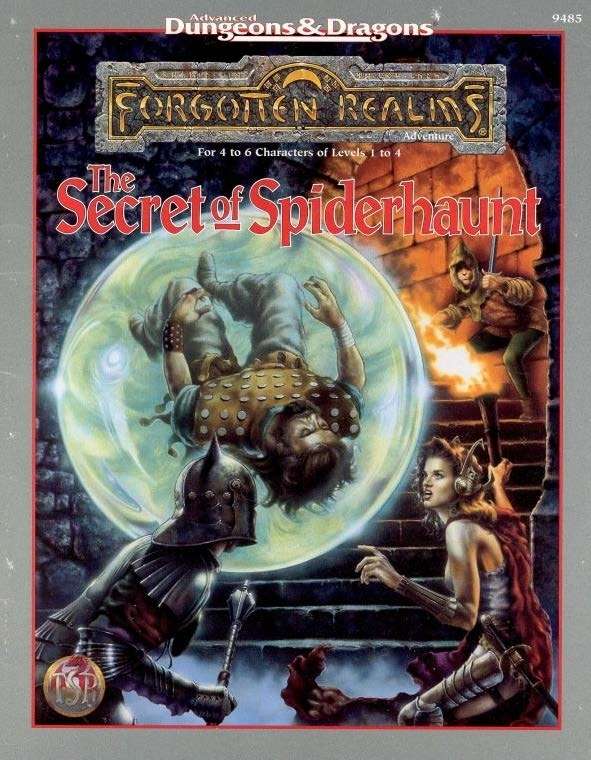
The infamous Sword of the Dales has always held a certain fascination in the eyes and hearts of the citizens of the Dalelands. Thus, it was no surprise when Randal Morn, rebel leader of Daggerdale, led an expedition into the crypt of a long-dead wizard to recover the weapon. Shaevyn the weapons-mage had created the Sword long ago, and it stood to reason that the blade would be waiting within his tomb. Perhaps the Sword of the Dales woulld allow Randal Morn to rule Daggerdale once again. But Randal Morn never returned from that fated party. Only tales of terror told by a lone survivor held any clues as to Randal's fate. A brave hand of heroes accomplished what Randal Morn's group failed to do in part one of this adventure trilogy, "The Sword of the Dales." Battling through the tomb's undead inhabitants, those heroes reached the burial crypt of Shraevyn. There, resting in the center of the coffin, was the Sword of the Dales, its azure glow filling the chamber. However, there was no sign of Randal Morn. Only a note signed by his hand held any clue as to his fate. "Seek me in Spiderhaunt," it proclaimed. "The fate of Daggerdale is in your hands." This is the second part of a trilogy of modules that began with "The Sword of the Dales." The saga concludes with "The Return of Randal Morn." TSR 9485

A free short adventure for four 4th-level characters by Mike Mearls Looking Glass Deep is a flexible, site-based scenario that presents you with the details of the ruined abode of the wizard Urlen Sparlek -- and the gang of outlaws that now occupies the place. This 10-page adventure by Mike Mearls is designed for 4th-level characters. Unlike some site-based scenarios, Looking Glass Deep features a dungeon full of monsters that take proactive steps to defeat the player characters (PCs). Tzarrik the hobgoblin sorcerer is an intelligent tactician with the ability to spy on the party almost at will when the group is within the Deep. His ragged gang of followers work together as a team under his command to repel attackers. Throughout the course of the adventure, the characters have the opportunity to locate an artifact called book the key of the way , discover the mysteries of the throne of the Deep -- and perhaps, in the end, even gain themselves a new headquarters. Published by Malhavoc Press
Some ports are more dangerous than the storm. It's alive, it's hungry, it's growing. And you're on the menu. Alone, out in the wilds with a savage winter storm bearing down on you, you need shelter to survive. You stumble through the trees and smell wood-smoke. Ahead you spot the small fortified trading outpost known as Jacob's well. You're not the only traveller to find themselves stranded here in the teeth of the storm. The only problem, someone has bought something with them, it's alive, it's growing, it's voracious and you are all on the menu. Think Aliens and The Thing and you're on the right track. Has potential to be scaled to suit a group of adventurers. Pgs. 8-23

What could happen while traveling the vast Savage Frontier? Just about anything! Encounters in the Savage Frontier includes 24 unique encounters of various difficulty that can be used while the adventuring party travels the Savage Frontier. It also includes several new creatures and magic items, digital hand-drawn maps (10 as downloadable .jpg files), and original artwork. Some of the encounters are short and brief, while others may take you a full gaming session to complete. Available for Fantasy Grounds

The Ghost Tribe of Orcs were driven from their home under Wyvern Tor by some terrible evil. They marched to Phandalin and attacked, only to be defeated. Now the heroes will go beneath Wyvern Tor to discover the terror that chased out the orcs and perhaps find the source of the orc’ssardonyx. Journey to Beneath Wyvern Tor is the third of four parts in the After Lost Mine series. It will play out the journey to the orc’s former cave settlement and then into the darkness beneath. Part IV will have the party deal with the terror from the Underdark that drove out the orcs.

The people of Northwood’s Rest need help. Winter is coming, and something’s been slaughtering the livestock. Surely it must be the orcs of the Northwood! Heroes are needed to hunt them down. Will you answer the call? Welcome to Hunted! The latest adventure from the critically acclaimed platinum best-selling author Tony Petrecca. Hey, that’s me! I’ll stop with the 3rd person talk now. My last release, Killer Kobolds, was all about unadulterated, non-stop run and gun action, and quite purposefully contained absolutely no moral quandaries. Its theme was simple - Kidnapping Kobolds needed killing… now go! The result was an absolute blast, but with Hunted! I wanted to explore notably different themes. With Hunted! Exploration, investigation, and role play go hand in hand with unexpected twists and turns to present an adventure I’m quite proud of. Worry not, action hounds, as there’s plenty of combat to be had, but with Hunted! mindless murder hobo’s need not apply. Set in the frontier town of Northwood's Rest, a simple thorpe on the edge of a forest, Hunted! lends itself to easy insertion into any campaign setting and would make an excellent side quest for Storm King's Thunder. With direct tie ins to Acererak, Hunted! fits naturally within any Tales of the Yawning Portal campaign. Scaled for a party of 4-6 adventurers of levels 5-7, Hunted! can be easily tweaked to accommodate parties of lesser or greater strength. Featuring gorgeous cartography by Ennie award winner Elven Tower Cartography, beautiful art, a bevy of new creatures, new locations, several potential plot twists and a fun new magic item, Hunted! should provide six to ten hours of outstanding Dungeons and Dragons 5th Edition adventuring fun.

A nearly-penniless merchant wants heroes to secure and return priceless heirlooms. But can they do it with goblins all around, raiding and pillaging? Can the heroes reach a peaceful settlement with the raiders, or will they wreak mayhem and slaughter? Find out in Eastbarrow! This package (adventure, maps, and handouts within) forms a complete module for use with DUNGEONS & DRAGONS® 5TH EDITION RULES. It is especially designed for Dungeon Masters to initiate play with a minimum of preparation. Also includes full-sized maps for the VTT of your choice! Old School Look and Feel!

The ruined Thorp of Rhu once produced honey, apples, hard cider, and mead. Villagers now stay away as they believe Rhu is cursed. Years ago a witch, Katla, was cheated from a reward promised for chasing away an attacking giant. Furious, she waited for her chance at revenge. Over a year, Katla created many small sack dolls and gifted them to Rhu’s children. One night, each doll animated, killed the sleeping adults, and set the village on fire. Now Sorcha, the village elder, asks the PCs to go to Rhu to locate a lost dwarven friend, help a restless soul, and find out what really happened to Rhu long ago. These outsider sack doll spirits take great pleasure in tormenting and slaying weaker creatures. At Rhu, the PCs encounter murderous sack dolls, learn the villagers’ & dwarf’s fate, parlay with spirits, and clash with Bloody Tears, the witch’s minion & spirit familiar. Published by Wicked Cool Games

The hunt is on! Agents have hired out the infamous Redcaps to raid along the Hruesen River and Baron Botkin wants them brought to justice. A mad run by the goblins left a trail of ruin along the river road but the time to act is now, before the trail goes cold. the evil doers broke off the raid and now lie in hiding somewhere in the Barren Wood. There in the deeps of the forest stands the legendary Slag Heap - an ancient complex of unknown origin and terrifying reputation for years ago the Heap served the Horned God's minions as a bastion against the fey of the Barren Wood. But now all the forest is hostile to outsiders, whether good or ill. The men of the Barren Wood are fierce, independent, and distrustful of outsiders. Facing them is a daunting task in the best of times and now they seem to be protecting one of their own. Discovering the real powers in this region only brings the characters closer to doom as they travel to piles and heaps of slag and detritus that was once a glorious abode and temple to the dark powers before the age of man. Also available for 5E

Rumors and legends surround a hidden temple dedicated to the god of Magic, Ileaeni. This lost shrine is supposed to be in the Border Hills but no one, not even a legendary general has been able to locate this famed location. While long rumored to hold a supply of magical items no proof exists of this temple aside from notations in old scrolls. Myth or real you and your party are interested in exploration and treasure…this sounds like it may be right up your alley.

Fleeing the rage that consumed their feuding families, Juliana and Orlando fled to the Cave of Echoes, where it is said every wish is granted. Two years have passed, and all attempts to return the lovers to their parents have failed, though some believe them lost in the enchanted garden beyond the cave. Many are the rescuers venturing into that enchanted park; a few have returned after long absences, their minds and memories curiously disturbed. Now, the handsome reward offered for the return of the lovers has tempted you, but who knows that lies beyond the Crystal Cave? TSR 9066

After checking local pawn shops and the library you have discovered information on an old Adurite noblewoman who possessed a magical mask. The woman had suffered a facial injury and commissioned a magical face shield to hide her wound. Having never heard of the item you believe it is probably in the ruins near Ugus Horrus where she lived. With no other leads at the moment you gear up and decide to embark on the search for this item!

Local farmers have been coming into Feastelburg recently recounting harrowing stories of a growing number of attacks upon the land. Farmers and travelers have decidedly noted that the creatures causing the problems are troglodytes. The creatures seem to be becoming bolder in their attacks as initially they were at night under cover of darkness. The last several attacks have occurred during daylight and the recent reports have included chasing down and murdering farmers and pilgrims alike. Several farms have been put to the torch and it has the town on edge.

The grain has rotted in the town of Elmwood, which means people might starve, businesses and banks might fail, and endanger the town’s already- precarious existence. Brave adventurers are needed to travel through the wild forest to seek the advice of the Sage of Cormanthor. Four hour adventure. Also contains information about the town of Elmwood. Part One of the Misaligned Trilogy

5e Solo Gamebooks presents Drums at Daggerford, the fifth in our continual series of solo adventures set in the Forgotten Realms. This quest enables you to experience D&D without a dungeon master! Simply roll up a level 5 PC and get playing. Drums at Daggerford is the way you must experience solo adventuring. Players and DMs beware, a new standard has been set. This solo adventure continues the story arc first begun in Death Knight’s Squire, developed further in Tyrant of Zhentil Keep & Citadel of the Raven, and left in The Tortured Land. Drums at Daggerford’s ability to echo a Tolkien spirit reverberates throughout the narrative no matter which path you may choose. But choose wisely because a razor’s edge separates peril from glory. Over a year in the writing, this latest instalment in our solo adventure series is a mini sandbox campaign that will give you anywhere up to 8 hours of solo adventuring enjoyment. Completionists and those who like to replay these adventures will get even more gametime. There are mysteries to be uncovered, items and sidekicks to be gained, codewords to unlock and villains to conquer! With lots of exploration, meaningful decisions, hard fights, and a variety of rewards and stories, Drums at Daggerford will continue to resonate with you long after solving the big mystery behind Krond Vikkurk’s malevolent plans.