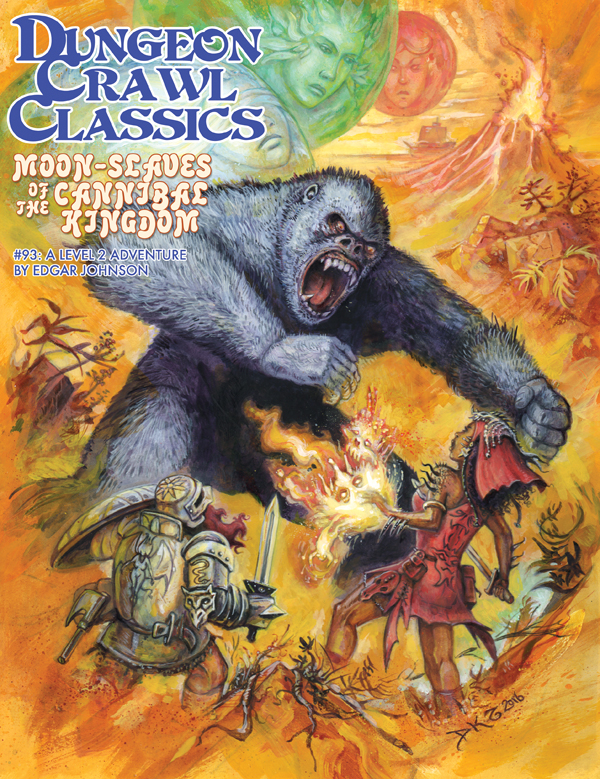
Far to the west, beyond civilized lands, lie the Tolomak Islands— volcanic peaks covered in pestilential jungle and bestriding sunken ruins. The legends say the Tolomaks are home to treacherous witches, ferocious cannibals, moon demons, and worse! Wise are those who steer well away from these accursed jungle isles, but not everyone is wise… For the legends also speak of power unimaginable and treasures beyond the limits of mortal avarice. Now, under the light of the triple moons, a band of intrepid adventurers sails ever nearer the islands. With luck, they will escape with a fortune; without it, they may not keep their souls.
A search for the ghostly dragon of the Deadwaters. The sage's deal is simple: The more you learn about the dragon, the richer you get. In this adventure, the bard Rondelle offers players rewards for learning all they can about a mysterious dragon that has been sighted in the area. Pgs. 22-38

Twilight at Eventide is a 32-page collection of three short adventures designed for characters of level 1-3. In the village of Eventide, the walls separating the settlement from the Feywild are weak. And strange creatures stalk the surrounding forests. Dark forms worship their demigod in hidden caves. A darkling elder has returned to take what was promised to him. And people enter the woods never to return. The village is in need of heroes. Will you answer the call? In this product, you will find: a description and map of the village of Eventide a vivid cast of characters in the village a variety of detailed location maps, including an old mine, an abandoned farmhouse, a decrepit tower, and a ruin adventures that feature xvarts, darklings, dryads, and hags a combination of roleplay, exploration, and combat encounters

The exciting artifact series concludes with AS3 – Peregrination. With a pair of control rods in hand you are guided to an ultimate prize, a Gnomish flying vessel! The rods have directed you to a crashed ship buried in the sandy beach. A check of the debris sheds light on the mystery of the artifact and a description of how to repair the intricate machine. Apparently finding the vessel is just the start!

After a successful mission for Earl Phenwick you return to receive your accolades. Upon your arrival it is discovered that the earl's child is missing. His daughter was last seen around a mirror of unknown power and an advisor believes that she may have made her way into a different world via the magical portal. Time to put on your hero hats!

Avalanches are hardly news in Icewind Dale. The frequency to which it is occurring, however, defies logic. What is the cause of this strange phenomenon? What horrors could have unleashed such force of nature with such reckless abandon? Horror Beneath the Frost is a slasher horror adventure set in Icewind Dale, deep within the Reghed Glacier. It features yetis, mind flayers and a boneclaw! The adventure is designed to be easily dropped into: • Any homebrew campaign where avalanches occur. • Icewind Dale: Rime of the Frostmaiden campaign. • Plague of Ancients Seasonal Campaign for the Adventurers League (AL) organized play program. Inside you will find: • A slasher horror adventure optimized for five characters with an average party level (APL) of 8. • Scaling advice for three to seven 5th to 10th level characters. • A printer-friendly version of the adventure. • 4 digital maps importable to Roll20, Foundry VTT and your VTT of choice. Includes gridded, grid-less and printer friendly versions of the maps. • D&D Adventurers League compatible adventure (Dungeon Seed: This Seems Familiar | DC-POA-JL01)
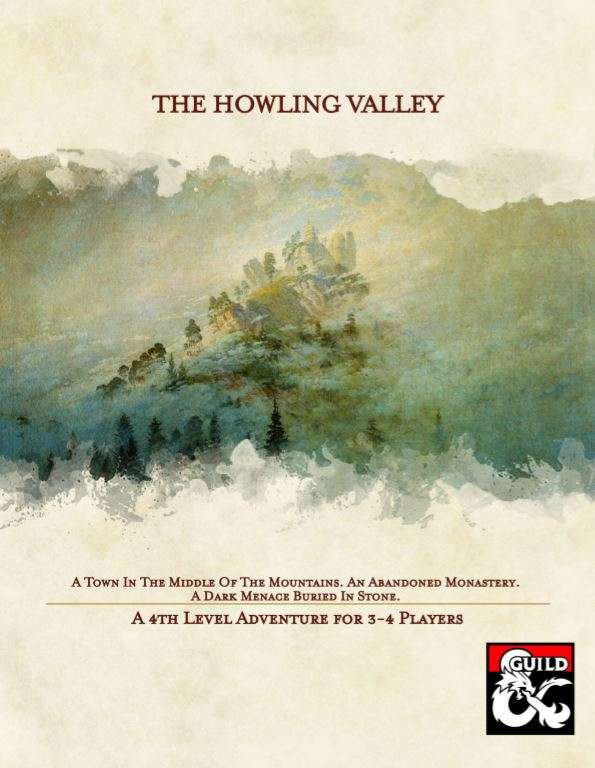
A cry for help by a small village in the Howling Valley. An abandoned monastery on top of the mountain. Hordes of undead pouring into the realms. A mad mage with bad intentions. Will you be able to put an end to the unfortunate events in the valley?

The seaside town of Ashenport has a troubled past and a dark secret. If you spend a night in Ashenport, you just might not wake up the next morning. "The Last Breaths of Ashenport" is an adventure of survival and alien horrors. The adventure is self-contained and can be placed in any setting. Pgs. 70-105

Base of Operations is a short adventure intended for four 5th-level characters. DMs can easily modify the adventure to suit higher- or lower-level adventurers, or larger or smaller parties of adventurers. Simply adding a few monsters to every encounter area makes the adventure more challenging for larger parties, and adding levels to any of the humanoids can make them more of a threat to high-level groups. For low-level adventurers, make the relationship between the two factions within Brightstone Keep more strained, and take away a few monsters from each group. You can remove levels from some of the humanoids in the adventure to make it a lower-level challenge, but it is important that the orc cleric (described in encounter area 8) still have the ability to animate the dead. Still, he can have fewer minions around him when encountered, and that makes him less of a challenge for a lowlevel party.

Important: The adventure is 1e but it has monster conversion notes for D&D 4th edition The town of Highport, once a human community overlooking Wooly Bay from its perch on the northern coast of the Pomarj, fell prey to hordes of humanoids swarming out of the jungle-covered hills surrounding the settlement. Though the orcs, goblins, kobolds, ogres, and gnolls razed much of the place in their ferocious rampages, the smoldering ruins they left behind soon became a new kind of community, a place of trade between the humanoid “locals” and the unsavory human traders who have no compunction about doing business with them. Slaves are a commodity in ready supply in Highport’s market, since many pirates raid up and down the coast of the bay, putting fishing villages to the torch and filling their holds with captured refugees. Slavery has become a thriving business in the town, and rumors abound of a cartel of Slave Lords who run things from behind the scenes, filling their coffers in secret from the buying and selling of human chattel. The trade has become so prolific that the good folk to the north have grown tired of these depredations and decided to fight back. Forces of righteousness and honor have recently descended upon Highport, some openly and others in secret, in various attempts to destroy the machinations of the Slave Lords and abolish the abominable enterprise that has taken far too many loved ones from home and hearth. One such doughty servant of goodness is Mikaro Valasteen, a cleric of Trithereon. Mikaro slipped unnoticed past the crumbling walls of Highport with a single mission: to rescue and transport as many slaves to their freedom as possible. Mikaro and a handful of faithful assistants located a number of escaped slaves—as well as rescued a few more not sufficiently restrained and guarded—and shepherded them through the gates and beyond the reach of their humanoid tormentors, returning them to their lands and homes. This covert freedom brigade enjoyed remarkable success early on, since the servants of the Slave Lords were often lax in their vigilance and sloppy in their efforts to prevent loss of the “merchandise.” After one too many shipments never made its destination, the humanoids stepped up their security and the normal channels of escape from Highport closed to Mikaro and his team. He cannot risk exposure by smuggling the freed slaves through the gates as merchandise any longer, since shipments of goods are now regularly stopped and checked. No longer able to free the slaves in that manner, Mikaro began hiding his charges in an abandoned villa in a particularly rundown part of the town. Although they are safe for the moment, their numbers have grown unmanageable, and the priest fears it is only a matter of time before someone slips up and brings slavers to their doorstep. Ever more desperate to find a new means of escape from Highport, Mikaro has started work on a plan that is both daring and dangerous. He intends to use a series of old sewers coupled with natural caverns running beneath the town as an escape route to the sea beyond the walls. But he needs someone to clear out the creatures and pitfalls he knows lie within. Pgs. 2-27

A young black dragon and two hatchling dragons live in an excavated sandstone burrow in the swamp west of Knacker Knob. Connected to the dragon lair is a complex of sandstone tunnels and chambers inhabited by lizard men. Some sandstone tunnels and chambers are partially flooded, and others are filled with nasty things such as slimes, oozes and gelatinous cubes. The lizard men revere the dragons as magical spirit guardians. In small groups the lizard men are easily defeated, but if allowed to prepare a common defense, the lizard men tribe with its spellcasters may present serious threat to the player characters (PCs). Wild Dragon Den is the first dragon's lair to conquer. Part of TSR 1073 The Dragon's Den
A band of shipwrecked adventurers awake to twilight on an uncharted jungle island to the Northwest of the Nalanthars with amnesia, little do they know the amnesia is recurrent at the completion of each long rest until an ancient curse powered by an incomplete Mythallar is lifted.

The party seeks out Commodore Krux at the Happy Beholder. After speaking with the patrons, the party learns that Krux has disappeared and gets a lead to check out his ship, the Second Wind. At the ship, the party learns from Fel Ardra and Flinch that Krux is being held prisoner by the Amoebros in a cave on the underside of the Rock of Bral. The party infiltrates the Amoebros’ lair, gets past the guards, and learns of the animal experimentation performed by the gang. In a final climactic scene, the party rescues Krux from Ripples, the wicked boss of the plasmoid gang.

The king has hired adventurers to investigate the sudden rash of giant attacks and strange phenomena around the town of Bywater. Meanwhile the townsfolk believe an evil witch is directing the attacks and only the magic sword of the town's founder can defeat her.
Pursued by wolves and worse, the party must fight a running battle to take refuge at the relative safety of the Bittermoon Inn, a decrepit old inn high in the mountains. But night is falling, can they uncover the secrets of the inn and use them to survive the night? This adventure can be played as a stand alone one-shot, or can be used as a drop-in side quest to almost any campaign. It is suitable for a party of about 5 characters at the First Tier (Levels 1-4). The players must fight a running battle with wolves to reach Bittermoon, then they must discover the secrets of the inn before escaping through a smuggler's tunnel. Finally they must face off against their unseen opponent at Skull Cavern. There are four encounter maps included with this title.
A short 2-combat side trek: After confronting an ettin and its pet owlbear, the PCs descend into an ancient ruin holding a portal to another plane, protected by a naga, an eidilon and a sea of serpents.

After a string of successful adventures, you find yourselves reequipping gear in the small community of Tarten. After an unusual currency exchange in the mercantile, the party learns that a group of adventurers had encountered some Goblins possessing old currency belonging to the Co-Tai people. Well, it ain’t grave robbin’ if someone else did for you!

The Cave on Foggy Hook is the first of three connected adventures in the village of Hookholm and is aimed at busy or first time Dungeon Masters. This adventure is designed for 3-5 1st level characters and can be played in a single 3-5 hour session excluding character creation. In this adventure the party will find themselves in Hookholm, a small coastal village rebuilding after a devastating storm almost wiped it off the map. The village is located on the inner curve of the Foggy Hook, a spit of marshy land jutting into the Grey Sea. Beset by the sort of calamities that new adventurers will be able to sink their teeth into and will offer opportunities for roleplaying, puzzle solving, exploration and combat. Includes 5 maps in a number of variations, a brand new monster in the vicious Kuo-toa Feral, and a new chase complications table for chases through swamps or marshes.

Sekarvu is a typical beholder. It spent much of its youth exploring underground realms and killing everything it found. One day, it came upon a large cavern filled with violet fungi. At the edge of the cavern, it found a small band of adventurers who had all but succumbed to the toxins of the fungi's tendrils. They offered little resistance to Sekarvu as it approached and began to feed on their still-writhing bodies. With its first bite, the beholder's life changed forever. Pgs. 52-55

This adventure picks up where AS1 – Artifact of Gegios left off. You return to the city of Gegios to divide treasure and determine what the strange wand is. Your return trip may have given you a clue in that travel to the east causes it to vibrate less while moving in a western direction causes it to shake more. What is the significance of this anomaly? Is your party ready to find out? Bring your water wings folks you’re probably going for a swim!