
The sequel to the DMs Guild best-selling Tales from Frozen North returns better than ever with almost 4 times more content! What you will find inside: * 36 random encounters (plus 4 mini random encounters within random encounters! Encounter-ception?!) * Chapter 1: Carnival Encounters. 6 Short encounters for any carnivals and fairs in the Feywild. * Chapter 2: The Summer Court. 10 Encounters that are short and whimsical, or featuring creatures common to the Summer Court. * Chapter 3: The Gloaming Court. 10 Encounters that are short and wicked, or featuring creatures common to the Gloaming Court. * Chapter 4: The Feydark. 10 Short encounters in the subterranean world of the Feydark. * Scaling guide provided for most encounters (Tiers 1-2) * Puzzle Encounters (The Fey do love their puzzles, especially if it infuriates others) * New Fey-themed Magic Items * New Creatures! Including but not limited to: * Tooth Fairy (you might want to hold on to your teeth with this one!) * The Dawn Growlers — a team of superhero hounds?! * and a totally innocent and harmless small white rabbit…yes… harmless

Something sinister is brewing in the Emerald forest! It starts off simple, as they do. A group of fresh-faced adventurers is tasked with clearing out rats in the tavern cellar. What they find down there is something more than they bargained for. Now, they have to make a perilous journey across an uncharted forest to face off against an unknown threat (it’s a swarm of BrainiumOGL Rats). The fate of the entire world might be at stake! (or that of a small hamlet, at any rate!) Ratcatchers is a 4-6 hour setting neutral one-shot adventure for four to five characters of level 1-2. It has been designed keeping in mind players new to the game. Features A 25 page full-color and fully illustrated PDF, a printer friendly B&W version, and a tested for screen readers accessible version. A beginner friendly adventure that hangs a lampshade on RPG tropes, then sets said lampshade on fire. A template to convert any beast into were-rat hybrids. Rat-bunny and rat-pigeon, a.k.a. Trash Gryphons included. Several colorful battle maps for VTT use. Terrible rat based puns. Content Warning: The intended tone of this adventure is a mix of horror and comedy. Where it exactly lies on the spectrum of horror to comedy is up to you, the DM, and your players. There is depiction of body transformation and body horror, parental neglect and tight spaces. Also, there are rats. Lots and lots of rats. Published by undeadR

Bountiful harvest abound! Come to the wonderful town of Kukurbi and enjoy the festivities, as Highharvestide is upon us! But all seems too gourd to be true! We guarantee you there’s nothing odd or sinister in this mischievous mini adventure! You butternut wait and hubbard right in! This Dungeons & Dragons mini adventure for 1st level characters comes with: • nine pages of content written by Alex Clippinger & Florian Emmerich • stunning art by Raluca Marinescu • a wonderful map of the town Kukurbi drawn by Erin Harvey, with a DM and Player version • two new monsters to squash (your party)

The Soulmonger is shattered and its pieces scattered across the peninsula of Chult. Dire forces seek those shards for their own nefarious purposes, and the Red Wizards are rumored to have found a number of them already. Can you wrest those necromantic artifacts from the hands of the dread mages? Part One of the Broken Chains Series. A Four-Hour Adventure for 17th-20th Level Characters.

This third installment of the Aumvor saga includes: ● 19 encounters ● Stats for Living Zombies (converted from 3.5e) ● and an introduction to the tower The adventure continues as your PCs make their way to the upper reaches of the tower and learn of the danger involved in moving deeper into Aumvor's dark realm. For centuries Aumvor the Undying has fed upon the life force of innocent folk who stumbled upon his portal traps. For centuries he has planned for and prepared for the eventual return of Netheril as a power in the world. That hope has now faded, and he has returned to his vault to regain strength and begin anew. Even now, he is deep in his tower vault plotting. 𝐁𝐞 𝐬𝐮𝐫𝐞 𝐭𝐨 𝐜𝐡𝐞𝐜𝐤 𝐨𝐮𝐭 𝐓𝐡𝐞 𝐓𝐨𝐰𝐞𝐫 𝐨𝐟 𝐁𝐨𝐧𝐝𝐚𝐠𝐞 𝐩𝐚𝐫𝐭 𝟏 “𝐀𝐮𝐦𝐯𝐨𝐫𝐬’ 𝐖𝐞𝐥𝐜𝐨𝐦𝐞” 𝐚𝐧𝐝 𝐩𝐚𝐫𝐭 𝟐 “𝐅𝐚𝐧𝐞 𝐨𝐟 𝐭𝐡𝐞 𝐉𝐚𝐢𝐥𝐞𝐫𝐬”.

Adventuring in the Principality of Lockerbie continues with Issue in the Canyon. Your party has enjoyed the advantages of being considered a hero but as the days’ progress, it is back to normal in Gormell. After having a bit of ale at the local tavern you notice a wagon caravan has arrived in town and the people are abuzz over their arrival. Noticing that some of employees are a little beat up, you find yourself in the sheriff’s office being told of a brazen, humanoid attack on the merchants. Looks like you just found a job opportunity!

At the request of a stranded djinni, you have three days to steal a diamond from the marbled, enchanted vaults of the Modern Artworks Museum. Investigate its defenses, disable magical wards, bamboozle the staff, battle a golem, and escape with the prize! A group that succeeds is rewarded with a single wish - the power to bring about almost anything you desire. Highlights of the adventure include (and are not limited to): - An alternate skill check system that keeps clumsy characters involved in the heist - A fight to the death with fantasy Botticelli's Birth of Venus - The Modern Artworks Museum, a trove of sculpture, frescoes and tapestries - Museum events: sketch and sip, a gala, seminars! - Museum brochure, including handy map and exhibit descriptions - A wish Clever and light-hearted, Diamond Heist adds brains and Renaissance style to any urban campaign. This adventure centers exploration, planning and roleplay. Players match wits against various spell effects, discovering and disabling magical wards to access their prize. A cumulative alarm level system replaces pass/fail steath skill checks, so one bad role doesn't ruin the heist. The artworks described are based on those of Renaissance Italy, with frescoes, marble sculpture, and haughty nobles aplenty. Content warnings: Death of a loved one, mentioned.

What links an infamous Zhentarim mercenary with a brilliant but tormented artificer? To find out, the adventurers must break the goblinoid siege of the village of Westfir. After the bizarre goblins are defeated, the Cornflower Hive must be destroyed. Ultimately, what secrets are held in the grain mill by the Westfork river? A D&D Adventurers League four-hour adventure for 1st-4th level characters.

This adventure can be used in any setting that features landowning nobility as a social class. It focuses on the Firebird, a mythical creature from Slavic folklore similar to the phoenix. The characters begin inside a tailor’s shop where they’ve been gathered by Pero Toporov, the best tailor in the city of Krylo. The city is ruled by the confident and insensitive Baron Yuri, who commissioned Pero to create a beautiful cloak woven with the feathers of the Firebird, a creature known for its healing powers. Pero agreed on the condition that their work would be used to aid Yuri's citizens, who have been sick and ailing under Yuri's restrictive rule. Instead, the Baron took the cloak for himself. Pero is hiring the adventurers to help them break into the Baron’s fortress and steal the cloak back without being caught. The characters find a way inside the fortress and break into the dungeon, where the cloak is supposedly hidden away. Within the dungeon, the party finds the Firebird itself locked in a golden cage where Baron Yuri—wearing the magic cloak—is antagonizing it. Baron Yuri attacks them to protect his treasure and is not open to negotiation. However, the characters may try to befriend or capture the Firebird. If they sway the bird to their side it may help them fight the Baron. Once Baron Yuri is defeated, the characters can take the cloak for themselves or return it to Pero. Dethroning the Baron earns them the gratitude of the city’s people. If they return the cloak, Pero pays the adventurers and assures them that the cloak will be used for good from now on. Pgs. 173-179
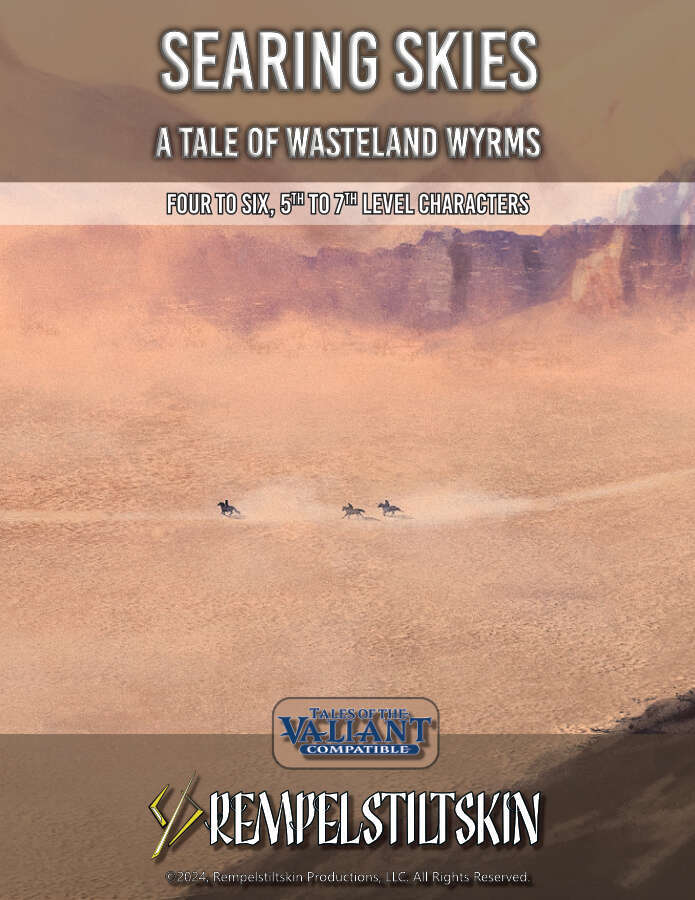
Draconic adventures in the scorching sands! In the desert, the Wyverns gather and move in prides. Their power is fearsome alone, but together almost unstoppable. Their eggs are valuable and sought after by thrill seekers, culinary connoisseurs, and purveyors of exotic pets and mounts. Two large groups—big game hunters looking for trophies and native desert nomads whose culture practices conservation of the Wyverns—are set to clash at a Wyvern Nest. A Sorceress wishes to stop all exploitation of the bestial dragons. These three groups require adventurers to succeed. But who will the adventurers side with? And what of the ruthless mercenary group The Furious Few? This Tales of the Valiant Compatible Adventure Module Toolkit Provides: • one regional map and four location maps to adventure in • Desert Wyvern Ecology and statblocks for various stages of development • Details of the three major factions vying for control of the eggs • A ruthless party of rivals for your players' characters • Over 60 NPC bios to help populate the desert and craft your tale. • Desert Environment rules and hazards

A gang of ogres is raiding a farming community, stealing crops and livestock, and advancing closer and closer to the town, and the townsfolk need your help!

Bodies continue pile up, and the Flaming Fist still has nothing but a name. Thankfully, the perpetrator of the murders has slipped up and the Flaming Fist has captured one of their underlings, in turn, has revealed the presence of a cult hideout in the sewers beneath the city. The Flaming Fist has asked that you investigate. Are you up for the task? Part Two of the Betrayal is in the Blood series of adventures. A Two-to-Four-Hour Adventure for 1st through 4th Level Characters (APL 3).

With allies gained from denizens of the Underdark, the former drown enclave of Szith Morcane is on the precipice of being retaken. During the battle for Szith Morcane, secrets of the drow community are revealed. What will you do with this knowledge, and how will it affect the outcome of the conflict?
A doctor who helps with rare and socially debilitating diseases who welcomes all to her doorstep suddenly becomes reclusive...and her patients are no longer able to be found. Adventurer's are hired by a powerful merchant who had committed her son to this doctor, and they need to find him and bring him home.

Your expedition to the wastelands proved fruitless until you came across a group of Bedouins. The locals report that they may have found a tomb hidden below the swirling desert sands. Intrigued, you and your group examine the site unaware that you are about to stumble into the deadly Gonnagetcha Tomb!

Into Wonderland is a book detailing an adventure in the Feywild, a setting for Dungeons and Dragons 5th Edition. This book provides player options, encounters, variant rules, and a campaign of expeditions into the unknown centred around the city of Endercoast that has been spirited away from the Material Plane. To survive, you'll need to balance the needs of the displaced city with the mercurial whims of four powerful archfey. What's Included? - Endercoast, a city plucked from its roots and replanted in the Feywild - Quirks of the Feywild, including four powerful archfey, a guide for creating new archfey, rules for travel using emotional truth instead of maps, chaotic seasonal and magical effects, pranks, consequences for getting lost, and 14 weird stops along the way - New races - New subclasses - New backgrounds - New feats - New spells - Fantastical questlines taking a party through the courts of the archfey and on magical journeys inspired by the fairy tales of the Brothers Grimm - A whole heap of chaotic encounters with strange fey creatures - Dozens of new monsters, including 8 ancient beasts, 3 dangerous plants, 4 extremely powerful archfey, a bunch of NPCs based on the new subclasses of the book, creepy new fey like the darkwood stalker and the time vulture, a powerful hag, and more

The Red Plumes have increased patrols in the region surrounding Hillsfar, and a string of disappearances has followed in their wake. Naturally, this has roused the suspicion of the factions. Join your factions and find out the truth behind the missing farmers. A four-hour adventure for 1st-4th level characters.
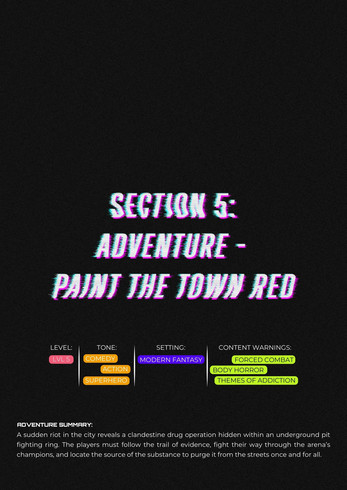
A sudden riot in the city reveals a clandestine drug operation hidden within an underground pit fighting ring. The players must follow the trail of evidence, fight their way through the arena’s champions, and locate the source of the substance to purge it from the streets once and for all.

𝐍𝐨𝐰 𝐰𝐢𝐭𝐡 𝐚𝐧 𝐢𝐥𝐥𝐮𝐬𝐭𝐫𝐚𝐭𝐢𝐨𝐧 𝐛𝐲 𝐂𝐇𝐑𝐈𝐒 𝐇𝐎𝐋𝐌𝐄𝐒 𝐚𝐧𝐝 𝐚 𝐏𝐑𝐈𝐍𝐓𝐄𝐑-𝐅𝐑𝐈𝐄𝐍𝐃𝐋𝐘 𝐃𝐔𝐍𝐆𝐄𝐎𝐍 𝐌𝐀𝐏! 𝐓𝐇𝐄 𝐑𝐔𝐈𝐍𝐄𝐃 𝐓𝐎𝐖𝐄𝐑 𝐎𝐅 𝐙𝐄𝐍𝐎𝐏𝐔𝐒 is a fifth edition (5E) conversion of the ground-breaking introductory adventure for Dungeons & Dragons that served as a DM aid in the first 𝐃&𝐃 𝐁𝐚𝐬𝐢𝐜 𝐒𝐞𝐭, released by TSR in 1977. This set included a 48-page rulebook covering the first three levels of play, and was skillfully edited by 𝐃𝐫. 𝐉. 𝐄𝐫𝐢𝐜 𝐇𝐨𝐥𝐦𝐞𝐬 from the original 1974 D&D rules written by 𝐆𝐚𝐫𝐲 𝐆𝐲𝐠𝐚𝐱 and 𝐃𝐚𝐯𝐞 𝐀𝐫𝐧𝐞𝐬𝐨𝐧. Holmes advanced the "Sample Dungeon" concept by writing a new thematic dungeon with a strong backstory, creating an adventure that has remained a fan favorite over the decades. Officially, its only title is "Sample Dungeon" but colloquially it goes by various names based on Zenopus, the doomed wizard who built the dungeon under his tower. An adventure for 1st to 2nd level characters; four pregenerated characters are included. Also includes ideas for using it as an adventure site in 𝐆𝐡𝐨𝐬𝐭𝐬 𝐨𝐟 𝐒𝐚𝐥𝐭𝐦𝐚𝐫𝐬𝐡. 𝐍𝐎𝐓𝐄: Using this conversion requires a copy of the original dungeon found in the (1977) Basic D&D rulebook. However, Wizards of the Coast has provided a free pdf of this dungeon since 2008 on their website, see the first page of the pdf for the link. 𝐂𝐎𝐍𝐓𝐄𝐍𝐓𝐒: Introduction, page 2 The Setting, page 3 About the Dungeon, page 4 Dungeon Master's Map, page 5 Areas of the Dungeon, pages 6-13 Appendix A: Further Reading, page 13 Appendix B: Dungeon Factions, page 14 Appendix C: Portown Rumors, pages 15-17 Appendix D: Use with Ghosts of Saltmarsh, pages 18-19 Appendix E: Pre-generated 1st level characters, page 20 𝐈𝐧𝐜𝐥𝐮𝐝𝐞𝐬 𝐭𝐡𝐞 𝐟𝐨𝐥𝐥𝐨𝐰𝐢𝐧𝐠 𝐧𝐞𝐰 𝐦𝐨𝐧𝐬𝐭𝐞𝐫𝐬, 𝐍𝐏𝐂𝐬, 𝐚𝐧𝐝 𝐌𝐚𝐠𝐢𝐜 𝐈𝐭𝐞𝐦𝐬 𝐟𝐨𝐫 𝟓𝐄: Cleaning Cube, Veteran Smuggler, Thaumaturgist, Monstrous Sand Crab, Lemunda, Monstrous Rat, Brazen Head of Zenopus, Verminslayer Longsword, Lesser Wand of Petrification, Scroll of Stone to Flesh The Ruined Tower of Zenopus was featured as part of the "D&D Classics" column in Issue #32 of Dragon+ magazine! Go to 𝐝𝐫𝐚𝐠𝐨𝐧𝐦𝐚𝐠.𝐜𝐨𝐦 or find the link on the Wikipeda page for Dragon magazine. 𝐂𝐑𝐄𝐃𝐈𝐓𝐒: Original Dungeon: J. Eric Holmes Conversion, Added Content & Cartography: Zach Howard Content Review & Editing: Scott McKinley Interior Art: Chris Holmes (“Octopus Attack”, page 9) Cover Art: “Italian Coast Scene with Ruined Tower” by Thomas Cole, 1838. Open Access Image from the National Gallery of Art at images.nga.gov Format: Derived from the “Adventure Template for Open Office/LibreOffice” by Dale Robbins on DMs Guild Dungeon Maps drawn using the application Gridmapper by Alex Schroeder
People have been going missing in Oreskos. Merchants never finish their rounds, and leonin disappear during their hunts. At the center of this conspiracy sits a lone tower, and on its throne a vicious lamia seeking to claim the grasslands as her kingdom. The Oreskan Lamia is a 3rd level Greek mythology inspired 5e adventure, for use with the Mythic Odysseys of Theros setting book.