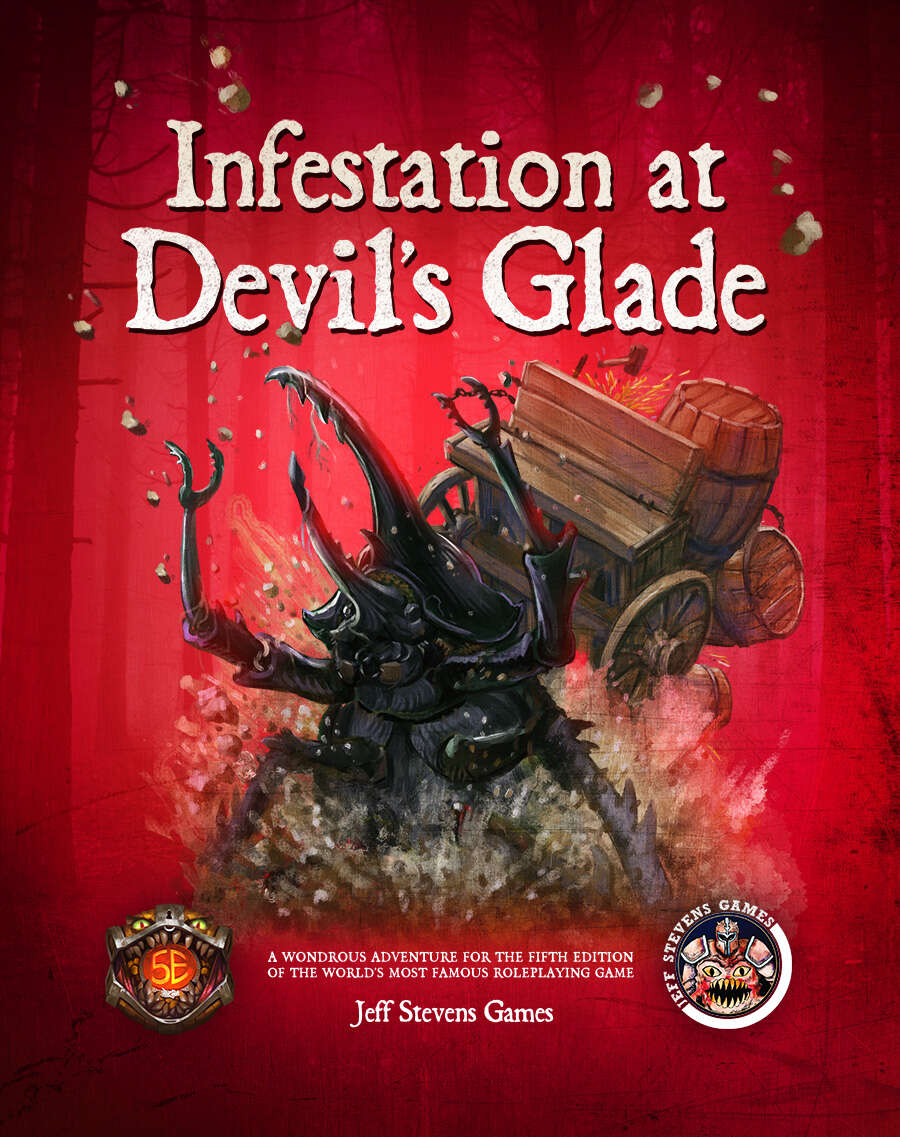
The town of Devil's Glade is under attack! Swarming insects have driven the residents out of their homes and businesses, and giant insects patrol the town square. Who or what has brought these creepy-crawlies to Devil's Glade? What's their motive? Are your heroes brave enough to put an end to the infestation? Infestation at Devil's Glade is a 2- to 4-hour adventure designed for four to five characters of 1st to 4th level, and is optimized for 2nd level characters. Scaling Suggestions are included, allowing you to play this adventure with characters of 5th to 6th level. Infestation at Devil's Glade isn't just a short adventure. We provide you with a location to which your heroes can return, or even use as a home base. The Supplement Includes: Adventure. The main adventure focuses on the heroes cleaning the town of the infesting insects and the villains who brought them. Beginning at The Fork (a tavern where many of the residents have made camp), the characters learn about the infestation of Devil's Glade, and are hired to look into the matter. NPCs. The adventure is filled with fun and engaging NPCs. During the characters' time at The Fork, they have the opportunity to talk with NPCs, help them, and learn more about the infestation. After the heroes return Devil's Glade to normal, the merchants and residents return, giving your characters unique shops to explore and quests to complete. Cursed Mask. The crux of the problem - a cursed mask that slowly transforms the attuned creature into a giant, insect monstrosity, and gives them power over insects. To end the infestation, the adventurers must confront the partially transformed person wearing the mask. Shops & Services. Devil's Glade contains shops and services the characters can explore, including therapeutic mud baths, a diner specializing in eggs, a trinket shop, a candle maker, and a dentist. Side Quests. We provide several side quests for before and after the main adventure, allowing you to increase the main adventure's run-time, and provide you with material for after the main adventure. Maps. The adventure contains maps for the main locations and major side quests. Each map is hand-drawn by Jean Lorber. Art. NO AI! The book is filled with fantastic, original artwork by Matt Morrow Art. Also Included: Map Files. Both grid and non-grid maps are included and available to download. Special VTT Tokens and Assets. Several custom tokens and art assets are included for VTT play.

In ages past, the sorcerer Xa’arek grew to be a cruel and powerful tyrant, causing untold misery in his quest for immortality. After decades of oppression, his people revolted against him, driving the tyrannical sorcerer into the cursed lands of Marsh-Blight. Although a few of his most fanatical followers accompanied him in his exile, he was largely forgotten by history...until now. The Tomb of Xa’arek is a very dangerous dungeon crawling adventure for 5th Edition Fantasy, in which the Player Characters (PC’s) must venture into the tomb of an infamous sorcerer, recover his secrets, and get out alive! This adventure is designed for characters of 3rd level and is optimised for 4 characters of 3rd level. The adventure is setting agnostic and can easily fit into any published or homebrew world. Low level dungeon crawl with horror themes of decay and infestation. Setting agnostic Suitable for any genre of fantasy Includes prompts for roleplay

When the characters set up camp in the forest, they catch the attention of a supernatural evil called the Night Hunter. Can they survive its increasingly audacious attacks and discover the true nature of what is hunting them in the night? This short horror scenario takes about 2 hours to complete and is for four or five 1st-level characters. Download it for free in the YouTube video walkthrough link! Inside the The Night Hunter, you'll find: -A new bogeyman monster tied to local folklore -The Arcane Library's signature format to make running the adventure effortless -Combat cards for monsters, PCs, and special treasure -Beautiful VTT maps with and without grid by Lantern's Light Maps
What happens when adventurers become the owners of a brothel? When a roguish associate asks them to attend an oligarch’s party in his place? What lurks in the Cartways besides kobolds? And what will you say when another thief tells you the only way to find a treasure is to become hunted by the Praetors? Dark dealings, my boys, and a knife in the guts might be the price. Whose guts? Might be yours if you cross the wrong one of the Nine. How much evil should be done for the greater good? How many sinful men should die to save a pure soul?

This is the laboratory of High Alchemist Sureves Epans. He led a group of alchemists in research for many years, but recently there was a bit of a mishap. He discovered his wife was cheating on him with one of his employees and while in a drunken stupor trying to create a discreet potion to deal with the two of them, he let loose an infectious plague on the lab which turned all but a lucky few in the facility into shambling husks of their former selves., fused with their own creations as their minds turned to know but one thought - rage. This dungeon has rules to modify all encounters for a group of players levels 4 through 6 and is intended for a party of four. If you have more players, feel free to adjust the difficulty up one level for each additional player or simply tune the monsters to your needs. This dungeon contains many original enemies, a unique puzzle, and an environment that is meant to bring a sense of terror and anxiety on your players. I consider this to be the Horror-themed adventure of the module so feel free to add some creepy music and extra details along the way to bring the area to life (or death).

Kalakeri: The Forbidden Temple is a gothic horror adventure for 4-5 characters of 7-8th level. It can be played over the course of 8 hours for a one-shot, but works better when played slowly over the course of two games. This is the third part of the Carnival of Lost Souls campaign. It can also be played as a standalone adventure. Kalakeri: The Forbidden Temple features: Exploration of the ancient Greater Vochalam temple with a powerful eidolon guardian. Lots of dangers and rival explorers are waiting for the characters, among them the priests of Osybus and Firan Zal’Honan himself! Intense social encounters with the leaders of major forces of Kalakeri: Ramya, Arijani and Reeva, and the possibility to align with them. Random encounter table for Kalakeri travels, and mechanic for quick resolution of random combat encounters. New custom monsters to make combat encounters truly memorable and exciting. High-quality maps, also available in universal vtt format. Check out previous adventures in the series: Lamordia: The Hardest of Hearts and Dementlieu: Dance with the Devil! And look out for the next adventure in the Carnival of Lost Souls series: Valachan: Hunter’s Moon! It will be released in the next month. Once all four adventures are out, we will also release a special Campaign Guide, which will explain in detail how to best set up and play the campaign. However, if you want to start your campaign right now, don’t worry - we have included a short appendix at the end of each adventure that will explain the basics! Disclaimer: We are a team of writers from Ukraine, so the unprovoked war and senseless aggression of the terrorist state of russia influenced our initial timelines significantly. However, we are now as safe as we can ever be under the constant threat of missile strikes, and determined to finish the whole series! And after that - who knows, maybe even more cool adventures will follow ;) Made in Ukraine

You and your associates dreamed of being big shot heroes but all you've managed to do was run afoul with a group of humanoids. Your speed has managed to distance yourself out of spear range and reached the river. The pounding waterfall matches the blood rushing in your ears and you try to move across the waterway only to find a cave system behind the water.Leaping in, you take a fortified position against the "horde"!

While lightning may strike anywhere, there is but a single Temple of Pure Lightning. This temple could be located just about anywhere – out in the middle of an expansive dungeon or even hidden beneath the streets of a bustling city. Regardless, this temple is not for the faint of heart. Within these walls are floors charged with lightning, ancient powerful weaponry, a vast series of winding powered minecarts, and rooms that are filled with eternal storm clouds. Just as dangerous are the aetherspawn that have been drawn to this place of great power and now see it as a home that will not be taken from them by the likes of a few mere adventurers.

This heist adventure that takes place almost entirely at Fort Bones. It is split into five scenes: Karrnathi Opening. The characters meet Vedim ir’Durna, a noble from the region who is willing to help the player characters infiltrate the Fort. Guild Handler Lhara introduces their prize: a necromantic artifact called the Queen of Night, tied to the plane of Mabar. Valenar Gambit. Whether by wit or stealth, the characters find their way inside the walls of Fort Bones. They might use the incoming Valenar attack as a distraction, find a secret entrance, or plant themselves on a visiting dignitary’s staff. Castling. Safely inside, the characters must figure out when the artifact is unguarded, and find their way into the castle’s inner sanctum. Check. The characters must navigate their way past a magical vault door, then descend into the crypts. The Queen of Night is guarded by a terrifying construct. Endgame. With the artifact in their hands, will the characters be able to escape with their lives?

5e Solo Gamebooks presents Tyrant of Zhentil Keep by Paul Bimler, a 160+ page solo adventure for Dungeons and Dragons Fifth Edition. This adventure is designed for one 3rd-level PC of any race or class, without a DM. Tyrant of Zhentil Keep continues the narrative of The Death Knight’s Squire (the first solo adventure in this series) but can be played as a standalone also. It follows the story of your PC as they continue their journey across Faerun, a lone adventurer wandering wherever the wind takes them. Eventually, it takes them to Zhentil Keep in the Moonsea Region, a strange city, full of secrets. There they begin a quest which takes place over two books, this being the first one, part 2 being Citadel of the Raven. Tyrant of Zhentil Keep is a mini-sandbox in gamebook form, with multiple sidequests and locations to explore. Everything leads towards a central story arc that becomes clearer as the book progresses. Where Death Knight’s Squire had a clear-cut mission at its core, this adventure is pure exploration at first, similar to how a game with a Dungeon Master might commence. The nature of your quest becomes clearer as you advance, collecting snippets of information and encountering various NPCs and locations. The adventure builds upon The Death Knight's Squire in several ways, introducing new combat sheets, sidequests and even audio sound FX embedded in the PDF! You have two ways to approach playing this adventure. You could print out the maps booklet and use actual tokens or miniatures (you’ll need access to a printer for this), or you can load individual .png files of the maps (included) into Roll20 or similar applications and place and move tokens on your device.

As Faerûn recovers from the demon threat, a prominent leader goes missing. Is this a simple rescue mission, or is there more at stake? This is a Tier 3 (APL 13) Adventurer's League legal adventure set in a small town near Yulash. This module first premiered at TotalCon 2017. Contents include: PDF of the adventure Fantasy Grounds module PDF of the Adventurer's League certificate
Called by the Elder Elemental Eye to serve, four corrupt prophets have risen from the depths of anonymity to claim mighty weapons with direct links to the power of the elemental princes. Each of these prophets has assembled a cadre of cultists and creatures to serve them in the construction of four elemental temples of lethal design. It is up to adventurers from heroic factions such as the Emerald Enclave and the Order of the Gauntlet to discover where the true power of each prophet lay, and dismantle it before it comes boiling up to obliterate the Realms.

The busy port city of Jute’s Landing is built into the white cliffs of a deep, protected harbor. It is an important trade stop for many ships and merchants, but this was not always so. Long ago this quiet harbor was home to a coven of hags. Jute Windbrow killed two of the three when he and his crew claimed the harbor for themselves. Evanore, the surviving hag, has lived for more than 100 years in disguise while the city grew up around her. The legend of the heroic Jute Windbrow defeating the wicked monsters has grown as great as her bitterness and desire for vengeance.

The time has come to venture beyond the village of Orașnou and explore the realm of Barovia. However, in your travels, you happen across an unusual tribe of peopl —distrusted denizens of the Demiplane of Dread. Do the Vistani truly possess the ability to see the future, or is it simple parlor tricks and deceit? Part Five of Misty Fortunes and Absent Hearts.

How dangerous is a wounded dragon? A black dragon has seized Ravenglade Keep, though not without resistance! Badly wounded in the fight, the Warriors of Sehanine have fled their home and now turn to the outside world for help. There’s no time to lose! Can you arrive at Ravenglade Keep in time and discern allies from foes on the way? Warriors of Sehanine is a Dungeons & Dragons adventure module for a party of four to five characters from 3rd to 5th level. • Experience the Wood of Sharp Teeth on the way to Ravenglade Keep in a 12 to 16 hour adventure of 38 pages, written by Mithral Best Selling creators Florian Emmerich, JVC Parry and DMsGuild Adept Ashley Warren • Rock the (virtual) table with four breathtaking maps by Dean Spencer & Erin Harvey that come with player and DM versions • Bring the adventure to life with stunning artwork and player handouts by Raluca Marinescu,Henrik Rosenborg & Nathalie Lehnert • Show the NPCs with selected exclusive Trash Mob Minis
Pursued by wolves and worse, the party must fight a running battle to take refuge at the relative safety of the Bittermoon Inn, a decrepit old inn high in the mountains. But night is falling, can they uncover the secrets of the inn and use them to survive the night? This adventure can be played as a stand alone one-shot, or can be used as a drop-in side quest to almost any campaign. It is suitable for a party of about 5 characters at the First Tier (Levels 1-4). The players must fight a running battle with wolves to reach Bittermoon, then they must discover the secrets of the inn before escaping through a smuggler's tunnel. Finally they must face off against their unseen opponent at Skull Cavern. There are four encounter maps included with this title.
Deep beneath the surface of a lake flourishing with aquatic life is the Temple of Pure Water. Within its walls your players will encounter dangerous aquatic flora, a deadly submerged temple, a sea dragon statue with power lurking within, and even a rapid downhill boat ride with sharks. Water in small doses is an elixir of life, but it large enough quantities your players may be left in over their heads as they make their way through this underwater adventure.

About: This encounter was cooked up in the Write your First Encounter workshop by the Storytelling Collective. It CAN be slid in as a side quest in any urban or sub-urban context, or be adapted to add confusion to any rescue mission you are presently running. Synopsis: Through the doorway a young woman shackled to the wall matching the description of Helena can be seen. Though disheveled and looking to be in great discomfort, her beauty is remarkable. But on closer inspection, there are other people here — three identical Helenas! Noble woman Elize Cleron has hired the party to infiltrate the catacombs under the Schaefer Estate and free her twin sister Helena. Helena is being held captive by the Schaefer family, trade rivals rumored to have ties to the underworld. Elize has been unable to free her sister herself because of her identical appearance. Rather than pay an unrealistic ransom, Elize has provided the party with what they need to break her out. This encounter is intended for 3rd level characters.

Kobolds. To some, that name means “a tiny creature that dies easily”. To others, that name invokes fear and dread of a relentless, diabolical nightmare. This adventure introduces you to the latter. If your party is unlucky enough to enter the kobold-infested mountain, they will wish they hadn’t after triggering traps around every corner. And if that doesn’t discourage them, the red dragon surely will.

A fiend lurks among the Black Blade goblins. A shapeshifting barghest fashioned by the General of Gehenna to exact revenge on all goblin-kind. It’s aim: to kill as many goblin leaders as possible… A masked goblin approaches the party asking for help. Two tribe leaders are dead. But a rival for chief has control of the crime scene. Will the party discover the barghest among the goblin ranks? Can they stop this imposter before it strikes again? Adventure Overview The adventure’s story is spread over 4 parts and takes approximately 4 hours to play. The adventure begins with a Call to Action scene. Part 1: Goblin Politics. Krill sends his emissaries to implore help from any strong intermediary. The party is asked to investigate the murder of Thrawn in Dringly’s lair. This is Story Objective A. Part 2: The Opposition. Gain entry into Dringly’s lair and investigate the murder of Thrawn. Gather enough evidence to find the killer. This is Story Objective B. Part 3: To The Lair! Now that the players have determined the barghest (Yeep) is to blame, they need to get to Krill’s lair quickly as he is in imminent danger. This is Story Objective C. Part 4: The Barghest.When the players arrive at the lair, they need to get to Krill and expose and defeat the barghest. This is Story Objective D. Adventure Background A barghest named Yeep has begun its onslaught of attacks against the Black Blade goblins. Starting with Chief Gnar, then his second in command Thrawn, the barghest is moving methodically down the line of command. Krill is now chief. But he has some problems: Two leaders of the Black Blades are dead. Who killed them and why? Is he next? Dringly, the next in command, has decided to take his lair for himself, declaring himself Chief of the Black Blades. Who are the Black Blades? The Black Blades are a tribe of goblins in the local area. They are known for dipping their blades in a dark black substance. It is rumored these blades are poisonous. The Black Blades regularly attack passersby on the road to rob them. The Black Blades have two lairs, one run by a chief who leads the whole tribe, and another overseen by a boss lieutenant. The Black Blades have a well-established pecking order which is how Krill stands to become chief. The next in line is Dringly, who has also declared himself chief and wants Krill dead. Krill suspects that there is something suspicious about two leaders being killed within a day of each other, but he has already burned Gnar’s body without any investigation. He needs to investigate the body of Thrawn, but it is in Dringly’s lair. Krill wishes to avoid direct confrontation with Dringly at the present for three reasons: 1) Any violence would only kill his own tribe members and further divide the lairs. 2) He believes there is still hope for negotiation to reunite the Black Blades. 3) He believes that if he were to attempt negotiations himself, Dringly would kill him. This adventure features: Two maps. Ready for your favorite Virtual Tabletop. A full color pdf. A black and white pdf. One custom monster, a reprint of barghest, all others available in the Monster Manual. Four hours of entertainment involving: roll playing a goblin bard, investigating a murder scene, tracking down a barghest before it strikes again. Applicable to any setting.