
The Free City: a shining gem in the crown of cultured civilization. Beneath the surface of this bustling metropolis is a rot, festering in the darkness, manipulating the lives of those unaware of its presence. Now a small adventuring band from out of town may be in over their heads. Their actions in Diamond Lake have attracted the wrath of one of the city’s hidden masters. A gang of infiltrators and an enigmatic mastermind plot their destruction, and only tracing the rot to the root can stop the onslaught. "The Hall of Harsh Reflections" is the fourth installment of the Age of Worms Adventure Path, a complete campaign consisting of 12 adventures, several "Backdrop" articles to help Dungeon masters run the series, and a handful of poster maps of key locations. For additional aid in running this campaign, check out Dragon's monthly "Worm Food" articles, a series that provides additional materials to help players survive this campaign. Check out issue #336 of Dragon for five attractions to tempt your PCs to spend some of their hard-earned loot. This issue of Dragon also features an Ecology of the Spawn of Kyuss, one of the central creatures featured in this campaign. Pgs. 34-60

The pearl divers of Shoalbury are in trouble. A band of birdlike kenku and ogres have been ambushing and plundering outgoing shipments of pearls, and the villagers are growing desperate. And why are the bandits stealing eyes from the bodies of their victims? A single guard survived the most recent ambush with one eye intact, and his testimony may just be enough to lead a brave band of adventurers to the bandit lair, and to the sinister cult they serve.

A rare breed of wolf has apparently been staging daring attacks on citizens of Rendrick. A group of hunters seek to claim bounty on the beast, but as the PCs quickly learn, the wolf isn't all it appears. Something sinister lurks in the woods near town, and the PCs must act quickly to save innocent lives. Pgs. 16-26
His name has inspired fear in legions of heroes, and his cult has lurked in the dismal reaches of the world for countless ages. His minions are savage and feral, his worshipers vile and wretched. He is Demogorgon, and his temples are nightmare realms haunted by primeval menaces and hateful legacies from a time when the world was savage. And now, a vengeful death knight has discovered one of these lost temples—will the PCs aid him in his dark quest for revenge, or will they fall before the awakened host of the Prince of Demons? Pgs. 64-83
/pic1109405.jpg)
Side-Trek adventure When your PCs gain access to the teleport spell, their whole world changes. That simple spell opens up instantaneous, long-distance travel. No more long overland journeys or dangerous retreats through hostile territory. All it takes is clasped hands and a word from the wizard, and poof! The PCs are where they want to go. Except that it isn’t that simple, because teleport isn’t foolproof. The off-target teleports are a matter of scattering your PCs someplace else on the map and forcing them to get their bearings and make the long overland journey anyway. But this Side Trek focuses on the really intriguing column on the teleport chart: “similar area.”
A short adventure for the Midnight campaign setting from Fantasy Flight Games. The adventurers must contact a recently-captured resistance fighter to uncover the identity of a traitor.

Strange catches have long plagued fishermen's nets -- but none so strange as rotting fish that twitch and gasp for days after they are taken from the water, or a gilled githyanki's severed head found in a shark's belly. Do these briny omens lend credence to rumors of a sunken githyanki city caught in a necromantic civil war? This is a sequel to "The Death of Lashimire" (Dungeon Magazine #116). This adventure makes use of rules and options from "Stormwrack" and the "Expanded Psionics Handbook". Pgs. 60-82

Sarkt is an illithid sorcerer. It was cast out of its community for its heretical studies (Sarkt was in fact, lucky to escape alive). It didn't take the cunning creature long to pick up a few thralls and find a new place to live, safe from the murderous intentions of its companions. Sarkt dwells in the subterranean ruins of an ancient shrine to Blibdoolpoolp, the crustacean-headed deity of the kuo-toas. This shrine lies on the fringe of a region controlled by kuo-toas, but since Sarkt's arrival, the fishmen avoid the area. A few unfortunate kuo-toas now serve Sarkt as thralls and maintain the illusion that the shrine serves Blibdoolpoolp. Pgs. 82-88
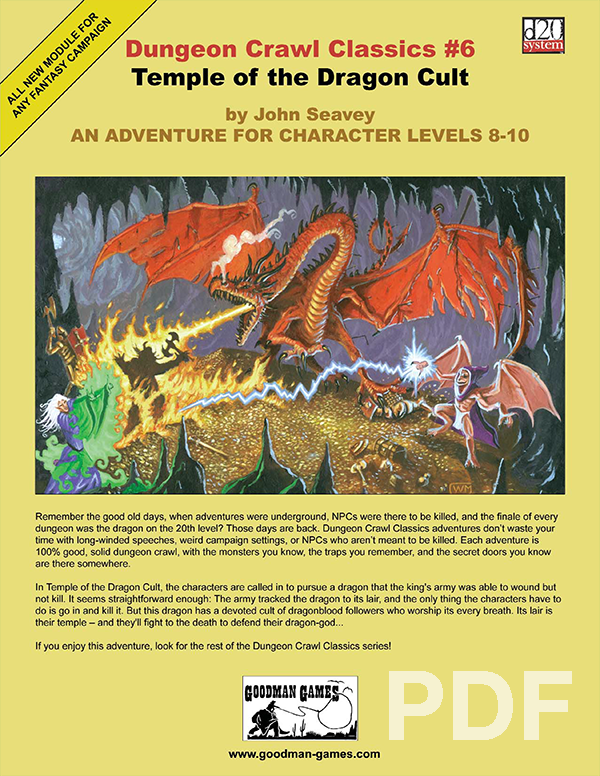
In Temple of the Dragon Cult, the characters are called in to pursue a dragon that the king’s army was able to wound but not kill. It seems straightforward enough: the army tracked the dragon to its lair, and all the characters have to do is go in and kill it. But this dragon has a devoted cult of dragonblood followers who worship its every breath. Its lair is their temple — and they’ll fight to the death to defend their dragon-god…

As the party faces an ancient foe who has never been defeated, their hunt threatens to unleash the buried ghosts of a forgotten feud between two of Waterdeep's powerful merchant houses. The third adventure in the Vampires of Waterdeep Campaign Arc. Pgs 70-93

A killer has come to Oakbridge, and she won't stop her murderous campaign until she exacts revenge against a group of ex-carnies who have come to Sharn in an attempt to start new lives in the aftermath of the Last War. Pgs. 22-36

This module is designed for characters who have made their way through the Freeport Trilogy. Characters new to Freeport are at disadvantadge, however. Hell in Freeport sends the characters to the depths of the Hell as pawns of an undead duke. When they discover the truth of their mission, they must race against a sinister clock to save two cities. Act 1 kicks off with a battle against a cornugon on the Freeport docks. The characters are hailed as heroes for defeating the fiend, and are summoned to the Church of Retribution to help in the battle against Hell. Tee old inquisitor who greets them is actually Jalie Squarefoot, an infernal lich who took this form to search for the perfect cat's-paw. Squarefoot wants to take the souls of Freetown, a city in Hell, but must first get around a contract poin: he can't take the city until the Tyre tower clock-now stopped- strikes midnight. He sends the party to Devil's Cry, an inslan off the coast of Freeport, with instructions to close the gate to Hell hidden inside. In truth, he knows the party will be transported straight to the Third Circle when they try. Inside Devil's Cry the party finds the remnants of a great battle fought between an invading devil's army and the Church of Retribution, and battle their way past undead defenders until they reach the gate itself and unwittingly trigger it. Act 2 begins with the party in a twin of the complex they explored in Devil's Cry, but now they are deep in Hell. They fight their way back to the cavern entrance, only to find that they are not on the Prime anymore. When they voyage back their homeport, they instead find themselves in Freetown, a city of scaped slaves in a dark mirror image of Freeport. Once in Freetown, they make the acquaintance of the city's mayor Wycleffe-a servant of Jalie Squarefoot-who persuades them to go on a quest to Tyre to restart the tower clock. They travel the Styx to the Eight Circle and fight their way into a long-buried vity, and then into the tower clock itself. They restart the clock and begin the trip home, but are waylaid by devils and taken prisioner. Act 3 opens with the party naked and in chains in the infernal prison called the Forge. They learn that Jalie Squarefoot and Wycleffe have duped them, and that the supposed rebels of Freetown are actually its protectors. The characters must escape or win their freedom in the gladiator pits before the tower clock they restarted destroys both Freetown and their home city of Freeport. They battle back to Freetown, taking revenge on their captors in the process, and capture the city from Wycleffe with the help of the rebels. Finally it falls to the PCs to enter the tower clock and stop it and Jalie Squarefoot before the fiend's plan can come to fruition. After being tricked and manipulated throughout the adventure, the party finally has their revenge on the duke and his minions.

A Brelish spy steals and defects with a powerful magic sword and the adventurer's have been hired to track down and recover the item. This adventure features a lengthy chase overland on horseback, on a train, and an airship. Along the way the adventurers will also have to deal with third parties seeking to recover the sword for themselves, such as Warforged agents of the Lord of Blades who have hired halfling mercenaries riding glidewings (pteranodons), and Emerald Claw raiders piloting an opposing airship. This adventure can be run stand-alone or as a sequel to The Forgotten Forge and Shadows of the Last War.

The characters have escaped the maze only to find themselves in strange dimensions of fire, stone and ice, and a strange idyllic hunting ground where all is not as it appears.

At the end of the Hateful Wars, Lord Sandor led his army into the Barrier Peaks in pursuit of a host of goblins and orcs. He and his army vanished, and now a group of adventurers follows his footsteps to discover what doom fell upon him and his men. Pgs. 30-46

The wizard Allustan requests the party's company on a trip to Blackwall Keep, a militia outpost on the border of a treacherous swamp. But what of the green worms and unkillable zombies plaguing the region, and what fell secret is locked in the keep's forlorn basement? "Encounter at Blackwall Keep" is the third installment of the Age of Worms Adventure Path, a complete campaign consisting of 12 adventures, several "Backdrop" articles to help Dungeon masters run the series, and a handful of poster maps of key locations. For additional aid in running this campaign, check out Dragon's monthly "Worm Food" articles, a series that provides additional materials to help players survive this campaign. Check out issue #335 of Dragon for three sample cohorts that they might want to take on. Pgs. 16-40
A Scavenger Hunt? The adventure begins in the city-state of Zoa as the wizard Geolain tasks the player characters with a quest to gather three ingredients they will use to forge a magic coin to defeat an evil wizard. Which will be more dangerous to collect, the mysterious diamond touched by death, the blood of a devil spilled by a coward or a blue dragon's breath? As the player characters race around Reanaaria Bay ti find the rare items, their nemesis Daresh the wizard begins to grow in strength and wrest power from the Skryvalkkers of the Lands of Skaarna. Will the player characters find the ingredients and enchant the coin in time? They just might be Skaarna's only hope. Published by Kenzer & Company
The brilliant (if somewhat eccentric) detective Viktor Saint-Demain has put more criminal masterminds behind bars than any three other inqusitives. But when the master sleuth fails to get the recogintion he deserves, he sets out to prove to Sharn that they can’t live without him. Pgs. 16-34
In Wheloon, a city known for its vibrant green slate roofs, a new temple to Mystra is in the final stages of construction. But something rings false among the heavenly spheres- or at least among those who mouth the pieties of Mystra while plotting magical mayhem behind closed temple doors.

Atop a distant mountain peak, a monstrous entity plots dark deeds. The final chapter of the Seeds of Sehan campaign arc. "To a mind that is still, the whole universe surrenders." Chuang-Tzu. Pgs. 30-47