
Welcome to the picturesque village of Eveningstar, nestled at the foot of the Stonelands where the River Starwater winds down a gorge and snakes into the King's Forest. Here, the Knights of Myth Drannor began their famous adventures. Here, the Ladies of the Brazen Blade, The Company of the Singing Sword, The Steel Shield Band, and many other came, clutching royal charters from King Azoun with the ink scarcely dry on the parchment. Some fell, some went on to greatness-but they all came here first; to the Haunted Halls. Despite numerous infiltrations, the Halls have not yet yielded all their secrets or treasures. Many dangers lurk as deadly as ever in dark chambers herein, awaiting new companies of eager-eyed adventurers. Is it your turn to dare The Haunted Halls? Many come, but few survive to again see Eveningstar's beauty. Welcome, then. Enter in, and find in these pages: A challenging introductory level dungeon. A detailed countryside setting, including important local personages, local color, and guidelines for play. Suggested campaign plots and adventures. New spells. New magical items. New monsters. A splendid campaign can begin here. Adventurers in an ongoing campaign can stop by for a memorable visit. Those looking for an underground stronghold may even find a home in the Haunted Halls of Eveningstar. TSR 9354

"Gnolls have captured the heroes! After stripping the characters of all equipment except their armor and clothing, the gnolls drag them to an expansive briar maze known as the Twisted Thickets and set them loose. Then, armed to the teeth, the gnolls hunt down their prey. The characters must survive the hunt and outwit their pursuers. After dealing with the gnoll hunters, the heroes can try to reclaim their lost equipment and exact revenge on the tribe, which lairs in the caves beneath Dead Gnoll’s Eye Socket."
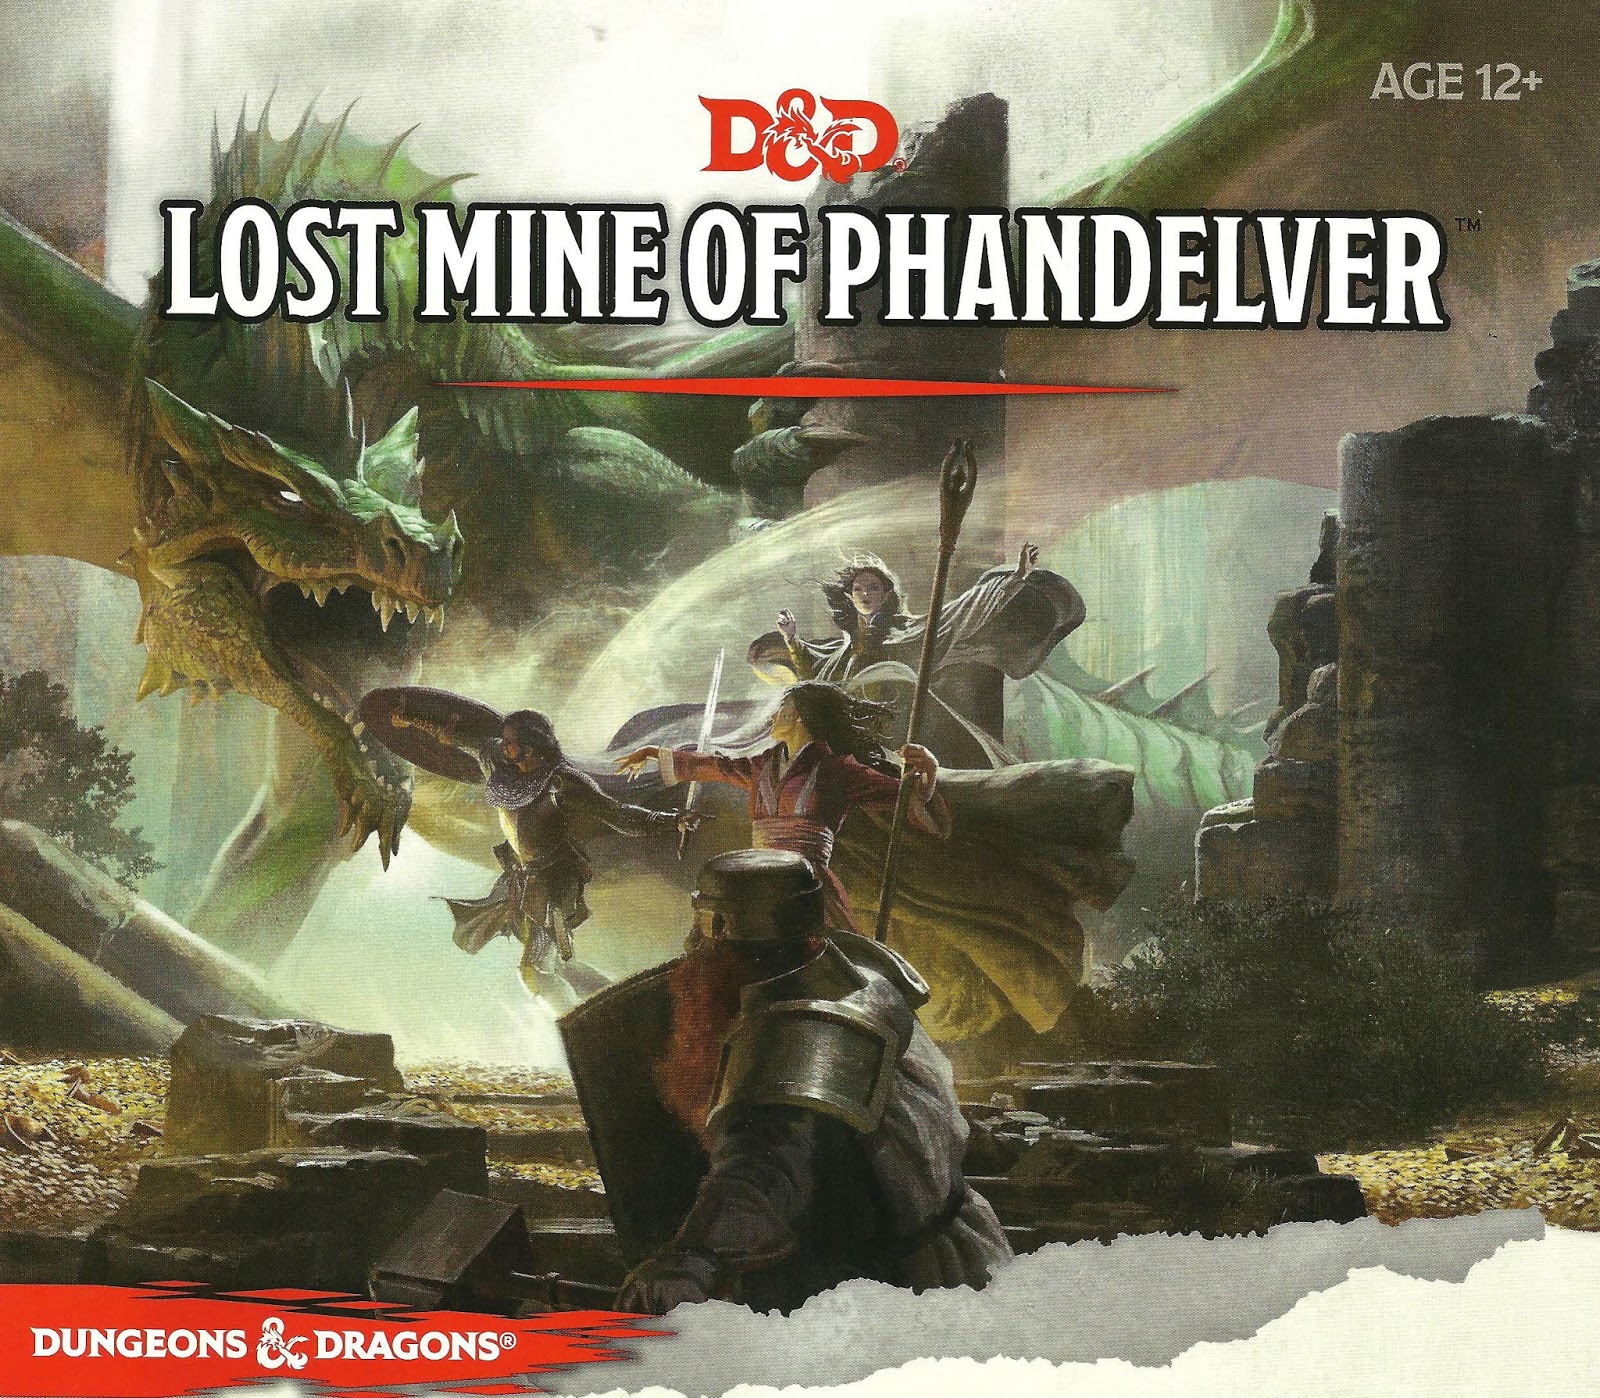
"More than five hundred years ago, clans of dwarves and gnomes made an agreement known as the Phandelver’s Pact, by which they would share a rich mine in a wondrous cavern known as Wave Echo Cave. In addition to its mineral wealth, the mine contained great magical power. Human spellcasters allied themselves with the dwarves and gnomes to channel and bind that energy into a great forge (called the Forge of Spells), where magic items could be crafted. Times were good, and the nearby human town of Phandalin (pronounced fan-duh-lin) prospered as well. But then disaster struck when orcs swept through the North and laid waste to all in their path. A powerful force of orcs reinforced by evil mercenary wizards attacked wave echo cave to seize its riches and magic treasures. Human wizards fought alongside their dwarf and gnome allies to defend the Forge of Spells, and the ensuing spell battle destroyed much of the cavern. Few survived the cave-ins and tremors, and the location of Wave Echo Cave was lost. For centuries, rumours of buried riches have attracted treasure seekers and opportunists to the area around Phandalin, but no one has ever succeeded in locating the lost mine. In recent years, people have resettled the area. Phandalin is now a rough-and-tumble frontier town. More important, the Rockseeker brothers - a trio of dwarves - have discovered the entrance to Wave Echo Cave, and they intend to reopen the mines. Unfortunately for the Rockseekers, they are not the only ones interested in Wave Echo Cave. A mysterious villain known as the Black Spider controls a network of bandit gangs and goblin tribes in the area, and his agents have followed the Rockseekers to their prize. Now the Black Spider wants Wave Echo Cave for himself, and he is taking steps to make sure no one else knows where it is." Extra Info from AL.com users: by @marcellarius. "There are a variety of locations in this adventure: the town of Phandalin, a gang hideout, a ruined keep in the forest, a destroyed village, and Wave Echo Cave (a dungeon crawl). The adventure is written in a sandbox style and relies on the players to choose their path. Phandalin offers several side-quests which could serve as hooks for continuing adventures. The premade characters have ties in their backgrounds to NPCs and locations. If you're not using these you'll need to consider other ways to introduce key NPCs."

An interesting and atypical adventure in its writing style. For one the module contains insightful "When things go Wrong" sections and DM guidance for sticking close enough to the rails for the story and fun's sake. Lots of DM hints about how to handle PCs' choices. Overall the story is fine too - a traditional hook, a mystery, some twists. There's a tower, a surprise pocket-dimension context, and a dungeon. It's mirror of life trapping, isn't it? Well, yes and no. People go in, and they don't come out. Nor can you talk with anyone inside. Somehow, that's not quite the way you remember those mirrors work. This Skarda fellow showed up a few years ago with a band of raiders, and no one in the land has been safe since then. Whole villages have disappeared into this Skarda's mirror. Your band is approached by relatives of one of the victims?and adventurer like yourselves. You have to get into that mirror of whatever-it-is, find this man, and get him out in one piece. The reward is more that adequate. Only problem is, no one out here can tell you what to expect once you get in? or even how to get there. TSR 9188

Special Basic/Expert Transition Module Barely one day's march from Kelven, the uncharted tracts of the Dymrak forest conceal horrors enough to freeze the blood of civilized folk. Those who have ventured there tell how death comes quick to the unwary - for the woods at night are far worse than any dungeon. But you are adventurers, veterans of many battles, and the call of the wild is strong. Will you answer the call, or are you afraid of the dark terrors of the night? The campaign adventure is for characters just beginning Expert play (levels 2-4) and hurls them into the exciting outdoor world which awaits in the Expert rulebook. With a 64 page booklet, 2 double-panel covers, a double-sided, fold-out mapsheet and 120 die-cut counters, this super module provides all you need for epic wilderness and dungeon adventuring. Journey across the Grand Duchy of Karameikos in a desperate race against time and the forces of evil. This adventure is for use with the Dungeons & Dragons Expert Set, which continues and expands the D&D Basic Rules. This adventure cannot be played without the D&D Basic and Expert rules produced by TSR inc. TSR 9149

A hunt for a missing key leads the heroes from the streets of the city of Greyhawk to the Tomb of Blood Everflowing in the treacherous Cairn Hills. Pgs. 18-20, 22 & 24-39

The heroes’ journey is finally at its climax. The evil god Tunkorl has just been freed from his prison and only the strongest and bravest mortals of the realm can defeat him before he regains full strength and throws the world in another dark age. However, the ultimate final fight will not be as straightforward as it seems when the party becomes trapped in a time dilated cross section of Carceri, struggling to get back to the real world and finish the job. Escape the Labyrinth is D&D 5e mini adventure for 3-7 characters of 20th level. This adventure is designed for a single 3-hour session which can be part of a special event, the end, or beginning of a campaign. The heroes go between fighting the big bad evil god (round by round) and trying to escape the mutliple layers of the Labyrinth of Futility a space-time dilated cross section of Carceri.

Chapter 2: The Sinister Secret of Saltmarsh In this version of the adventure, the characters find navigational charts and logs aboard the Sea Ghost that implicate its crew as slavers. Ned Shakeshaft is a Scarlet Brotherhood agent. He makes an attempt to foil the characters, but his true intent is to surrender and implicate Gellan Primewater as a key villain. The distraction afforded by the lizardfolk and the looming sahuagin threat gives the Scarlet Brotherhood the opportunity to bring more agents into town. posing as mercenaries brought in by Anders to protect the town. If Gellan can be removed from the council, Solmor might ask one of the characters to take his place.
Wednesday's child... It's a blessed event only if you can end the curse in time. People have been disappearing form the town of Monetenapoleone and a swamp has appeared blocking the towns trade route. It is up to the players to find what is causing all of these strange events and to stop it. Pgs. 32-49

Deep below the surface lies an ancient beholder city called Ilth K'hinax. In times past, hundreds of beholders called it home - until simmering rivalries within their society exploded into warfare. The few survivors fled, leaving the city deserted for hundreds of years. However, the story of Ilth K'hinax's glory was passed down from one generation of beholders to the next. Now, after countless years of self-imposed exile, the beholders are back! After securing the city, the hive mother of Ilth K'hinax implemented a plan to wipe out all the beings living above it. Unfortunately for the beholders, several facets of the hive mother's plan have been revealed through the exploits of a party of adventurers. Now, this group of heroes must meet eye to eye with Ilth K'hinax's newest occupants in an effort to stop the hive mother's pernicious plan! "Eye to Eye" is the last of three adventures featuring the nightmarish beholder. It can be played as an individual mission or as part of the series that began with "Eye of Pain" and continued in "Eye of Doom." TSR 9536

This was supposed to be a simple job! In the small town of Haanex on Reanaaria Bay, the wizard Veoden assembles the PCs to do a simple job: find the remnants of a meteor said to be made of the rare substance mithral. First they must find a map that local rumor tells is guarded by the spirits of the dead. Upon recovering the map and locating the crater, they uncover a plot to create a powerful magical item called the Coin of Power. This artifact is a tool for wickedness and the players soon find themselves on a quest to learn the means to destroy this evil item and its insidious master before she destroys them. Complicating matters is the fact that the one man who can help them was lost during an expedition to the Reelio Jungle months ago and is yet to return. Will the PCs be able to survive the rigors of the jungle and solve the riddle of the tribesmen who live there? The lives of innocents might depend on it! This accessory provides characters with an elaborate storyline and a chance for many varied types of adventure. You will take your PCs from the quiet village of Haanex in northern Reanaaria Bay to the Vry Naasu Headlands, the City-State of Zoa and finally the forlorn Reelio Jungle. The Root of All Evil fantasy game supplement is set in the popular Kingdoms of Kalamar Dungeons & Dragons campaign setting but can be adapated for use in any setting! This module can be used by itself, or as Part One of the Coin of Power trilogy (see also Forging Darkness and Coin’s End).

It is time to put a stop to the marauders! For years the coastal towns have been burned and looted by the forces of evil. You and your fellow adventurers have been recruited to root out and destroy the source of these raids. But beware, hundreds of good men and women have been taken by the slavers and have never been seen or heard from again! First part of Scourge of the Slave Lords (A1–4) TSR 9039

Restore an Abandoned Temple Enter the catacombs near the desecrated Temple of Muir, Goddess of Paladins, and search for the lost tomb of Abysthor. Will your party be able to cleanse the evil that now inhabits these once-sacred halls, and recover the Stone of Tircople? Can your characters survive the traps of an undead sorcerer? Will your players discover the chamber of Living Rock and the secret power it holds? Adventure awaits! Gold and Glory! A fantasy adventure published for the D20 system, The Tomb of Abysthor is the first module in Necromancer Games Dungeon series and can be played as a stand-alone story or in conjunction with The Crucible of Freya and the forthcoming city supplement Bards Gate. What secrets lie hidden in the tomb of Abysthor?

Who could know what is hidden within the secluded mansion of the crazed mage? Well, now, when nobody has seen him here for more than a year, it’s the best time to find out! A 4-hour adventure for two 1st–2nd level characters. Small Party Adventure: Though the party size of 3–5 characters is considered optimal in D&D, there are times when you can only gather one or two players at most. This adventure is designed exactly for such occasions.
A dangerous beast - but one with a mission. Even the gods slip up now and then, but few dare remind them of it. Ri Conn's son was killed by the white boar of Kilfay, and he has passed sentence of death upon it! What starts as a hunting expedition for the PCs ends up being a grand adventure through the forest. Several interesting set pieces on the path of the boar's rampage are included in the adventure. The path of destruction leads through a goblin camp and ends in the tower of a now-dead mage (which still holds the target of the boar's ire, a mutated bulette that the mage bred). Will the party help the boar kill the bulette mutation, or let it free? Pgs. 32-47
Only You can prevent forest curses! The population of a small town have been disappearing and its up to the party to save them and the town from a looming disaster.

Gazing down from the pinnacle of Hardway Mountain, who would not be drawn by the far-off glint of the Serpent's Eye? The descent will be hard, the mountains know neither mercy nor compassion. Many are the lessons to be learned, but fate has left you little choice - are you equal to the challenge? "Eye of the Serpent" is a one-on-one wilderness adventure module for one player and one Dungeon Master, and has been designed to develop the specialist skills of a 1st-level druid, ranger, or monk character. It can also be used for a normal party of four to six 1st-level player characters. The perils of Hardway Mountain are unchanging, but the routes between them are not. This module includes a unique route planning system with different of routes linking the encounters to challenge the abilities of druids, rangers, or monks. TSR 9125

This deluxe adventure takes heroes into the ruins of Gardmore Abbey, a monastery that was once the base of a militant order of paladins devoted to Bahamut. According to legend, the paladins brought a dark artifact back from a far crusade and stored it in their abbey for safekeeping, and evil forces gathered to assault the abbey and take it back. What the legends don’t tell is that this artifact was actually the Deck of Many Things, a force of pure Chaos. This adventure brings characters into the extensive dungeons beneath the ruins - dungeons that are warped and twisted with the raw forces of Chaos surrounding the cards of the deck.

The final fate of Roslof Keep and the Company of the Ivory Scimitar hangs in the balance. With five levels conquered, the party must finally face the ultimate challenge of the sixth and final floor. Can the stalward adventures overcome the last defense of the Infernal Machine? Will Roslof Keep be freed from the violet corruption? What unforeseen plot twists still await those willing to brave the challenges presented in The Realms of Madness and Despair? This adventure is formatted to both 1E & 5E gaming rules. Also available in PDF.

The heroes arrive at the eponymous Keep on the Borderlands, a fortress on the edge of civilization built to stave off the chaos and evil of the wilderness. Using it as a home base, a party can make forays into the surrounding wilderness, encountering monster and marauder alike. The centerpiece of the adventure is certainly the CAVES OF CHAOS, a network of tunnels and caverns found in the walls of a nearby but isolated ravine. It is here that hordes of evil humanoids have made their home. Through combat and negotiation, the players can try to explore and map out these caves, perhaps with the aim of accumulating valuable treasure or even cleansing the land of evil creatures. However, even the Caves are not all they seem. Beyond the goblins and kobolds lurk dark horrors: cults dedicated to fiendish chaos and a Minotaur's enchanted labyrinth await the unprepared adventurer. But for the hero who is brave, clever, and fortunate in equal and sufficient measure, great treasures and glory await in the Caves of Chaos that lie beyond the Keep on the Borderlands! TSR 9034