
Your magic user friend has had his spellbook taken by marauding bugbears. He, and by extension you, are tasked by his mentor to recover the tome. Now you must track the goblinoids across the maze like hill country to find his stolen book. Pgs. 9-24 of Polyhedron #28
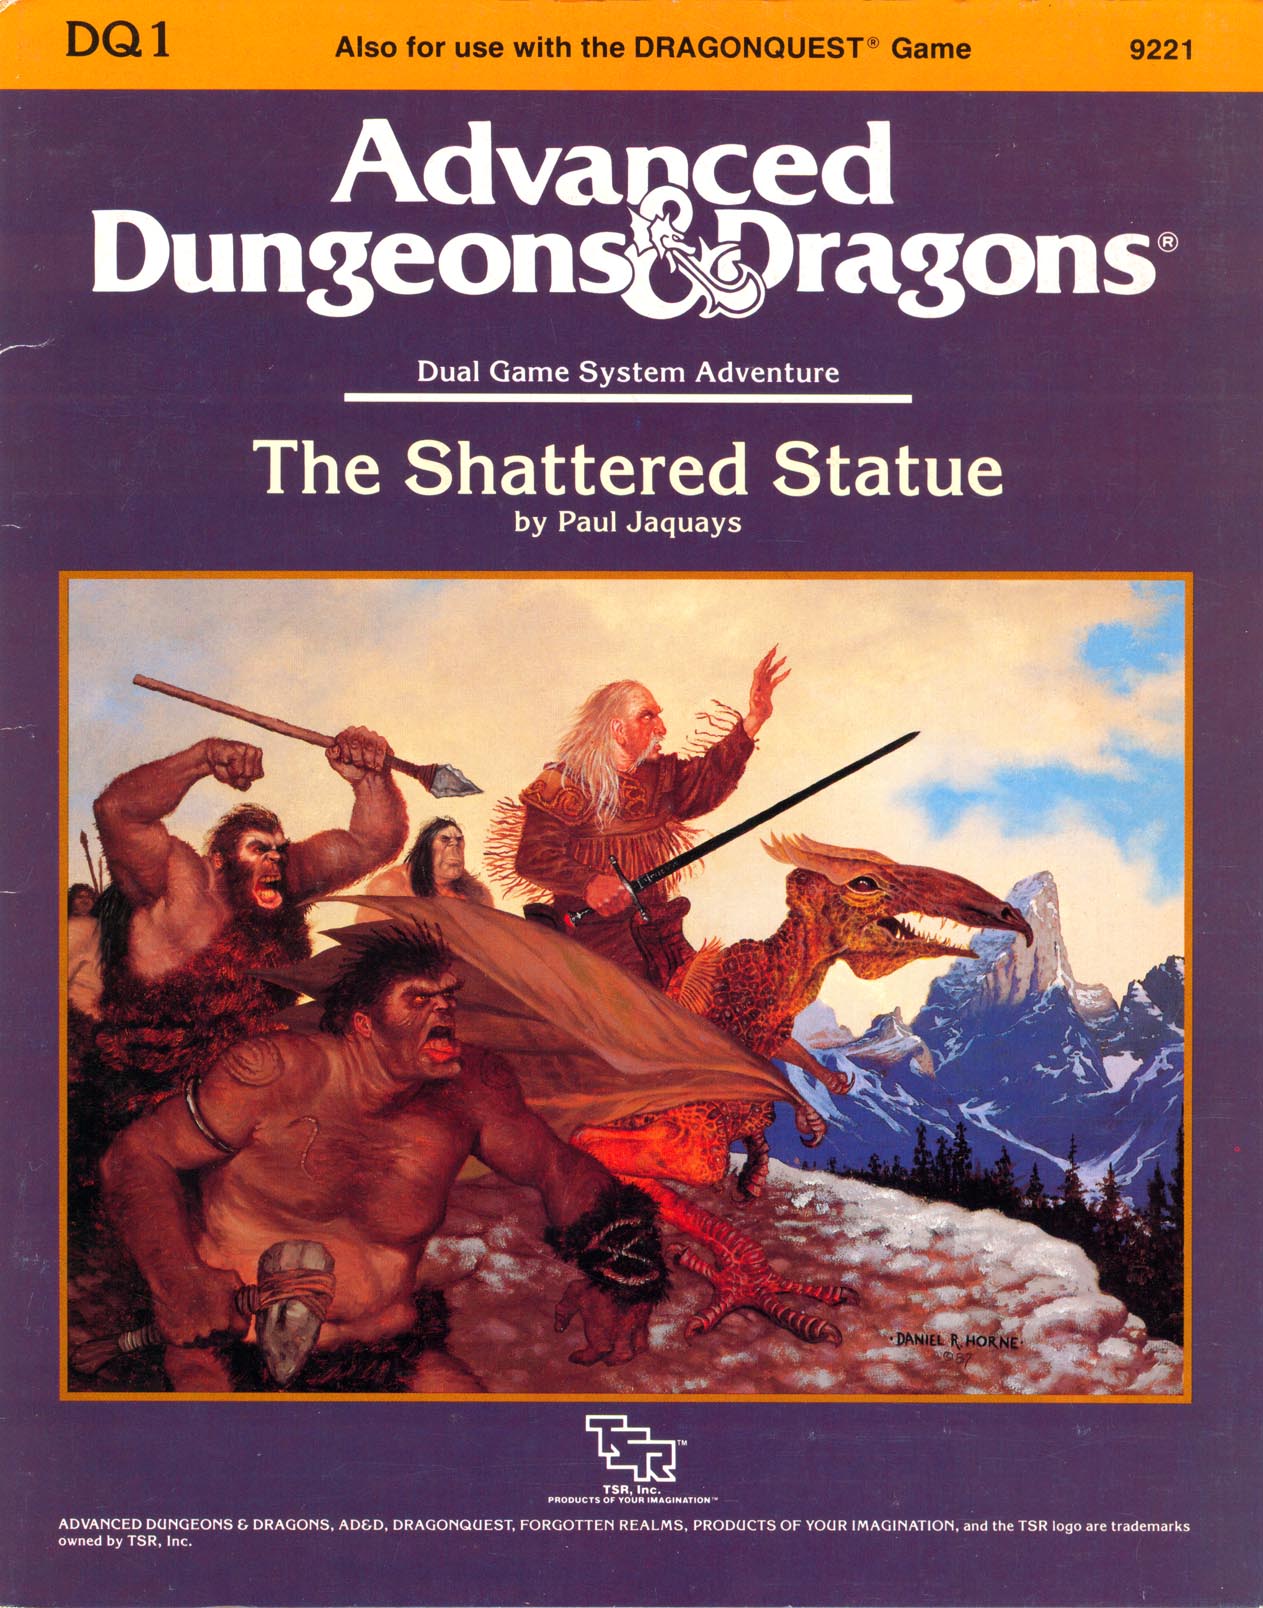
"A mutual friend has praised your skills highly. If you seek rich reward and the opportunity to delve into mysteries ancient and lost, bring this bottle forthwith to my demesne in the village of Volkumburgh. Together we may seek to bring mankind the lost wonder of the awtawmatawn." A mysterious note, a disappearing 5-foot-long religious relic, and the ruins of two magical schools. What do these things have in common? How deeply are your party members involved in all this? "The Shattered Statue" is the first dual-game-system module of its kind. Players of both the AD&D game system and DRAGONQUEST game system can use this adventure. It is suitable for use with FORGOTTEN REALMS campaign setting. TSR 9221

Part 1 of an Expert-level quest into a hostile wilderness. This adventure takes place in the Known World of the D&D game, as outlined throughout the D&D game rule books and modules. The DM may find it useful to consult the Companion and Masters Sets, as well as most of the X-series of Expert Set modules. D&D Expert Set module X9, The Savage Coast, would be especially helpful, as Tortles of the Purple Sage could easily serve and continue that module's direction and plot like, adding a previously undescribed area (the Great Northway) to the Known World. The DM may also place the areas and events of this adventure within an existing campaign setting, as long as the geographical areas of the campaign match those set forth here. Pgs. 40-62
Goblin attacks have always plagued the farmers and merchants who live and travel along the roads leading to Whitesparrow. But a recent rash of new attacks are something different. The goblins of one particular tribe have gotten particularly smart, attacking with careful tactics and cunning ambushes. The village guards haven’t been able to outwit the goblins, even when laying traps of their own and hiring mercenaries to stop them. Even as goblins go, Rosethorn isn’t much to look at. He’s small and runty, and yet a lucky break placed him in charge of the Brownleaf goblin tribe. When he claimed a powerful magic relic from a dead wizard three months ago, Rosethorn found his intellect multiplied many times over. The world began to make a more intricate kind of sense to him, and he saw patterns in the ways other folk traveled the roads. After hiring a spy in Whitesparrow to tell him which wagons to pursue, Rosethorn cunningly bribed the wagons’ guards to throw battles in the goblins’ favor. He then moved the lair of the Brownleaf tribe away from their dank caves and into the ruins of the Bearded Man—an enormous dead tree at the center of the Howling Wood. There, Rosethorn continues his campaign of ambush against the foolish villagers, increasing his wealth and power with each robbery.

The outpost of Fort Dolor has experienced an unprecedented stretch of peace in recent times. Then nearly the entire garrison disappears on a supposed routine patrol, and the town— still on the frontier— is left nearly defenseless. Can the adventurers dig to the bottom of the mystery at Fort Dolor before they, too, disappear? Pgs. 82-103

The mining town of Glister has a problem. The latest caravan only arrived with a part of its supplies. Orcs waylaid them, took much needed goods, and are now making demands that the town return an artifact that is theirs, but the town is unfamiliar with. Help track down information about this artifact and possibly defend the city from an orc invasion! A 4-hour Adventure for 1st-4th Level Characters Part 2 of Kossuth's Kiss

Giants have been raiding the lands of men in large bands, with giants of different sorts in these marauding groups. Death and destruction have been laid heavily upon every place these monsters have visited. This has caused great anger in high places, for life and property loss means failure of the vows of noble rulers to protect the life and goods of each and every subject -- and possible lean times for the rulers as well as the ruled. Therefore, a party of the bravest and most powerful adventurers has been assembled and given the charge to punish the miscreant giants. This module contains background information, referee's notes, two level maps, and exploration matrix keys. It provides a complete module for play of ADVANCED DUNGEONS & DRAGONS, and it can be used alone or as the first of a three-part expedition adventure which also employs DUNGEON MODULE G2 (GLACIAL RIFT OF THE FROST GIANT JARL) and DUNGEON MODULE G3 (HALL OF THE FIRE GIANT KING). TSR 9016

The town of Byr is in need of heroes. Residents of the town of Byr have been kidnapped. Some think it was marauding Hobgoblins, but a grizzled and crippled veteran who helped to drive the Chagmat (monstrous spider-people) back many years ago believes that the Chagmat are back. Their forgotten temple is believed to be up on Little Boy Mountain. He argues that the mountain is where answers, and the missing townsfolk, can be found. Pgs. 33-48

Special Basic/Expert Transition Module Barely one day's march from Kelven, the uncharted tracts of the Dymrak forest conceal horrors enough to freeze the blood of civilized folk. Those who have ventured there tell how death comes quick to the unwary - for the woods at night are far worse than any dungeon. But you are adventurers, veterans of many battles, and the call of the wild is strong. Will you answer the call, or are you afraid of the dark terrors of the night? The campaign adventure is for characters just beginning Expert play (levels 2-4) and hurls them into the exciting outdoor world which awaits in the Expert rulebook. With a 64 page booklet, 2 double-panel covers, a double-sided, fold-out mapsheet and 120 die-cut counters, this super module provides all you need for epic wilderness and dungeon adventuring. Journey across the Grand Duchy of Karameikos in a desperate race against time and the forces of evil. This adventure is for use with the Dungeons & Dragons Expert Set, which continues and expands the D&D Basic Rules. This adventure cannot be played without the D&D Basic and Expert rules produced by TSR inc. TSR 9149

“The Shadow Rift of Umbraforge” is a sequel to “Siege of Bordrin’s Watch” and the third part of the Scales of War Adventure Path. In “Siege of Bordrin’s Watch,” the PCs discovered that dark creepers had sold arms and tactical intelligence to the orc war chief Tusk, aiding him in his attack against the folk of the Stonehome Mountains. In this adventure, the PCs investigate the link between the orcs and the dark ones, stumbling into an armsrunning operation that takes them to the Shadowfell in order to finally confront the charismatic figure behind it. Pgs. 4-53

Rumors of faceless demonic creatures have been steadily rising in the Hillsfar region, and it is said that far below the surface of Faerun, nestled in the bowels of the Underdark, ancient terrors are stirring. The imperiled drow of Szith Morcane have extended an intriguing offer, but can the drow be trusted, and for how long? An eight-hour adventure for 11th-16th level characters.

Candlekeep is under siege, and it needs adventurers to help protect it! Heed the call to defend the legendary monastery and stand against the tide of evil. Confrontation at Candlekeep was used as a D&D Next playtest for D&D 5E. It was released to organized play Dungeon Masters in August 2013, and ran at Gen Con, PAX, and other major conventions. The adventure includes rules for running multiple tables, but can also be run for just one table. The attack on Candlekeep by forces of Asmodeus is tied to the events in Ed Greenwood's novel about the Sundering, "The Herald."
Surviving the shipwreck is easy; living through the wizardly bet afterward is not. Their game could mean your lives. A storm caused the PCs' vessel to sink and is now forcing them to seek shelter in the keep on the remote isle. Their goal is to locate a boat or some other means of transportation to return to the mainland after the storm has passed. But first, they must survive the tests and traps the island's inhabitants have set for them. Pgs. 45-64

To a wizard, knowledge is power, and the wizard Lirdrium Arkayz wants to know the mysterious secret of The Rock. Many have tried to discover it - but The Rock keeps its secret well. The wizard offers a rich reward to anyone bold enough to solve this dark mystery. But the road to The Rock leads to danger and hidden peril - dangers that have claimed the lives of many brave adventurers. Rashness and folly will lead to quick death, but riches await the clever and brave. Have you the wits, courage and skill to survive the Journey to The rock? TSR 9106

Storms frequently blow from the Cloudscape Mountains, but never one like this: For weeks it has hung over the peaks, casting its dark shadow across the land. Its huge black clouds billow and writhe in an effort to smother the sun. Once so picturesque and enchanting, the Cloudscape Mountains have taken on a sinister appearance. Fear now stalks the land. A malignant entity is growing and festering high in the mountain peaks. With dark tendrils, it reaches out towards the lowlands. No one is safe. Caravans are not arriving at the village of Lurneslye. It is only a matter of time before the villagers fall prey to the dark clouds and the evil they conceal. TSR 9151

The Sea Witch is a short adventure for four 10th-level characters. The difficulty of the adventure can be adjusted by changing the level of main antagonist (Black Molly, the sea hag pirate) or by altering the number of her ogre servants. To tailor the encounter to groups of different levels, refer to table 4-1 in Chapter 4 of the DUNGEON MASTER’S GUIDE. The adventure is set off a lightly populated coastline known as Misty Bay, but adapts easily to any coastal region in existing campaigns. The sea hag known as Black Molly is a notorious pirate who has plagued the coastal cities for the better part of a decade. A successful Knowledge (local) check (DC 15) will reveal that Molly and her ogre crew have a filthy reputation as merciless killers who delight not only in plundering vessels for their riches, but also in destroying the ships themselves and sending all hands to the bottom of the sea. Now the villain and her followers have seized control of the Old Lighthouse of Misty Bay located off a lightly populated coastline. For generations the lighthouse beacon has protected the fishermen of this region, warning them of the dangerous rocks that lurk just below the level of the high tides. Recently, the hag has put out the beacon, darkening the lighthouse; misery and destruction are sure to follow as ships start to blunder into the rocks. Blackmail is apparently Black Molly’s aim in this venture: She conveyed a message to the nearest shore community, the fishing village of Poisson, demanding the princely sum of 50,000 gp. Until she receives this ransom, she intends to hold the lighthouse and its beacon hostage. The fate of the human keepers who tend the lighthouse is unknown to the seaside communities at this time, but they fear the worst. The Sea Witch is ostensibly a rescue mission: The PCs are pitted against the evil of Black Molly and the brawn of her savage ogre crew. It is the heroes’ task to retake the lighthouse and, if possible, free its captives from the clutches of their jailer. What neither the PCs nor the shore communities yet realize is that while she 1would be pleased to have the gold, Black Molly is in fact after bigger treasure. Molly has no intention of giving up the lighthouse — at least, not until she finds what her master sent her here for. Lying on the sea floor practically at the base of the rock on which the lighthouse sits is the wreck of the war galley Flying Cloud, which according to popular legend was captained by a cleric who wore around his neck an amulet of the planes. Black Molly wants this prize, but so far she hasn’t been able to find it. She’s scoured the wreck without finding any sign of the magic item. Now she’s trying to determine where to search next, for the item might well be somewhere near the wreck. If she can’t find it, she’ll start torturing her captives to find out if they have any useful knowledge about the amulet.

The End of the World Is at Hand! A hideous death cult has seized control of an ancient artifact-monument known as Tovag Baragu. The power behind the cult is the Old One himself, Iuz the Evil, demonic master of an empire. He's on an all-or-nothing quest for supremacy over the world—and the heavens beyond. To stop him, heroes must face horrors never dreamed of, journeying to a shadowed city where Death rules and the living cower. Here, Iuz will achieve his mad dream by destroying the imprisoned master of that alien citadel: Vecna, the mightiest lich, an immortal demigod. Two items exist with the power to stop Iuz—the Eye and the Hand of Vecna—but using them carries fantastic risks. Not even the gods know what will be unleashed when these items are fully activated. Die Vecna Die! takes the heroes from the Greyhawk campaign to the demiplane of Ravenloft and then to the Planescape city of Sigil. However, none of the material from those settings is required for play. TSR 11662

You are Erystelle of Dorneryll, famed elfin champion and magic-user. After years of adventuring, you have come home to the Emerlas - the hauntingly beautiful elfin woodland at the tip of Canolbarth forest. A place of legends and of peace. The journey has been long, but soon the winding forest track will bring you to Dorneryll, the majestic oak tree home of your childhood. Ahead, you glimpse a plume of smoke curling lazily into the sky. Dorneyll is close, and your mind floods with thoughts of home. Suddenly, your reverie is shattered! The thin plume of smoke is gone, an in its place a column of red flame leaps high among the trees. Dorneryll is under attack! Gripping your lance, you urge your mount into a gallop. Starbow surges forward; your war dogs close on her heels... Blade of Vengeance is an adventure for one player and one dungeon master, featuring a lone elf against the forces of evil. Can you save the Emerlas from destruction? The answer waits inside. TSR 9108

A combination wilderness/dungeon module, first searching for then exploring the temple of Tharizdun. Tharizdun is long gone from the place, so there's no epic final fight. Rather, a mysterious Black Cyst waits at the bottom of the dungeon. The encounter with it is almost scripted, having no hazard except for careless/foolish players. Contains several monsters from the Fiend Folio. Loosely follows Lost Caverns of Tsojcanth. TSR 9065

The wizard Kavorquian is dead. But certain items belonging to his adopted son were in the wizard's keeping at the time of his demise. Now someone must venture into the silent vaults of Kavorquian's stronghold and recover the missing property. Queen's Harvest picks up its story where B11, King's Festival, left off. It can be played as a sequel to that adventure or as a complete adventure in itself. It is tailored for beginning Dungeon Masters and players and contains helpful hints on adventuring and the land of Karameikos. The story develops simply, but ultimately leads the player characters into the nether reaches of Penhaligon's politics to confront Ilyana Penhaligon, mad pretender to the throne! TSR 9261